3. Reference
This part of the reference documentation details the various components that comprise Spring AMQP. The main chapter covers the core classes to develop an AMQP application. This part also includes a chapter about the sample applications.
In this chapter, we will explore the interfaces and classes that are the essential components for developing applications with Spring AMQP.
Spring AMQP consists of a handful of modules, each represented by a JAR in the distribution. These modules are: spring-amqp, and spring-rabbit. The spring-amqp module contains the org.springframework.amqp.core package. Within that package, you will find the classes that represent the core AMQP "model". Our intention is to provide generic abstractions that do not rely on any particular AMQP broker implementation or client library. End user code will be more portable across vendor implementations as it can be developed against the abstraction layer only. These abstractions are then used implemented by broker-specific modules, such as spring-rabbit. There is currently only a RabbitMQ implementation; however the abstractions have been validated in .NET using Apache Qpid in addition to RabbitMQ. Since AMQP operates at the protocol level in principle, the RabbitMQ client can be used with any broker that supports the same protocol version, but we do not test any other brokers at present.
The overview here assumes that you are already familiar with the basics of the AMQP specification. If you are not, then have a look at the resources listed in Chapter 5, Other Resources
The 0-9-1 AMQP specification does not define a Message class or interface. Instead, when performing an operation such as basicPublish(), the content is passed as a byte-array argument and additional properties are passed in as separate arguments. Spring AMQP defines a Message class as part of a more general AMQP domain model representation. The purpose of the Message class is to simply encapsulate the body and properties within a single instance so that the API can in turn be simpler. The Message class definition is quite straightforward.
public class Message {

    private final MessageProperties messageProperties;

    private final byte[] body;

    public Message(byte[] body, MessageProperties messageProperties) {
        this.body = body;
        this.messageProperties = messageProperties;
    }

    public byte[] getBody() {
        return this.body;
    }

    public MessageProperties getMessageProperties() {
        return this.messageProperties;
    }
}
The MessageProperties interface defines several common properties such as messageId, timestamp, contentType, and several more. Those properties can also be extended with user-defined headers by calling the setHeader(String key, Object value) method.
![[Important]](/images/spring-amqp/1.7.11.RELEASE/important.png) |
Important |
|---|---|
Starting with versions |
The Exchange interface represents an AMQP Exchange, which is what a Message Producer sends to. Each Exchange within a virtual host of a broker will have a unique name as well as a few other properties:
public interface Exchange {

    String getName();

    String getExchangeType();

    boolean isDurable();

    boolean isAutoDelete();

    Map<String, Object> getArguments();

}
As you can see, an Exchange also has a type represented by constants defined in ExchangeTypes. The basic types are: Direct, Topic, Fanout, and Headers. In the core package you will find implementations of the Exchange interface for each of those types. The behavior varies across these Exchange types in terms of how they handle bindings to Queues. For example, a Direct exchange allows for a Queue to be bound by a fixed routing key (often the Queue’s name). A Topic exchange supports bindings with routing patterns that may include the * and # wildcards for exactly-one and zero-or-more, respectively. The Fanout exchange publishes to all Queues that are bound to it without taking any routing key into consideration. For much more information about these and the other Exchange types, check out Chapter 5, Other Resources.
![[Note]](/images/spring-amqp/1.7.11.RELEASE/note.png) |
Note |
|---|---|
The AMQP specification also requires that any broker provide a "default" Direct Exchange that has no name. All Queues that are declared will be bound to that default Exchange with their names as routing keys. You will learn more about the default Exchange’s usage within Spring AMQP in Section 3.1.4, “AmqpTemplate”. |
The Queue class represents the component from which a Message Consumer receives Messages. Like the various Exchange classes, our implementation is intended to be an abstract representation of this core AMQP type.
public class Queue  {

    private final String name;

    private volatile boolean durable;

    private volatile boolean exclusive;

    private volatile boolean autoDelete;

    private volatile Map<String, Object> arguments;

    /**
     * The queue is durable, non-exclusive and non auto-delete.
     *
     * @param name the name of the queue.
     */
    public Queue(String name) {
        this(name, true, false, false);
    }

    // Getters and Setters omitted for brevity

}
Notice that the constructor takes the Queue name. Depending on the implementation, the admin template may provide methods for generating a uniquely named Queue. Such Queues can be useful as a "reply-to" address or other temporary situations. For that reason, the exclusive and autoDelete properties of an auto-generated Queue would both be set to true.
|
Note |
|---|---|
See the section on queues in Section 3.1.10, “Configuring the broker” for information about declaring queues using namespace support, including queue arguments. |
Given that a producer sends to an Exchange and a consumer receives from a Queue, the bindings that connect Queues to Exchanges are critical for connecting those producers and consumers via messaging. In Spring AMQP, we define a Binding class to represent those connections. Let’s review the basic options for binding Queues to Exchanges.
You can bind a Queue to a DirectExchange with a fixed routing key.
new Binding(someQueue, someDirectExchange, "foo.bar")You can bind a Queue to a TopicExchange with a routing pattern.
new Binding(someQueue, someTopicExchange, "foo.*")You can bind a Queue to a FanoutExchange with no routing key.
new Binding(someQueue, someFanoutExchange)We also provide a BindingBuilder to facilitate a "fluent API" style.
Binding b = BindingBuilder.bind(someQueue).to(someTopicExchange).with("foo.*"); |
Note |
|---|---|
The BindingBuilder class is shown above for clarity, but this style works well when using a static import for the bind() method. |
By itself, an instance of the Binding class is just holding the data about a connection. In other words, it is not an "active" component. However, as you will see later in Section 3.1.10, “Configuring the broker”, Binding instances can be used by the AmqpAdmin class to actually trigger the binding actions on the broker. Also, as you will see in that same section, the Binding instances can be defined using Spring’s @Bean-style within @Configuration classes. There is also a convenient base class which further simplifies that approach for generating AMQP-related bean definitions and recognizes the Queues, Exchanges, and Bindings so that they will all be declared on the AMQP broker upon application startup.
The AmqpTemplate is also defined within the core package. As one of the main components involved in actual AMQP messaging, it is discussed in detail in its own section (see Section 3.1.4, “AmqpTemplate”).
Whereas the AMQP model we described in the previous section is generic and applicable to all implementations, when we get into the management of resources, the details are specific to the broker implementation. Therefore, in this section, we will be focusing on code that exists only within our "spring-rabbit" module since at this point, RabbitMQ is the only supported implementation.
The central component for managing a connection to the RabbitMQ broker is the ConnectionFactory interface. The responsibility of a ConnectionFactory implementation is to provide an instance of org.springframework.amqp.rabbit.connection.Connection which is a wrapper for com.rabbitmq.client.Connection. The only concrete implementation we provide is CachingConnectionFactory which, by default, establishes a single connection proxy that can be shared by the application. Sharing of the connection is possible since the "unit of work" for messaging with AMQP is actually a "channel" (in some ways, this is similar to the relationship between a Connection and a Session in JMS). As you can imagine, the connection instance provides a createChannel method. The CachingConnectionFactory implementation supports caching of those channels, and it maintains separate caches for channels based on whether they are transactional or not. When creating an instance of CachingConnectionFactory, the hostname can be provided via the constructor. The username and password properties should be provided as well. If you would like to configure the size of the channel cache (the default is 25), you could call the setChannelCacheSize() method here as well.
Starting with version 1.3, the CachingConnectionFactory can be configured to cache connections as well as just channels. In this case, each call to createConnection() creates a new connection (or retrieves an idle one from the cache). Closing a connection returns it to the cache (if the cache size has not been reached). Channels created on such connections are cached too. The use of separate connections might be useful in some environments, such as consuming from an HA cluster, in conjunction with a load balancer, to connect to different cluster members. Set the cacheMode to CacheMode.CONNECTION.
|
Note |
|---|---|
This does not limit the number of connections, it specifies how many idle open connections are allowed. |
Starting with version 1.5.5, a new property connectionLimit is provided. When this is set, it limits the total number of connections allowed. When set, if the limit is reached, the channelCheckoutTimeLimit is used to wait for a connection to become idle. If the time is exceeded, an AmqpTimeoutException is thrown.
|
Important |
|---|---|
When the cache mode is Also, at the time of writing, the |
It is important to understand that the cache size is (by default) not a limit, but merely the number of channels that can be cached. With a cache size of, say, 10, any number of channels can actually be in use. If more than 10 channels are being used and they are all returned to the cache, 10 will go in the cache; the remainder will be physically closed.
Starting with version 1.6, the default channel cache size has been increased from 1 to 25. In high volume, multi-threaded, environments, a small cache means that channels are created and closed at a high rate. Increasing the default cache size will avoid this overhead. You should monitor the channels in use via the RabbitMQ Admin UI and consider increasing the cache size further if you see many channels being created and closed. The cache will only grow on-demand (to suit the concurrency requirements of the application) so this change will not impact existing low-volume applications.
Starting with version 1.4.2, the CachingConnectionFactory has a property channelCheckoutTimeout. When this property is greater than zero, the channelCacheSize becomes a limit on the number of channels that can be created on a connection. If the limit is reached, calling threads will block until a channel is available or this timeout is reached, in which case a AmqpTimeoutException is thrown.
![[Warning]](/images/spring-amqp/1.7.11.RELEASE/warning.png) |
Warning |
|---|---|
Channels used within the framework (e.g. |
CachingConnectionFactory connectionFactory = new CachingConnectionFactory("somehost");
connectionFactory.setUsername("guest");
connectionFactory.setPassword("guest");

Connection connection = connectionFactory.createConnection();
When using XML, the configuration might look like this:
<bean id="connectionFactory"
      class="org.springframework.amqp.rabbit.connection.CachingConnectionFactory">
    <constructor-arg value="somehost"/>
    <property name="username" value="guest"/>
    <property name="password" value="guest"/>
</bean> |
Note |
|---|---|
There is also a |
A ConnectionFactory can be created quickly and conveniently using the rabbit namespace:
<rabbit:connection-factory id="connectionFactory"/>In most cases this will be preferable since the framework can choose the best defaults for you. The created instance will be a CachingConnectionFactory. Keep in mind that the default cache size for channels is 25. If you want more channels to be cached set a larger value via the channelCacheSize property. In XML it would look like this:
<bean id="connectionFactory"
      class="org.springframework.amqp.rabbit.connection.CachingConnectionFactory">
    <constructor-arg value="somehost"/>
    <property name="username" value="guest"/>
    <property name="password" value="guest"/>
    <property name="channelCacheSize" value="50"/>
</bean>
And with the namespace you can just add the channel-cache-size attribute:
<rabbit:connection-factory
    id="connectionFactory" channel-cache-size="50"/>
The default cache mode is CHANNEL, but you can configure it to cache connections instead; in this case, we use connection-cache-size:
<rabbit:connection-factory
    id="connectionFactory" cache-mode="CONNECTION" connection-cache-size="25"/>
Host and port attributes can be provided using the namespace
<rabbit:connection-factory
    id="connectionFactory" host="somehost" port="5672"/>
Alternatively, if running in a clustered environment, use the addresses attribute.
<rabbit:connection-factory
    id="connectionFactory" addresses="host1:5672,host2:5672"/>
Here’s an example with a custom thread factory that prefixes thread names with rabbitmq-.
<rabbit:connection-factory id="multiHost" virtual-host="/bar" addresses="host1:1234,host2,host3:4567"
    thread-factory="tf"
    channel-cache-size="10" username="user" password="password" />

<bean id="tf" class="org.springframework.scheduling.concurrent.CustomizableThreadFactory">
    <constructor-arg value="rabbitmq-" />
</bean>
Starting with version 1.7 a ConnectionNameStrategy is provided for the injection into the AbstractionConnectionFactory. The generated name is used for the application-specific identification of the target RabbitMQ connection. The connection name is displayed in the management UI if RabbitMQ server supports it. This value doesn’t have to be unique and cannot be used as a connection identifier e.g. in HTTP API requests. This value is supposed to be human-readable and is a part of ClientProperties under connection_name key. Can be used as a simple Lambda:
connectionFactory.setConnectionNameStrategy(connectionFactory -> "MY_CONNECTION");The ConnectionFactory argument can be used to distinguish target connection names by some logic. By default a beanName of the AbstractConnectionFactory and an internal counter are used to generate connection_name. The <rabbit:connection-factory> namespace component is also supplied with the connection-name-strategy attribute.
Starting with version 1.7.7, an AmqpResourceNotAvailableException is provided, which is thrown now when SimpleConnection.createChannel() can’t create a Channel, for example, because the channelMax limit is reached and there are no available channels in the cache. This exception can be used in the RetryPolicy to recover the operation after some back-off.
The CachingConnectionFactory uses an instance of the Rabbit client ConnectionFactory; a number of configuration properties are passed through (host, port, userName, password, requestedHeartBeat, connectionTimeout for example) when setting the equivalent property on the CachingConnectionFactory. To set other properties (clientProperties for example), define an instance of the rabbit factory and provide a reference to it using the appropriate constructor of the CachingConnectionFactory. When using the namespace as described above, provide a reference to the configured factory in the connection-factory attribute. For convenience, a factory bean is provided to assist in configuring the connection factory in a Spring application context, as discussed in the next section.
<rabbit:connection-factory
id="connectionFactory" connection-factory="rabbitConnectionFactory"/> |
Note |
|---|---|
The 4.0.x client enables automatic recovery by default; while compatible with this feature, Spring AMQP has its own recovery mechanisms and the client recovery feature generally isn’t needed. It is recommended to disable |
Starting with version 1.4, a convenient RabbitConnectionFactoryBean is provided to enable convenient configuration of SSL properties on the underlying client connection factory, using dependency injection. Other setters simply delegate to the underlying factory. Previously you had to configure the SSL options programmatically.
<rabbit:connection-factory id="rabbitConnectionFactory"
    connection-factory="clientConnectionFactory"
    host="${host}"
    port="${port}"
    virtual-host="${vhost}"
    username="${username}" password="${password}" />

<bean id="clientConnectionFactory"
        class="org.springframework.amqp.rabbit.connection.RabbitConnectionFactoryBean">
    <property name="useSSL" value="true" />
    <property name="sslPropertiesLocation" value="file:/secrets/rabbitSSL.properties"/>
</bean>
Refer to the RabbitMQ Documentation for information about configuring SSL. Omit the keyStore and trustStore configuration to connect over SSL without certificate validation. Key and trust store configuration can be provided as follows:
The sslPropertiesLocation property is a Spring Resource pointing to a properties file containing the following keys:
keyStore=file:/secret/keycert.p12
trustStore=file:/secret/trustStore
keyStore.passPhrase=secret
trustStore.passPhrase=secret
The keyStore and truststore are Spring Resources pointing to the stores. Typically this properties file will be secured by the operating system with the application having read access.
Starting with Spring AMQP version 1.5, these properties can be set directly on the factory bean. If both discrete properties and sslPropertiesLocation is provided, properties in the latter will override the discrete values.
Starting with version 1.3, the AbstractRoutingConnectionFactory has been introduced. This provides a mechanism to configure mappings for several ConnectionFactories and determine a target ConnectionFactory by some lookupKey at runtime. Typically, the implementation checks a thread-bound context. For convenience, Spring AMQP provides the SimpleRoutingConnectionFactory, which gets the current thread-bound lookupKey from the SimpleResourceHolder:
<bean id="connectionFactory"
      class="org.springframework.amqp.rabbit.connection.SimpleRoutingConnectionFactory">
	<property name="targetConnectionFactories">
		<map>
			<entry key="#{connectionFactory1.virtualHost}" ref="connectionFactory1"/>
			<entry key="#{connectionFactory2.virtualHost}" ref="connectionFactory2"/>
		</map>
	</property>
</bean>

<rabbit:template id="template" connection-factory="connectionFactory" />
public class MyService {
@Autowired
private RabbitTemplate rabbitTemplate;
public void service(String vHost, String payload) {
SimpleResourceHolder.bind(rabbitTemplate.getConnectionFactory(), vHost);
rabbitTemplate.convertAndSend(payload);
SimpleResourceHolder.unbind(rabbitTemplate.getConnectionFactory());
}
}It is important to unbind the resource after use. For more information see the JavaDocs of AbstractRoutingConnectionFactory.
Starting with version 1.4, the RabbitTemplate supports the SpEL sendConnectionFactorySelectorExpression and receiveConnectionFactorySelectorExpression properties, which are evaluated on each AMQP protocol interaction operation (send, sendAndReceive, receive or receiveAndReply), resolving to a lookupKey value for the provided AbstractRoutingConnectionFactory. Bean references, such as "@vHostResolver.getVHost(#root)" can be used in the expression. For send operations, the Message to be sent is the root evaluation object; for receive operations, the queueName is the root evaluation object.
The routing algorithm is: If the selector expression is null, or is evaluated to null, or the provided ConnectionFactory isn’t an instance of AbstractRoutingConnectionFactory, everything works as before, relying on the provided ConnectionFactory implementation. The same occurs if the evaluation result isn’t null, but there is no target ConnectionFactory for that lookupKey and the AbstractRoutingConnectionFactory is configured with lenientFallback = true. Of course, in the case of an AbstractRoutingConnectionFactory it does fallback to its routing implementation based on determineCurrentLookupKey(). But, if lenientFallback = false, an IllegalStateException is thrown.
The Namespace support also provides the send-connection-factory-selector-expression and receive-connection-factory-selector-expression attributes on the <rabbit:template> component.
Also starting with version 1.4, you can configure a routing connection factory in a listener container. In that case, the list of queue names is used as the lookup key. For example, if you configure the container with setQueueNames("foo", "bar"), the lookup key will be "[foo,bar]" (no spaces).
Starting with version 1.6.9 you can add a qualifier to the lookup key using setLookupKeyQualifier on the listener container. This would enable, for example, listening to queues with the same name, but in different virtual host (where you would have a connection factory for each).
For example, with lookup key qualifier foo and a container listening to queue bar, the lookup key you would register the target connection factory with would be foo[bar].
When using HA queues in a cluster, for the best performance, it can be desirable to connect to the physical broker where the master queue resides. While the CachingConnectionFactory can be configured with multiple broker addresses; this is to fail over and the client will attempt to connect in order. The LocalizedQueueConnectionFactory uses the REST API provided by the admin plugin to determine which node the queue is mastered. It then creates (or retrieves from a cache) a CachingConnectionFactory that will connect to just that node. If the connection fails, the new master node is determined and the consumer connects to it. The LocalizedQueueConnectionFactory is configured with a default connection factory, in case the physical location of the queue cannot be determined, in which case it will connect as normal to the cluster.
The LocalizedQueueConnectionFactory is a RoutingConnectionFactory and the SimpleMessageListenerContainer uses the queue names as the lookup key as discussed in the section called “Routing Connection Factory” above.
|
Note |
|---|---|
For this reason (the use of the queue name for the lookup), the |
|
Note |
|---|---|
The RabbitMQ management plugin must be enabled on each node. |
![[Caution]](/images/spring-amqp/1.7.11.RELEASE/caution.png) |
Caution |
|---|---|
This connection factory is intended for long-lived connections, such as those used by the |
Here is an example configuration, using Spring Boot’s RabbitProperties to configure the factories:
@Autowired
private RabbitProperties props;

private final String[] adminUris = { "http://host1:15672", "http://host2:15672" };

private final String[] nodes = { "[email protected] ", "[email protected] " };

@Bean
public ConnectionFactory defaultConnectionFactory() {
    CachingConnectionFactory cf = new CachingConnectionFactory();
    cf.setAddresses(this.props.getAddresses());
    cf.setUsername(this.props.getUsername());
    cf.setPassword(this.props.getPassword());
    cf.setVirtualHost(this.props.getVirtualHost());
    return cf;
}

@Bean
public ConnectionFactory queueAffinityCF(
        @Qualifier("defaultConnectionFactory") ConnectionFactory defaultCF) {
    return new LocalizedQueueConnectionFactory(defaultCF,
            StringUtils.commaDelimitedListToStringArray(this.props.getAddresses()),
            this.adminUris, this.nodes,
            this.props.getVirtualHost(), this.props.getUsername(), this.props.getPassword(),
            false, null);
}
Notice that the first three parameters are arrays of addresses, adminUris and nodes. These are positional in that when a container attempts to connect to a queue, it determines on which node the queue is mastered and connects to the address in the same array position.
Confirmed and returned messages are supported by setting the CachingConnectionFactory's publisherConfirms and publisherReturns properties to 'true' respectively.
When these options are set, Channel s created by the factory are wrapped in an PublisherCallbackChannel, which is used to facilitate the callbacks. When such a channel is obtained, the client can register a PublisherCallbackChannel.Listener with the Channel. The PublisherCallbackChannel implementation contains logic to route a confirm/return to the appropriate listener. These features are explained further in the following sections.
![[Tip]](/images/spring-amqp/1.7.11.RELEASE/tip.png) |
Tip |
|---|---|
For some more background information, please see the following blog post by the RabbitMQ team titled Introducing Publisher Confirms . |
A mechanism to enable users to control logging levels was introduced in version 1.5.
The CachingConnectionFactory uses a default strategy to log channel closures as follows:
- Normal channel closes (200 OK) are not logged.
- If a channel is closed due to a failed passive queue declaration, it is logged at debug level.
- If a channel is closed because the
basic.consumeis refused due to an exclusive consumer condition, it is logged at INFO level. - All others are logged at ERROR level.
To modify this behavior, inject a custom ConditionalExceptionLogger into the CachingConnectionFactory in its closeExceptionLogger property.
Also see the section called “Consumer Events”.
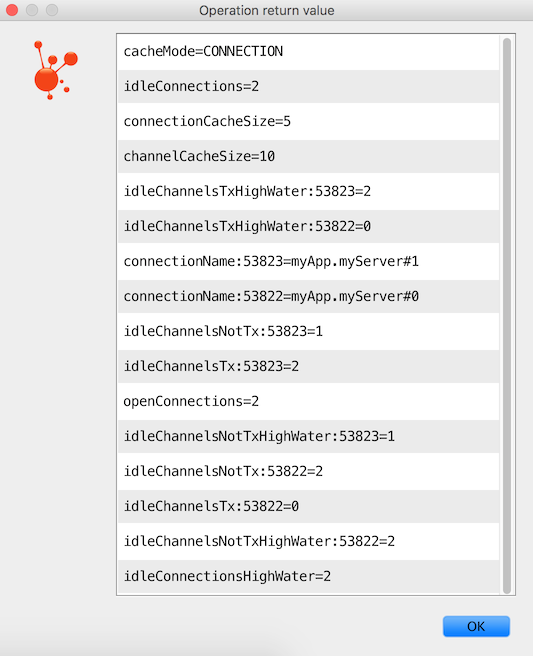
Staring with version 1.6, the CachingConnectionFactory now provides cache statistics via the getCacheProperties() method. These statistics can be used to tune the cache to optimize it in production. For example, the high water marks can be used to determine whether the cache size should be increased. If it equals the cache size, you might want to consider increasing further.
Table 3.1. Cache properties for CacheMode.CHANNEL
| Property | Meaning |
|---|---|
|
The name of the connection generated by the |
|
The currently configured maximum channels that are allowed to be idle. |
|
The local port for the connection (if available). This can be used to correlate with connections/channels on the RabbitMQ Admin UI. |
|
The number of transactional channels that are currently idle (cached). |
|
The number of non-transactional channels that are currently idle (cached). |
|
The maximum number of transactional channels that have been concurrently idle (cached). |
|
The maximum number of non-transactional channels have been concurrently idle (cached). |
Table 3.2. Cache properties for CacheMode.CONNECTION
| Property | Meaning |
|---|---|
|
The name of the connection generated by the |
|
The number of connection objects representing connections to brokers. |
|
The currently configured maximum channels that are allowed to be idle. |
|
The currently configured maximum connections that are allowed to be idle. |
|
The number of connections that are currently idle. |
|
The maximum number of connections that have been concurrently idle. |
|
The number of transactional channels that are currently idle (cached) for this connection. The localPort part of the property name can be used to correlate with connections/channels on the RabbitMQ Admin UI. |
|
The number of non-transactional channels that are currently idle (cached) for this connection. The localPort part of the property name can be used to correlate with connections/channels on the RabbitMQ Admin UI. |
|
The maximum number of transactional channels that have been concurrently idle (cached). The localPort part of the property name can be used to correlate with connections/channels on the RabbitMQ Admin UI. |
|
The maximum number of non-transactional channels have been concurrently idle (cached). The localPort part of the property name can be used to correlate with connections/channels on the RabbitMQ Admin UI. |
The cacheMode property (CHANNEL or CONNECTION is also included).
Since the first version of Spring AMQP, the framework has provided its own connection and channel recovery in the event of a broker failure. Also, as discussed in Section 3.1.10, “Configuring the broker”, the RabbitAdmin will re-declare any infrastructure beans (queues etc) when the connection is re-established. It therefore does not rely on the Auto Recovery that is now provided by the amqp-client library. Spring AMQP now uses the 4.0.x version of amqp-client, which has auto recovery enabled by default. Spring AMQP can still use its own recovery mechanisms if you wish, disabling it in the client, (by setting the automaticRecoveryEnabled property on the underlying RabbitMQ connectionFactory to false). However, the framework is completely compatible with auto recovery being enabled. This means any consumers you create within your code (perhaps via RabbitTemplate.execute()) can be recovered automatically.
The CachingConnectionFactory now allows you to access the underlying connection factory to allow, for example, setting custom client properties:
connectionFactory.getRabbitConnectionFactory().getClientProperties().put("foo", "bar");These properties appear in the RabbitMQ Admin UI when viewing the connection.
As with many other high-level abstractions provided by the Spring Framework and related projects, Spring AMQP provides a "template" that plays a central role. The interface that defines the main operations is called AmqpTemplate. Those operations cover the general behavior for sending and receiving Messages. In other words, they are not unique to any implementation, hence the "AMQP" in the name. On the other hand, there are implementations of that interface that are tied to implementations of the AMQP protocol. Unlike JMS, which is an interface-level API itself, AMQP is a wire-level protocol. The implementations of that protocol provide their own client libraries, so each implementation of the template interface will depend on a particular client library. Currently, there is only a single implementation: RabbitTemplate. In the examples that follow, you will often see usage of an "AmqpTemplate", but when you look at the configuration examples, or any code excerpts where the template is instantiated and/or setters are invoked, you will see the implementation type (e.g. "RabbitTemplate").
As mentioned above, the AmqpTemplate interface defines all of the basic operations for sending and receiving Messages. We will explore Message sending and reception, respectively, in the two sections that follow.
See also the section called “AsyncRabbitTemplate”.
Starting with version 1.3 you can now configure the RabbitTemplate to use a RetryTemplate to help with handling problems with broker connectivity. Refer to the spring-retry project for complete information; the following is just one example that uses an exponential back off policy and the default SimpleRetryPolicy which will make three attempts before throwing the exception to the caller.
Using the XML namespace:
<rabbit:template id="template" connection-factory="connectionFactory" retry-template="retryTemplate"/>

<bean id="retryTemplate" class="org.springframework.retry.support.RetryTemplate">
    <property name="backOffPolicy">
        <bean class="org.springframework.retry.backoff.ExponentialBackOffPolicy">
            <property name="initialInterval" value="500" />
            <property name="multiplier" value="10.0" />
            <property name="maxInterval" value="10000" />
        </bean>
    </property>
</bean>
Using @Configuration:
@Bean
public AmqpTemplate rabbitTemplate();
    RabbitTemplate template = new RabbitTemplate(connectionFactory());
    RetryTemplate retryTemplate = new RetryTemplate();
    ExponentialBackOffPolicy backOffPolicy = new ExponentialBackOffPolicy();
    backOffPolicy.setInitialInterval(500);
    backOffPolicy.setMultiplier(10.0);
    backOffPolicy.setMaxInterval(10000);
    retryTemplate.setBackOffPolicy(backOffPolicy);
    template.setRetryTemplate(retryTemplate);
    return template;
}
Starting with version 1.4, in addition to the retryTemplate property, the recoveryCallback option is supported on the RabbitTemplate. It is used as a second argument for the RetryTemplate.execute(RetryCallback<T, E> retryCallback, RecoveryCallback<T>recoveryCallback).
|
Note |
|---|---|
The |
retryTemplate.execute(
    new RetryCallback<Object, Exception>() {

        @Override
        public Object doWithRetry(RetryContext context) throws Exception {
            context.setAttribute("message", message);
            return rabbitTemplate.convertAndSend(exchange, routingKey, message);
        }
    }, new RecoveryCallback<Object>() {

        @Override
        public Object recover(RetryContext context) throws Exception {
            Object message = context.getAttribute("message");
            Throwable t = context.getLastThrowable();
            // Do something with message
            return null;
        }
    });
}
In this case, you would not inject a RetryTemplate into the RabbitTemplate.
The RabbitTemplate implementation of AmqpTemplate supports Publisher Confirms and Returns.
For returned messages, the template’s mandatory property must be set to true, or the mandatory-expression must evaluate to true for a particular message. This feature requires a CachingConnectionFactory that has its publisherReturns property set to true (see the section called “Publisher Confirms and Returns”). Returns are sent to to the client by it registering a RabbitTemplate.ReturnCallback by calling setReturnCallback(ReturnCallback callback). The callback must implement this method:
void returnedMessage(Message message, int replyCode, String replyText,
          String exchange, String routingKey);
Only one ReturnCallback is supported by each RabbitTemplate. See also the section called “Reply Timeout”.
For Publisher Confirms (aka Publisher Acknowledgements), the template requires a CachingConnectionFactory that has its publisherConfirms property set to true. Confirms are sent to to the client by it registering a RabbitTemplate.ConfirmCallback by calling setConfirmCallback(ConfirmCallback callback). The callback must implement this method:
void confirm(CorrelationData correlationData, boolean ack, String cause);The CorrelationData is an object supplied by the client when sending the original message. The ack is true for an ack and false for a nack. For nack s, the cause may contain a reason for the nack, if it is available when the nack is generated. An example is when sending a message to a non-existent exchange. In that case the broker closes the channel; the reason for the closure is included in the cause. cause was added in version 1.4.
Only one ConfirmCallback is supported by a RabbitTemplate.
|
Note |
|---|---|
When a rabbit template send operation completes, the channel is closed; this would preclude the reception of confirms or returns in the case when the connection factory cache is full (when there is space in the cache, the channel is not physically closed and the returns/confirms will proceed as normal). When the cache is full, the framework defers the close for up to 5 seconds, in order to allow time for the confirms/returns to be received. When using confirms, the channel will be closed when the last confirm is received. When using only returns, the channel will remain open for the full 5 seconds. It is generally recommended to set the connection factory’s |
Starting with version 1.4 RabbitMessagingTemplate, built on top of RabbitTemplate, provides an integration with the Spring Framework messaging abstraction, i.e. org.springframework.messaging.Message. This allows you to send and receive messages using the spring-messaging Message<?> abstraction. This abstraction is used by other Spring projects such as Spring Integration and Spring’s STOMP support. There are two message converters involved; one to convert between a spring-messaging Message<?> and Spring AMQP’s Message abstraction, and one to convert between Spring AMQP’s Message abstraction and the format required by the underlying RabbitMQ client library. By default, the message payload is converted by the provided RabbitTemplate 's message converter. Alternatively, you can inject a custom MessagingMessageConverter with some other payload converter:
MessagingMessageConverter amqpMessageConverter = new MessagingMessageConverter();
amqpMessageConverter.setPayloadConverter(myPayloadConverter);
rabbitMessagingTemplate.setAmqpMessageConverter(amqpMessageConverter);Starting with version 1.6, the template now supports a user-id-expression (userIdExpression when using Java configuration). If a message is sent, the user id property is set (if not already set) after evaluating this expression. The root object for the evaluation is the message to be sent.
Examples:
<rabbit:template ... user-id-expression="'guest'" />

<rabbit:template ... user-id-expression="@myConnectionFactory.username" />
The first example is a literal expression; the second obtains the username property from a connection factory bean in the application context.
When sending a Message, one can use any of the following methods:
void send(Message message) throws AmqpException;

void send(String routingKey, Message message) throws AmqpException;

void send(String exchange, String routingKey, Message message) throws AmqpException;
We can begin our discussion with the last method listed above since it is actually the most explicit. It allows an AMQP Exchange name to be provided at runtime along with a routing key. The last parameter is the callback that is responsible for actual creating of the Message instance. An example of using this method to send a Message might look this this:
amqpTemplate.send("marketData.topic", "quotes.nasdaq.FOO",
    new Message("12.34".getBytes(), someProperties));
The "exchange" property can be set on the template itself if you plan to use that template instance to send to the same exchange most or all of the time. In such cases, the second method listed above may be used instead. The following example is functionally equivalent to the previous one:
amqpTemplate.setExchange("marketData.topic");
amqpTemplate.send("quotes.nasdaq.FOO", new Message("12.34".getBytes(), someProperties));
If both the "exchange" and "routingKey" properties are set on the template, then the method accepting only the Message may be used:
amqpTemplate.setExchange("marketData.topic");
amqpTemplate.setRoutingKey("quotes.nasdaq.FOO");
amqpTemplate.send(new Message("12.34".getBytes(), someProperties));
A better way of thinking about the exchange and routing key properties is that the explicit method parameters will always override the template’s default values. In fact, even if you do not explicitly set those properties on the template, there are always default values in place. In both cases, the default is an empty String, but that is actually a sensible default. As far as the routing key is concerned, it’s not always necessary in the first place (e.g. a Fanout Exchange). Furthermore, a Queue may be bound to an Exchange with an empty String. Those are both legitimate scenarios for reliance on the default empty String value for the routing key property of the template. As far as the Exchange name is concerned, the empty String is quite commonly used because the AMQP specification defines the "default Exchange" as having no name. Since all Queues are automatically bound to that default Exchange (which is a Direct Exchange) using their name as the binding value, that second method above can be used for simple point-to-point Messaging to any Queue through the default Exchange. Simply provide the queue name as the "routingKey" - either by providing the method parameter at runtime:
RabbitTemplate template = new RabbitTemplate(); // using default no-name Exchange
template.send("queue.helloWorld", new Message("Hello World".getBytes(), someProperties));
Or, if you prefer to create a template that will be used for publishing primarily or exclusively to a single Queue, the following is perfectly reasonable:
RabbitTemplate template = new RabbitTemplate(); // using default no-name Exchange
template.setRoutingKey("queue.helloWorld"); // but we'll always send to this Queue
template.send(new Message("Hello World".getBytes(), someProperties));Starting with version 1.3, a message builder API is provided by the MessageBuilder and MessagePropertiesBuilder; they provides a convenient "fluent" means of creating a message or message properties:
Message message = MessageBuilder.withBody("foo".getBytes())
    .setContentType(MessageProperties.CONTENT_TYPE_TEXT_PLAIN)
    .setMessageId("123")
    .setHeader("bar", "baz")
    .build();
or
MessageProperties props = MessagePropertiesBuilder.newInstance()
    .setContentType(MessageProperties.CONTENT_TYPE_TEXT_PLAIN)
    .setMessageId("123")
    .setHeader("bar", "baz")
    .build();
Message message = MessageBuilder.withBody("foo".getBytes())
    .andProperties(props)
    .build();
Each of the properties defined on the MessageProperties can be set. Other methods include setHeader(String key, String value), removeHeader(String key), removeHeaders(), and copyProperties(MessageProperties properties). Each property setting method has a set*IfAbsent() variant. In the cases where a default initial value exists, the method is named set*IfAbsentOrDefault().
Five static methods are provided to create an initial message builder:
public static MessageBuilder withBody(byte[] body)

public static MessageBuilder withClonedBody(byte[] body)

public static MessageBuilder withBody(byte[] body, int from, int to)

public static MessageBuilder fromMessage(Message message)

public static MessageBuilder fromClonedMessage(Message message)
|
The message created by the builder will have a body that is a direct reference to the argument. |
|
The message created by the builder will have a body that is a new array containing a copy of bytes in the argument. |
|
The message created by the builder will have a body that is a new array containing the range of bytes from the argument. See |
|
The message created by the builder will have a body that is a direct reference to the body of the argument. The argument’s properties are copied to a new |
|
The message created by the builder will have a body that is a new array containing a copy of the argument’s body. The argument’s properties are copied to a new |
public static MessagePropertiesBuilder newInstance()

public static MessagePropertiesBuilder fromProperties(MessageProperties properties)

public static MessagePropertiesBuilder fromClonedProperties(MessageProperties properties)
|
A new message properties object is initialized with default values. |
|
The builder is initialized with, and |
|
The argument’s properties are copied to a new |
With the RabbitTemplate implementation of AmqpTemplate, each of the send() methods has an overloaded version that takes an additional CorrelationData object. When publisher confirms are enabled, this object is returned in the callback described in Section 3.1.4, “AmqpTemplate”. This allows the sender to correlate a confirm (ack or nack) with the sent message.
Starting with version 1.6.7, the CorrelationAwareMessagePostProcessor interface was introduced, allowing the correlation data to be modified after the message has been converted:
Message postProcessMessage(Message message, Correlation correlation);Also starting with version 1.6.7 a new callback interface is provided CorrelationDataPostProcessor; this is invoked after all MessagePostProcessor s (provided in the send() method as well as those provided in setBeforePublishPostProcessors()). Implementations can update or replace the correlation data supplied in the send() method (if any). The Message and original CorrelationData (if any) are provided as arguments.
CorrelationData postProcess(Message message, CorrelationData correlationData);When the template’s mandatory property is true returned messages are provided by the callback described in Section 3.1.4, “AmqpTemplate”.
Starting with version 1.4 the RabbitTemplate supports the SpEL mandatoryExpression property, which is evaluated against each request message, as the root evaluation object, resolving to a boolean value. Bean references, such as "@myBean.isMandatory(#root)" can be used in the expression.
Publisher returns can also be used internally by the RabbitTemplate in send and receive operations. See the section called “Reply Timeout” for more information.
Starting with version 1.4.2, the BatchingRabbitTemplate has been introduced. This is a subclass of RabbitTemplate with an overridden send method that batches messages according to the BatchingStrategy; only when a batch is complete is the message sent to RabbitMQ.
public interface BatchingStrategy {

	MessageBatch addToBatch(String exchange, String routingKey, Message message);

	Date nextRelease();

	Collection<MessageBatch> releaseBatches();

} |
Caution |
|---|---|
Batched data is held in memory; unsent messages can be lost in the event of a system failure. |
A SimpleBatchingStrategy is provided. It supports sending messages to a single exchange/routing key. It has properties:
batchSize- the number of messages in a batch before it is sentbufferLimit- the maximum size of the batched message; this will preempt thebatchSizeif exceeded, and cause a partial batch to be senttimeout- a time after which a partial batch will be sent when there is no new activity adding messages to the batch
The SimpleBatchingStrategy formats the batch by preceding each embedded message with a 4 byte binary length. This is communicated to the receiving system by setting the springBatchFormat message property to lengthHeader4.
|
Important |
|---|---|
Batched messages are automatically de-batched by listener containers (using the |
Message reception is always a little more complicated than sending. There are two ways to receive a Message. The simpler option is to poll for a single Message at a time with a polling method call. The more complicated yet more common approach is to register a listener that will receive Messages on-demand, asynchronously. We will look at an example of each approach in the next two sub-sections.
The AmqpTemplate itself can be used for polled Message reception. By default, if no message is available, null is returned immediately; there is no blocking. Starting with version 1.5, you can now set a receiveTimeout, in milliseconds, and the receive methods will block for up to that long, waiting for a message. A value less than zero means block indefinitely (or at least until the connection to the broker is lost). Version 1.6 introduced variants of the receive methods allowing the timeout to be passed in on each call.
|
Caution |
|---|---|
Since the receive operation creates a new |
There are four simple receive methods available. As with the Exchange on the sending side, there is a method that requires a default queue property having been set directly on the template itself, and there is a method that accepts a queue parameter at runtime. Version 1.6 introduced variants to accept timeoutMillis to override receiveTimeout on a per-request basis.
Message receive() throws AmqpException;

Message receive(String queueName) throws AmqpException;

Message receive(long timeoutMillis) throws AmqpException;

Message receive(String queueName, long timeoutMillis) throws AmqpException;
Just like in the case of sending messages, the AmqpTemplate has some convenience methods for receiving POJOs instead of Message instances, and implementations will provide a way to customize the MessageConverter used to create the Object returned:
Object receiveAndConvert() throws AmqpException;

Object receiveAndConvert(String queueName) throws AmqpException;

Message receiveAndConvert(long timeoutMillis) throws AmqpException;

Message receiveAndConvert(String queueName, long timeoutMillis) throws AmqpException;
Similar to sendAndReceive methods, beginning with version 1.3, the AmqpTemplate has several convenience receiveAndReply methods for synchronously receiving, processing and replying to messages:
<R, S> boolean receiveAndReply(ReceiveAndReplyCallback<R, S> callback)
	   throws AmqpException;

<R, S> boolean receiveAndReply(String queueName, ReceiveAndReplyCallback<R, S> callback)
 	throws AmqpException;

<R, S> boolean receiveAndReply(ReceiveAndReplyCallback<R, S> callback,
	String replyExchange, String replyRoutingKey) throws AmqpException;

<R, S> boolean receiveAndReply(String queueName, ReceiveAndReplyCallback<R, S> callback,
	String replyExchange, String replyRoutingKey) throws AmqpException;

<R, S> boolean receiveAndReply(ReceiveAndReplyCallback<R, S> callback,
 	ReplyToAddressCallback<S> replyToAddressCallback) throws AmqpException;

<R, S> boolean receiveAndReply(String queueName, ReceiveAndReplyCallback<R, S> callback,
			ReplyToAddressCallback<S> replyToAddressCallback) throws AmqpException;
The AmqpTemplate implementation takes care of the receive and reply phases. In most cases you should provide only an implementation of ReceiveAndReplyCallback to perform some business logic for the received message and build a reply object or message, if needed. Note, a ReceiveAndReplyCallback may return null. In this case no reply is sent and receiveAndReply works like the receive method. This allows the same queue to be used for a mixture of messages, some of which may not need a reply.
Automatic message (request and reply) conversion is applied only if the provided callback is not an instance of ReceiveAndReplyMessageCallback - which provides a raw message exchange contract.
The ReplyToAddressCallback is useful for cases requiring custom logic to determine the replyTo address at runtime against the received message and reply from the ReceiveAndReplyCallback. By default, replyTo information in the request message is used to route the reply.
The following is an example of POJO-based receive and reply…
boolean received =
        this.template.receiveAndReply(ROUTE, new ReceiveAndReplyCallback<Order, Invoice>() {

                public Invoice handle(Order order) {
                        return processOrder(order);
                }
        });
if (received) {
        log.info("We received an order!");
} |
Important |
|---|---|
Spring AMQP also supports annotated-listener endpoints through the use of the |
For asynchronous Message reception, a dedicated component (not the AmqpTemplate) is involved. That component is a container for a Message consuming callback. We will look at the container and its properties in just a moment, but first we should look at the callback since that is where your application code will be integrated with the messaging system. There are a few options for the callback starting with an implementation of the MessageListener interface:
public interface MessageListener {
    void onMessage(Message message);
}
If your callback logic depends upon the AMQP Channel instance for any reason, you may instead use the ChannelAwareMessageListener. It looks similar but with an extra parameter:
public interface ChannelAwareMessageListener {
    void onMessage(Message message, Channel channel) throws Exception;
}If you prefer to maintain a stricter separation between your application logic and the messaging API, you can rely upon an adapter implementation that is provided by the framework. This is often referred to as "Message-driven POJO" support. When using the adapter, you only need to provide a reference to the instance that the adapter itself should invoke.
MessageListenerAdapter listener = new MessageListenerAdapter(somePojo);
    listener.setDefaultListenerMethod("myMethod");
You can subclass the adapter and provide an implementation of getListenerMethodName() to dynamically select different methods based on the message. This method has two parameters, the originalMessage and extractedMessage, the latter being the result of any conversion. By default, a SimpleMessageConverter is configured; see the section called “SimpleMessageConverter” for more information and information about other converters available.
Starting with version 1.4.2, the original message has properties consumerQueue and consumerTag which can be used to determine which queue a message was received from.
Starting with version 1.5, you can configure a map of consumer queue/tag to method name, to dynamically select the method to call. If no entry is in the map, we fall back to the default listener method.
Now that you’ve seen the various options for the Message-listening callback, we can turn our attention to the container. Basically, the container handles the "active" responsibilities so that the listener callback can remain passive. The container is an example of a "lifecycle" component. It provides methods for starting and stopping. When configuring the container, you are essentially bridging the gap between an AMQP Queue and the MessageListener instance. You must provide a reference to the ConnectionFactory and the queue name or Queue instance(s) from which that listener should consume Messages. Here is the most basic example using the default implementation, SimpleMessageListenerContainer :
SimpleMessageListenerContainer container = new SimpleMessageListenerContainer();
container.setConnectionFactory(rabbitConnectionFactory);
container.setQueueNames("some.queue");
container.setMessageListener(new MessageListenerAdapter(somePojo));
As an "active" component, it’s most common to create the listener container with a bean definition so that it can simply run in the background. This can be done via XML:
<rabbit:listener-container connection-factory="rabbitConnectionFactory">
    <rabbit:listener queues="some.queue" ref="somePojo" method="handle"/>
</rabbit:listener-container>
Or, you may prefer to use the @Configuration style which will look very similar to the actual code snippet above:
@Configuration
public class ExampleAmqpConfiguration {

    @Bean
    public SimpleMessageListenerContainer messageListenerContainer() {
        SimpleMessageListenerContainer container = new SimpleMessageListenerContainer();
        container.setConnectionFactory(rabbitConnectionFactory());
        container.setQueueName("some.queue");
        container.setMessageListener(exampleListener());
        return container;
    }

    @Bean
    public ConnectionFactory rabbitConnectionFactory() {
        CachingConnectionFactory connectionFactory =
            new CachingConnectionFactory("localhost");
        connectionFactory.setUsername("guest");
        connectionFactory.setPassword("guest");
        return connectionFactory;
    }

    @Bean
    public MessageListener exampleListener() {
        return new MessageListener() {
            public void onMessage(Message message) {
                System.out.println("received: " + message);
            }
        };
    }
}
Starting with RabbitMQ Version 3.2, the broker now supports consumer priority (see Using Consumer Priorities with RabbitMQ ). This is enabled by setting the x-priority argument on the consumer. The SimpleMessageListenerContainer now supports setting consumer arguments:
container.setConsumerArguments(Collections.
<String, Object> singletonMap("x-priority", Integer.valueOf(10)));
For convenience, the namespace provides the priority attribute on the listener element:
<rabbit:listener-container connection-factory="rabbitConnectionFactory">
    <rabbit:listener queues="some.queue" ref="somePojo" method="handle" priority="10" />
</rabbit:listener-container>
Starting with version 1.3 the queue(s) on which the container is listening can be modified at runtime; see Section 3.1.18, “Listener Container Queues”.
When a container is configured to listen to auto-delete queue(s), or the queue has an x-expires option or the Time-To-Live policy is configured on the Broker, the queue is removed by the broker when the container is stopped (last consumer is cancelled). Before version 1.3, the container could not be restarted because the queue was missing; the RabbitAdmin only automatically redeclares queues etc, when the connection is closed/opens, which does not happen when the container is stopped/started.
Starting with version 1.3, the container will now use a RabbitAdmin to redeclare any missing queues during startup.
You can also use conditional declaration (the section called “Conditional Declaration”) together with an auto-startup="false" admin to defer queue declaration until the container is started.
<rabbit:queue id="otherAnon" declared-by="containerAdmin" />

<rabbit:direct-exchange name="otherExchange" auto-delete="true" declared-by="containerAdmin">
    <rabbit:bindings>
        <rabbit:binding queue="otherAnon" key="otherAnon" />
    </rabbit:bindings>
</rabbit:direct-exchange>

<rabbit:listener-container id="container2" auto-startup="false">
    <rabbit:listener id="listener2" ref="foo" queues="otherAnon" admin="containerAdmin" />
</rabbit:listener-container>

<rabbit:admin id="containerAdmin" connection-factory="rabbitConnectionFactory"
    auto-startup="false" />
In this case, the queue and exchange are declared by containerAdmin which has auto-startup="false" so the elements are not declared during context initialization. Also, the container is not started for the same reason. When the container is later started, it uses it’s reference to containerAdmin to declare the elements.
Batched messages are automatically de-batched by listener containers (using the springBatchFormat message header). Rejecting any message from a batch will cause the entire batch to be rejected. See the section called “Batching” for more information about batching.
Starting with version 1.5, the SimpleMessageListenerContainer publishes application events whenever a listener (consumer) experiences a failure of some kind. The event ListenerContainerConsumerFailedEvent has the following properties:
container- the listener container where the consumer experienced the problem.reason- a textual reason for the failure.fatal- a boolean indicating whether the failure was fatal; with non-fatal exceptions, the container will attempt to restart the consumer, according to theretryInterval.throwable- theThrowablethat was caught.
These events can be consumed by implementing ApplicationListener<ListenerContainerConsumerFailedEvent>.
|
Note |
|---|---|
System-wide events (such as connection failures) will be published by all consumers when |
If a consumer fails because one if its queues is being used exclusively, by default, as well as publishing the event, a WARN log is issued. To change this logging behavior, provide a custom ConditionalExceptionLogger in the SimpleMessageListenerContainer 's exclusiveConsumerExceptionLogger property. See also the section called “Logging Channel Close Events”.
Fatal errors are always logged at ERROR level; this it not modifiable.
Several other events are published at various stages of the container lifecycle:
AsyncConsumerStartedEvent(when the consumer is started)AsyncConsumerRestartedEvent(when the consumer is restarted after a failure -SimpleMessageListenerContaineronly)AsyncConsumerTerminatedEvent(when a consumer is stopped normally)AsyncConsumerStoppedEvent(when the consumer is stopped -SimpleMessageListenerContaineronly)ConsumeOkEvent(when aconsumeOkis received from the broker, contains the queue name andconsumerTag)ListenerContainerIdleEvent(see the section called “Detecting Idle Asynchronous Consumers”)
Starting with version 1.4.5, you can now provide a strategy to generate consumer tags. By default, the consumer tag will be generated by the broker.
public interface ConsumerTagStrategy {

    String createConsumerTag(String queue);

}
The queue is made available so it can (optionally) be used in the tag.
See Section 3.1.15, “Message Listener Container Configuration”.
Starting with version 1.4, the easiest way to receive a message asynchronously is to use the annotated listener endpoint infrastructure. In a nutshell, it allows you to expose a method of a managed bean as a Rabbit listener endpoint.
@Component
public class MyService {

    @RabbitListener(queues = "myQueue")
    public void processOrder(String data) {
        ...
    }

}
The idea of the example above is that, whenever a message is available on the org.springframework.amqp.core.Queue "myQueue", the processOrder method is invoked accordingly (in this case, with the payload of the message).
The annotated endpoint infrastructure creates a message listener container behind the scenes for each annotated method, using a RabbitListenerContainerFactory.
In the example above, myQueue must already exist and be bound to some exchange. Starting with version 1.5.0, the queue can be declared and bound automatically, as long as a RabbitAdmin exists in the application context.
|
Note |
|---|---|
Property placeholders ( |
@Component
public class MyService {

  @RabbitListener(bindings = @QueueBinding(
        value = @Queue(value = "myQueue", durable = "true"),
        exchange = @Exchange(value = "auto.exch", ignoreDeclarationExceptions = "true"),
        key = "orderRoutingKey")
  )
  public void processOrder(String data) {
    ...
  }

  @RabbitListener(bindings = @QueueBinding(
        value = @Queue,
        exchange = @Exchange(value = "auto.exch"),
        key = "invoiceRoutingKey")
  )
  public void processInvoice(String data) {
    ...
  }

}
In the first example, a queue myQueue will be declared automatically (durable) together with the exchange, if needed, and bound to the exchange with the routing key. In the second example, an anonymous (exclusive, auto-delete) queue will be declared and bound. Multiple QueueBinding entries can be provided, allowing the listener to listen to multiple queues.
Only DIRECT, FANOUT, TOPIC and HEADERS, exchange types are supported with this mechanism. Use normal @Bean definitions when more advanced configuration is required.
Notice ignoreDeclarationExceptions on the exchange in the first example. This allows, for example, binding to an existing exchange that might have different settings (such as internal). By default the properties of an existing exchange must match.
Starting with version 1.6, you can now specify arguments within @QueueBinding annotations for queues, exchanges and bindings. For example:
@RabbitListener(bindings = @QueueBinding(
        value = @Queue(value = "auto.headers", autoDelete = "true",
                        arguments = @Argument(name = "x-message-ttl", value = "10000",
                                                type = "java.lang.Integer")),
        exchange = @Exchange(value = "auto.headers", type = ExchangeTypes.HEADERS, autoDelete = "true"),
        arguments = {
                @Argument(name = "x-match", value = "all"),
                @Argument(name = "foo", value = "bar"),
                @Argument(name = "baz")
        })
)
public String handleWithHeadersExchange(String foo) {
    ...
}
Notice that the x-message-ttl argument is set to 10 seconds for the queue. Since the argument type is not String, we have to specify its type; in this case Integer. As with all such declarations, if the queue exists already, the arguments must match those on the queue. For the header exchange, we set the binding arguments to match messages that have the header foo set to bar and the header baz must be present with any value. The x-match argument means both conditions must be satisfied.
The argument name, value, and type can be property placeholders (${...}) or SpEL expressions (#{...}). The name must resolve to a String; the expression for type must resolve to a Class or the fully-qualified name of a class. The value must resolve to something that can be converted by the DefaultConversionService to the type (such as the x-message-ttl in the above example).
If a name resolves to null or an empty String, that @Argument is ignored.
Sometimes you may want to use the same configuration for multiple listeners. To reduce the boilerplate configuration, you can use meta-annotations to create your own listener annotation:
@Target({ElementType.TYPE, ElementType.METHOD, ElementType.ANNOTATION_TYPE})
@Retention(RetentionPolicy.RUNTIME)
@RabbitListener(bindings = @QueueBinding(
        value = @Queue,
        exchange = @Exchange(value = "metaFanout", type = ExchangeTypes.FANOUT)))
public @interface MyAnonFanoutListener {
}

public class MetaListener {

    @MyAnonFanoutListener
    public void handle1(String foo) {
        ...
    }

    @MyAnonFanoutListener
    public void handle2(String foo) {
        ...
    }

}
In this example, each listener created by the @MyAnonFanoutListener annotation will bind an anonymous, auto-delete queue to the fanout exchange metaFanout. The meta-annotation mechanism is simple in that attributes on the user-defined annotation are not examined - so you can’t override settings from the meta-annotation. Use normal @Bean definitions when more advanced configuration is required.
To enable support for @RabbitListener annotations add @EnableRabbit to one of your @Configuration classes.
@Configuration
@EnableRabbit
public class AppConfig {

    @Bean
    public SimpleRabbitListenerContainerFactory rabbitListenerContainerFactory() {
        SimpleRabbitListenerContainerFactory factory = new SimpleRabbitListenerContainerFactory();
        factory.setConnectionFactory(connectionFactory());
        factory.setConcurrentConsumers(3);
        factory.setMaxConcurrentConsumers(10);
        return factory;
    }
}
By default, the infrastructure looks for a bean named rabbitListenerContainerFactory as the source for the factory to use to create message listener containers. In this case, and ignoring the RabbitMQ infrastructure setup, the processOrder method can be invoked with a core poll size of 3 threads and a maximum pool size of 10 threads.
It is possible to customize the listener container factory to use per annotation or an explicit default can be configured by implementing the RabbitListenerConfigurer interface. The default is only required if at least one endpoint is registered without a specific container factory. See the javadoc for full details and examples.
If you prefer XML configuration, use the <rabbit:annotation-driven> element.
<rabbit:annotation-driven/>

<bean id="rabbitListenerContainerFactory"
      class="org.springframework.amqp.rabbit.config.SimpleRabbitListenerContainerFactory">
    <property name="connectionFactory" ref="connectionFactory"/>
    <property name="concurrentConsumers" value="3"/>
    <property name="maxConcurrentConsumers" value="10"/>
</bean>There are two conversion steps in the pipeline before invoking the listener. The first uses a MessageConverter to convert the incoming Spring AMQP Message to a spring-messaging Message. When the target method is invoked, the message payload is converted, if necessary, to the method parameter type.
The default MessageConverter for the first step is a Spring AMQP SimpleMessageConverter that handles conversion to String and java.io.Serializable objects; all others remain as a byte[]. In the following discussion, we call this the message converter.
The default converter for the second step is a GenericMessageConverter which delegates to a conversion service (an instance of DefaultFormattingConversionService). In the following discussion, we call this the method argument converter.
To change the message converter, simply add it as a property to the container factory bean:
@Bean
public SimpleRabbitListenerContainerFactory rabbitListenerContainerFactory() {
    SimpleRabbitListenerContainerFactory factory = new SimpleRabbitListenerContainerFactory();
    ...
    factory.setMessageConverter(new Jackson2JsonMessageConverter());
    ...
    return factory;
}
This configures a Jackson2 converter that expects header information to be present to guide the conversion.
You can also consider a ContentTypeDelegatingMessageConverter which can handle conversion of different content types.
In most cases, it is not necessary to customize the method argument converter unless, for example, you want to use a custom ConversionService.
In versions prior to 1.6, the type information to convert the JSON had to be provided in message headers, or a custom ClassMapper was required. Starting with version 1.6, if there are no type information headers, the type can be inferred from the target method arguments.
|
Note |
|---|---|
This type inference only works for |
See the section called “Jackson2JsonMessageConverter” for more information.
If you wish to customize the method argument converter, you can do so as follows:
@Configuration
@EnableRabbit
public class AppConfig implements RabbitListenerConfigurer {

    ...

    @Bean
    public DefaultMessageHandlerMethodFactory myHandlerMethodFactory() {
        DefaultMessageHandlerMethodFactory factory = new DefaultMessageHandlerMethodFactory();
        factory.setMessageConverter(new GenericMessageConverter(myConversionService()));
        return factory;
    }

    @Bean
    public ConversionService myConversionService() {
        DefaultConversionService conv = new DefaultConversionService();
        conv.addConverter(mySpecialConverter());
        return conv;
    }

    @Override
    public void configureRabbitListeners(RabbitListenerEndpointRegistrar registrar) {
        registrar.setMessageHandlerMethodFactory(myHandlerMethodFactory());
    }

    ...

} |
Important |
|---|---|
for multi-method listeners (see the section called “Multi-Method Listeners”), the method selection is based on the payload of the message after the message conversion; the method argument converter is only called after the method has been selected. |
RabbitListenerEndpoint provides a model of a Rabbit endpoint and is responsible for configuring the container for that model. The infrastructure allows you to configure endpoints programmatically in addition to the ones that are detected by the RabbitListener annotation.
@Configuration
@EnableRabbit
public class AppConfig implements RabbitListenerConfigurer {

    @Override
    public void configureRabbitListeners(RabbitListenerEndpointRegistrar registrar) {
        SimpleRabbitListenerEndpoint endpoint = new SimpleRabbitListenerEndpoint();
        endpoint.setQueueNames("anotherQueue");
        endpoint.setMessageListener(message -> {
            // processing
        });
        registrar.registerEndpoint(endpoint);
    }
}
In the example above, we used SimpleRabbitListenerEndpoint which provides the actual MessageListener to invoke but you could just as well build your own endpoint variant describing a custom invocation mechanism.
It should be noted that you could just as well skip the use of @RabbitListener altogether and only register your endpoints programmatically through RabbitListenerConfigurer.
So far, we have been injecting a simple String in our endpoint but it can actually have a very flexible method signature. Let’s rewrite it to inject the Order with a custom header:
@Component
public class MyService {

    @RabbitListener(queues = "myQueue")
    public void processOrder(Order order, @Header("order_type") String orderType) {
        ...
    }
}
These are the main elements you can inject in listener endpoints:
The raw org.springframework.amqp.core.Message.
The com.rabbitmq.client.Channel on which the message was received
The org.springframework.messaging.Message representing the incoming AMQP message. Note that this message holds both the custom and the standard headers (as defined by AmqpHeaders).
|
Note |
|---|---|
Starting with version 1.6, the inbound |
@Header-annotated method arguments to extract a specific header value, including standard AMQP headers.
@Headers-annotated argument that must also be assignable to java.util.Map for getting access to all headers.
A non-annotated element that is not one of the supported types (i.e. Message and Channel) is considered to be the payload. You can make that explicit by annotating the parameter with @Payload. You can also turn on validation by adding an extra @Valid.
The ability to inject Spring’s Message abstraction is particularly useful to benefit from all the information stored in the transport-specific message without relying on transport-specific API.
@RabbitListener(queues = "myQueue")
public void processOrder(Message<Order> order) { ...
}
Handling of method arguments is provided by DefaultMessageHandlerMethodFactory which can be further customized to support additional method arguments. The conversion and validation support can be customized there as well.
For instance, if we want to make sure our Order is valid before processing it, we can annotate the payload with @Valid and configure the necessary validator as follows:
@Configuration
@EnableRabbit
public class AppConfig implements RabbitListenerConfigurer {

    @Override
    public void configureRabbitListeners(RabbitListenerEndpointRegistrar registrar) {
        registrar.setMessageHandlerMethodFactory(myHandlerMethodFactory());
    }

    @Bean
    public DefaultMessageHandlerMethodFactory myHandlerMethodFactory() {
        DefaultMessageHandlerMethodFactory factory = new DefaultMessageHandlerMethodFactory();
        factory.setValidator(myValidator());
        return factory;
    }
}When using the queues attribute, you can specify that the associated container can listen to multiple queues. You can use a @Header annotation to make the queue name from which a message was received available to the POJO method:
@Component
public class MyService {

    @RabbitListener(queues = { "queue1", "queue2" } )
    public void processOrder(String data, @Header(AmqpHeaders.CONSUMER_QUEUE) String queue) {
        ...
    }

}
Starting with version 1.5, you can externalize the queue names using property placeholders, and SpEL:
@Component
public class MyService {

    @RabbitListener(queues = "#{'${property.with.comma.delimited.queue.names}'.split(',')}" )
    public void processOrder(String data, @Header(AmqpHeaders.CONSUMER_QUEUE) String queue) {
        ...
    }

}
Prior to version 1.5, only a single queue could be specified this way; each queue needed a separate property.
The existing support in MessageListenerAdapter already allows your method to have a non-void return type. When that’s the case, the result of the invocation is encapsulated in a message sent either in the address specified in the ReplyToAddress header of the original message or in the default address configured on the listener. That default address can now be set using the @SendTo annotation of the messaging abstraction.
Assuming our processOrder method should now return an OrderStatus, it is possible to write it as follow to automatically send a reply:
@RabbitListener(destination = "myQueue")
@SendTo("status")
public OrderStatus processOrder(Order order) {
    // order processing
    return status;
}
If you need to set additional headers in a transport-independent manner, you could return a Message instead, something like:
@RabbitListener(destination = "myQueue")
@SendTo("status")
public Message<OrderStatus> processOrder(Order order) {
    // order processing
    return MessageBuilder
        .withPayload(status)
        .setHeader("code", 1234)
        .build();
}
The @SendTo value is assumed as a reply exchange and routingKey pair following the pattern exchange/routingKey, where one of those parts can be omitted. The valid values are:
foo/bar - the replyTo exchange and routingKey.
foo/ - the replyTo exchange and default (empty) routingKey.
bar or /bar - the replyTo routingKey and default (empty) exchange.
/ or empty - the replyTo default exchange and default routingKey.
Also @SendTo can be used without a value attribute. This case is equal to an empty sendTo pattern. @SendTo is only used if the inbound message does not have a replyToAddress property.
Starting with version 1.5, the @SendTo value can be a bean initialization SpEL Expression, for example…
@RabbitListener(queues = "test.sendTo.spel")
@SendTo("#{spelReplyTo}")
public String capitalizeWithSendToSpel(String foo) {
    return foo.toUpperCase();
}
...
@Bean
public String spelReplyTo() {
    return "test.sendTo.reply.spel";
}
The expression must evaluate to a String, which can be a simple queue name (sent to the default exchange) or with the form exchange/routingKey as discussed above.
|
Note |
|---|---|
The |
For dynamic reply routing, the message sender should include a reply_to message property or use the alternate runtime SpEL expression described below.
Starting with version 1.6, the @SendTo can be a SpEL expression that is evaluated at runtime against the request and reply:
@RabbitListener(queues = "test.sendTo.spel")
@SendTo("!{'some.reply.queue.with.' + result.queueName}")
public Bar capitalizeWithSendToSpel(Foo foo) {
    return processTheFooAndReturnABar(foo);
}
The runtime nature of the SpEL expression is indicated with !{...} delimiters. The evaluation context #root object for the expression has three properties:
request- theo.s.amqp.core.Messagerequest object.source- theo.s.messaging.Message<?>after conversion.result- the method result.
The context has a map property accessor, a standard type converter and a bean resolver, allowing other beans in the context to be referenced (e.g. @someBeanName.determineReplyQ(request, result)).
In summary, #{...} is evaluated once during initialization, with the #root object being the application context; beans are referenced by their names. !{...} is evaluated at runtime for each message with the root object having the properties above and beans are referenced with their names, prefixed by @.
Starting with version 1.5.0, the @RabbitListener annotation can now be specified at the class level. Together with the new @RabbitHandler annotation, this allows a single listener to invoke different methods, based on the payload type of the incoming message. This is best described using an example:
@RabbitListener(id="multi", queues = "someQueue")
public class MultiListenerBean {

    @RabbitHandler
    @SendTo("my.reply.queue")
    public String bar(Bar bar) {
        ...
    }

    @RabbitHandler
    public String baz(Baz baz) {
        ...
    }

    @RabbitHandler
    public String qux(@Header("amqp_receivedRoutingKey") String rk, @Payload Qux qux) {
        ...
    }

}
In this case, the individual @RabbitHandler methods are invoked if the converted payload is a Bar, Baz or Qux. It is important to understand that the system must be able to identify a unique method based on the payload type. The type is checked for assignability to a single parameter that has no annotations, or is annotated with the @Payload annotation. Notice that the same method signatures apply as discussed in the method-level @RabbitListener described above.
Notice that the @SendTo must be specified on each method (if needed); it is not supported at the class level.
Starting with version 1.6, the @RabbitListener annotation is marked with @Repeatable. This means that the annotation can appear on the same annotated element (method or class) multiple times. In this case, a separate listener container is created for each annotation, each of which invokes the same listener @Bean. Repeatable annotations can be used with Java 8 or above; when using Java 7 or earlier, the same effect can be achieved by using the @RabbitListeners "container" annotation, with an array of @RabbitListener annotations.
If your service is intended to be proxied (e.g. in case of @Transactional) there are some considerations when the interface has generic parameters. With a generic interface and a particular implementation, e.g.:
interface TxService<P> {

   String handle(P payload, String header);

}

static class TxServiceImpl implements TxService<Foo> {

    @Override
    @RabbitListener(...)
    public String handle(Foo foo, String rk) {
         ...
    }

}
you are forced to switch to the CGLIB target class proxy because the actual implementation of the interface handle method is a bridge method. In the case of transaction management, the use of CGLIB is configured using an annotation option - @EnableTransactionManagement(proxyTargetClass = true). And in this case, all annotations have to be declared on the target method in the implementation:
static class TxServiceImpl implements TxService<Foo> {

    @Override
    @Transactional
    @RabbitListener(...)
    public String handle(@Payload Foo foo, @Header("amqp_receivedRoutingKey") String rk) {
        ...
    }

}Containers created for annotations are not registered with the application context. You can obtain a collection of all containers by invoking getListenerContainers() on the RabbitListenerEndpointRegistry bean. You can then iterate over this collection, for example, to stop/start all containers or invoke the Lifecycle methods on the registry itself which will invoke the operations on each container.
You can also get a reference to an individual container using its id, using getListenerContainer(String id); for example registry.getListenerContainer("multi") for the container created by the snippet above.
Starting with version 1.5.2, you can obtain the id s of the registered containers with getListenerContainerIds().
Starting with version 1.5, you can now assign a group to the container on the RabbitListener endpoint. This provides a mechanism to get a reference to a subset of containers; adding a group attribute causes a bean of type Collection<MessageListenerContainer> to be registered with the context with the group name.
A number of different threads are involved with asynchronous consumers.
Threads from the TaskExecutor configured in the SimpleMessageListener are used to invoke the MessageListener when a new message is delivered by RabbitMQ Client. If not configured, a SimpleAsyncTaskExecutor is used. If a pooled executor is used, ensure the pool size is sufficient to handle the configured concurrency.
|
Note |
|---|---|
When using the default |
The Executor configured in the CachingConnectionFactory is passed into the RabbitMQ Client when creating the connection, and its threads are used to deliver new messages to the listener container. At the time of writing, if this is not configured, the client uses an internal thread pool executor with a pool size of 5.
The RabbitMQ client uses a ThreadFactory to create threads for low-level I/O (socket) operations. To modify this factory, you need to configure the underlying RabbitMQ ConnectionFactory, as discussed in the section called “Configuring the Underlying Client Connection Factory”.
While efficient, one problem with asynchronous consumers is detecting when they are idle - users might want to take some action if no messages arrive for some period of time.
Starting with version 1.6, it is now possible to configure the listener container to publish a ListenerContainerIdleEvent when some time passes with no message delivery. While the container is idle, an event will be published every idleEventInterval milliseconds.
To configure this feature, set the idleEventInterval on the container:
<rabbit:listener-container connection-factory="connectionFactory"
        ...
        idle-event-interval="60000"
        ...
        >
    <rabbit:listener id="container1" queue-names="foo" ref="myListener" method="handle" />
</rabbit:listener-container>@Bean
public SimpleMessageListenerContainer(ConnectionFactory connectionFactory) {
SimpleMessageListenerContainer container = new SimpleMessageListenerContainer(connectionFactory);
...
container.setIdleEventInterval(60000L);
...
return container;
}@Bean
public SimpleRabbitListenerContainerFactory rabbitListenerContainerFactory() {
SimpleRabbitListenerContainerFactory factory = new SimpleRabbitListenerContainerFactory();
factory.setConnectionFactory(rabbitConnectionFactory());
factory.setIdleEventInterval(60000L);
...
return factory;
}In each of these cases, an event will be published once per minute while the container is idle.
You can capture these events by implementing ApplicationListener - either a general listener, or one narrowed to only receive this specific event. You can also use @EventListener, introduced in Spring Framework 4.2.
The following example combines the @RabbitListener and @EventListener into a single class. It’s important to understand that the application listener will get events for all containers so you may need to check the listener id if you want to take specific action based on which container is idle. You can also use the @EventListener condition for this purpose.
The events have 4 properties:
source- the listener container instanceid- the listener id (or container bean name)idleTime- the time the container had been idle when the event was publishedqueueNames- the names of the queue(s) that the container listens to
public class Listener {

    @RabbitListener(id="foo", queues="#{queue.name}")
    public String listen(String foo) {
        return foo.toUpperCase();
    }

    @EventListener(condition = "event.listenerId == 'foo'")
    public void onApplicationEvent(ListenerContainerIdleEvent event) {
        ...
    }

} |
Important |
|---|---|
Event listeners will see events for all containers; so, in the example above, we narrow the events received based on the listener ID. |
|
Caution |
|---|---|
If you wish to use the idle event to stop the lister container, you should not call |
The AmqpTemplate also defines several methods for sending and receiving Messages that will delegate to a MessageConverter. The MessageConverter itself is quite straightforward. It provides a single method for each direction: one for converting to a Message and another for converting from a Message. Notice that when converting to a Message, you may also provide properties in addition to the object. The "object" parameter typically corresponds to the Message body.
public interface MessageConverter {

    Message toMessage(Object object, MessageProperties messageProperties)
            throws MessageConversionException;

    Object fromMessage(Message message) throws MessageConversionException;

}
The relevant Message-sending methods on the AmqpTemplate are listed below. They are simpler than the methods we discussed previously because they do not require the Message instance. Instead, the MessageConverter is responsible for "creating" each Message by converting the provided object to the byte array for the Message body and then adding any provided MessageProperties.
void convertAndSend(Object message) throws AmqpException;

void convertAndSend(String routingKey, Object message) throws AmqpException;

void convertAndSend(String exchange, String routingKey, Object message)
    throws AmqpException;

void convertAndSend(Object message, MessagePostProcessor messagePostProcessor)
    throws AmqpException;

void convertAndSend(String routingKey, Object message,
    MessagePostProcessor messagePostProcessor) throws AmqpException;

void convertAndSend(String exchange, String routingKey, Object message,
    MessagePostProcessor messagePostProcessor) throws AmqpException;
On the receiving side, there are only two methods: one that accepts the queue name and one that relies on the template’s "queue" property having been set.
Object receiveAndConvert() throws AmqpException;

Object receiveAndConvert(String queueName) throws AmqpException; |
Note |
|---|---|
The |
The default implementation of the MessageConverter strategy is called SimpleMessageConverter. This is the converter that will be used by an instance of RabbitTemplate if you do not explicitly configure an alternative. It handles text-based content, serialized Java objects, and simple byte arrays.
If the content type of the input Message begins with "text" (e.g. "text/plain"), it will also check for the content-encoding property to determine the charset to be used when converting the Message body byte array to a Java String. If no content-encoding property had been set on the input Message, it will use the "UTF-8" charset by default. If you need to override that default setting, you can configure an instance of SimpleMessageConverter, set its "defaultCharset" property and then inject that into a RabbitTemplate instance.
If the content-type property value of the input Message is set to "application/x-java-serialized-object", the SimpleMessageConverter will attempt to deserialize (rehydrate) the byte array into a Java object. While that might be useful for simple prototyping, it’s generally not recommended to rely on Java serialization since it leads to tight coupling between the producer and consumer. Of course, it also rules out usage of non-Java systems on either side. With AMQP being a wire-level protocol, it would be unfortunate to lose much of that advantage with such restrictions. In the next two sections, we’ll explore some alternatives for passing rich domain object content without relying on Java serialization.
For all other content-types, the SimpleMessageConverter will return the Message body content directly as a byte array.
See the section called “Java Deserialization” for important information.
When converting to a Message from an arbitrary Java Object, the SimpleMessageConverter likewise deals with byte arrays, Strings, and Serializable instances. It will convert each of these to bytes (in the case of byte arrays, there is nothing to convert), and it will set the content-type property accordingly. If the Object to be converted does not match one of those types, the Message body will be null.
This converter is similar to the SimpleMessageConverter except it can be configured with other Spring Framework Serializer and Deserializer implementations for application/x-java-serialized-object conversions.
See the section called “Java Deserialization” for important information.
As mentioned in the previous section, relying on Java serialization is generally not recommended. One rather common alternative that is more flexible and portable across different languages and platforms is JSON (JavaScript Object Notation). The converter can be configured on any RabbitTemplate instance to override its usage of the SimpleMessageConverter default. The Jackson2JsonMessageConverter uses the com.fasterxml.jackson 2.x library.
<bean class="org.springframework.amqp.rabbit.core.RabbitTemplate">
    <property name="connectionFactory" ref="rabbitConnectionFactory"/>
    <property name="messageConverter">
        <bean class="org.springframework.amqp.support.converter.Jackson2JsonMessageConverter">
            <!-- if necessary, override the DefaultClassMapper -->
            <property name="classMapper" ref="customClassMapper"/>
        </bean>
    </property>
</bean>
As shown above, Jackson2JsonMessageConverter uses a DefaultClassMapper by default. Type information is added to (and retrieved from) the MessageProperties. If an inbound message does not contain type information in the MessageProperties, but you know the expected type, you can configure a static type using the defaultType property
<bean id="jsonConverterWithDefaultType"
      class="o.s.amqp.support.converter.Jackson2JsonMessageConverter">
    <property name="classMapper">
        <bean class="org.springframework.amqp.support.converter.DefaultClassMapper">
            <property name="defaultType" value="foo.PurchaseOrder"/>
        </bean>
    </property>
</bean>Inbound messages are converted to objects according to the type information added to headers by the sending system.
In versions prior to 1.6, if type information is not present, conversion would fail. Starting with version 1.6, if type information is missing, the converter will convert the JSON using Jackson defaults (usually a map).
Also, starting with version 1.6, when using @RabbitListener annotations (on methods), the inferred type information is added to the MessageProperties; this allows the converter to convert to the argument type of the target method. This only applies if there is one parameter with no annotations or a single parameter with the @Payload annotation. Parameters of type Message are ignored during the analysis.
|
Important |
|---|---|
By default, the inferred type information will override the inbound |