1. Configuring a Step
As discussed in the domain chapter, a Step is a domain object that encapsulates an independent, sequential phase of a batch job and contains all of the information necessary to define and control the actual batch processing. This is a necessarily vague description because the contents of any given Step are at the discretion of the developer writing a Job. A Step can be as simple or complex as the developer desires. A simple Step might load data from a file into the database, requiring little or no code (depending upon the implementations used). A more complex Step might have complicated business rules that are applied as part of the processing, as shown in the following image:
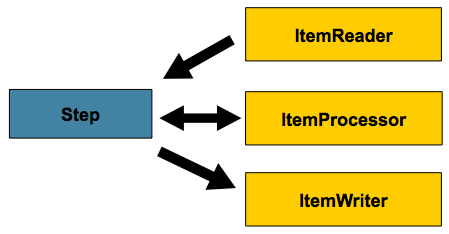
Figure 1. Step
1.1. Chunk-oriented Processing
Spring Batch uses a 'Chunk-oriented' processing style within its most common implementation. Chunk oriented processing refers to reading the data one at a time and creating 'chunks' that are written out within a transaction boundary. One item is read in from an ItemReader, handed to an ItemProcessor, and aggregated. Once the number of items read equals the commit interval, the entire chunk is written out by the ItemWriter, and then the transaction is committed. The following image shows the process:
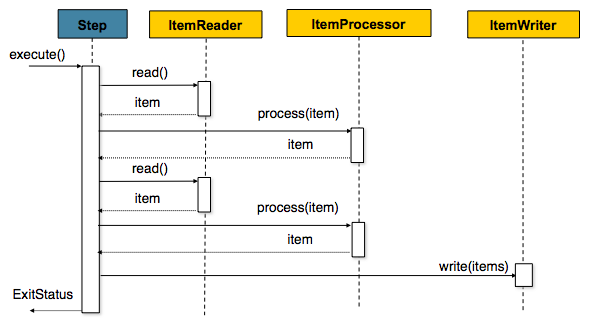
Figure 2. Chunk-oriented Processing
The following code shows the same concepts shown:
List items = new Arraylist();
for(int i = 0; i < commitInterval; i++){
    Object item = itemReader.read()
    Object processedItem = itemProcessor.process(item);
    items.add(processedItem);
}
itemWriter.write(items);
1.1.1. Configuring a Step
Despite the relatively short list of required dependencies for a Step, it is an extremely complex class that can potentially contain many collaborators.
In order to ease configuration, the Spring Batch namespace can be used, as shown in the following example:
XML Configuration
<job id="sampleJob" job-repository="jobRepository">
    <step id="step1">
        <tasklet transaction-manager="transactionManager">
            <chunk reader="itemReader" writer="itemWriter" commit-interval="10"/>
        </tasklet>
    </step>
</job>
When using java configuration, the Spring Batch builders can be used, as shown in the following example:
Java Configuration
/**
 * Note the JobRepository is typically autowired in and not needed to be explicitly
 * configured
 */
@Bean
public Job sampleJob(JobRepository jobRepository, Step sampleStep) {
    return this.jobBuilderFactory.get("sampleJob")
                            .repository(jobRepository)
                .start(sampleStep)
                .build();
}

/**
 * Note the TransactionManager is typically autowired in and not needed to be explicitly
 * configured
 */
@Bean
public Step sampleStep(PlatformTransactionManager transactionManager) {
        return this.stepBuilderFactory.get("sampleStep")
                                .transactionManager(transactionManager)
                                .<String, String>chunk(10)
                                .reader(itemReader())
                                .writer(itemWriter())
                                .build();
}
The configuration above includes the only required dependencies to create a item-oriented step:
reader: TheItemReaderthat provides items for processing.writer: TheItemWriterthat processes the items provided by theItemReader.
transaction-manager: Spring’sPlatformTransactionManagerthat begins and commits transactions during processing.
transactionManager: Spring’sPlatformTransactionManagerthat begins and commits transactions during processing.
job-repository: TheJobRepositorythat periodically stores theStepExecutionandExecutionContextduring processing (just before committing). For an in-line <step/> (one defined within a <job/>), it is an attribute on the <job/> element. For a standalone step, it is defined as an attribute of the <tasklet/>.
repository: TheJobRepositorythat periodically stores theStepExecutionandExecutionContextduring processing (just before committing).
commit-interval: The number of items to be processed before the transaction is committed.
chunk: Indicates that this is an item based step and the number of items to be processed before the transaction is committed.
It should be noted that job-repository defaults to jobRepository and transaction-manager defaults to transactionManger. Also, the ItemProcessor is optional, since the item could be directly passed from the reader to the writer.
It should be noted that repository defaults to jobRepository and transactionManager defaults to transactionManger (all provided through the infrastructure from @EnableBatchProcessing). Also, the ItemProcessor is optional, since the item could be directly passed from the reader to the writer.
1.1.2. Inheriting from a Parent Step
If a group of Steps share similar configurations, then it may be helpful to define a "parent" Step from which the concrete Steps may inherit properties. Similar to class inheritance in Java, the "child" Step combines its elements and attributes with the parent’s. The child also overrides any of the parent’s Steps.
In the following example, the Step, "concreteStep1", inherits from "parentStep". It is instantiated with 'itemReader', 'itemProcessor', 'itemWriter', startLimit=5, and allowStartIfComplete=true. Additionally, the commitInterval is '5', since it is overridden by the "concreteStep1" Step, as shown in the following example:
<step id="parentStep">
    <tasklet allow-start-if-complete="true">
        <chunk reader="itemReader" writer="itemWriter" commit-interval="10"/>
    </tasklet>
</step>

<step id="concreteStep1" parent="parentStep">
    <tasklet start-limit="5">
        <chunk processor="itemProcessor" commit-interval="5"/>
    </tasklet>
</step>
The id attribute is still required on the step within the job element. This is for two reasons:
The
idis used as the step name when persisting theStepExecution. If the same standalone step is referenced in more than one step in the job, an error occurs.
When creating job flows, as described later in this chapter, the
nextattribute should be referring to the step in the flow, not the standalone step.
Abstract Step
Sometimes, it may be necessary to define a parent Step that is not a complete Step configuration. If, for instance, the reader, writer, and tasklet attributes are left off of a Step configuration, then initialization fails. If a parent must be defined without these properties, then the abstract attribute should be used. An abstract Step is only extended, never instantiated.
In the following example, the Step abstractParentStep would not be instantiated if it were not declared to be abstract. The Step, "concreteStep2", has 'itemReader', 'itemWriter', and commit-interval=10.
<step id="abstractParentStep" abstract="true">
    <tasklet>
        <chunk commit-interval="10"/>
    </tasklet>
</step>

<step id="concreteStep2" parent="abstractParentStep">
    <tasklet>
        <chunk reader="itemReader" writer="itemWriter"/>
    </tasklet>
</step>
Merging Lists
Some of the configurable elements on Steps are lists, such as the <listeners/> element. If both the parent and child Steps declare a <listeners/> element, then the child’s list overrides the parent’s. In order to allow a child to add additional listeners to the list defined by the parent, every list element has a merge attribute. If the element specifies that merge="true", then the child’s list is combined with the parent’s instead of overriding it.
In the following example, the Step "concreteStep3", is created with two listeners: listenerOne and listenerTwo:
<step id="listenersParentStep" abstract="true">
    <listeners>
        <listener ref="listenerOne"/>
    <listeners>
</step>

<step id="concreteStep3" parent="listenersParentStep">
    <tasklet>
        <chunk reader="itemReader" writer="itemWriter" commit-interval="5"/>
    </tasklet>
    <listeners merge="true">
        <listener ref="listenerTwo"/>
    <listeners>
</step>
1.1.3. The Commit Interval
As mentioned previously, a step reads in and writes out items, periodically committing using the supplied PlatformTransactionManager. With a commit-interval of 1, it commits after writing each individual item. This is less than ideal in many situations, since beginning and committing a transaction is expensive. Ideally, it is preferable to process as many items as possible in each transaction, which is completely dependent upon the type of data being processed and the resources with which the step is interacting. For this reason, the number of items that are processed within a commit can be configured. The following example shows a step whose tasklet has a commit-interval value of 10.
XML Configuration
<job id="sampleJob">
    <step id="step1">
        <tasklet>
            <chunk reader="itemReader" writer="itemWriter" commit-interval="10"/>
        </tasklet>
    </step>
</job>
Java Configuration
@Bean
public Job sampleJob() {
    return this.jobBuilderFactory.get("sampleJob")
                     .start(step1())
                     .end()
                     .build();
}

@Bean
public Step step1() {
        return this.stepBuilderFactory.get("step1")
                                .<String, String>chunk(10)
                                .reader(itemReader())
                                .writer(itemWriter())
                                .build();
}
In the preceding example, 10 items are processed within each transaction. At the beginning of processing, a transaction is begun. Also, each time read is called on the ItemReader, a counter is incremented. When it reaches 10, the list of aggregated items is passed to the ItemWriter, and the transaction is committed.
1.1.4. Configuring a Step for Restart
In the "Configuring and Running a Job" section , restarting a Job was discussed. Restart has numerous impacts on steps, and, consequently, may require some specific configuration.
Setting a Start Limit
There are many scenarios where you may want to control the number of times a Step may be started. For example, a particular Step might need to be configured so that it only runs once because it invalidates some resource that must be fixed manually before it can be run again. This is configurable on the step level, since different steps may have different requirements. A Step that may only be executed once can exist as part of the same Job as a Step that can be run infinitely. The following code fragment shows an example of a start limit configuration:
XML Configuration
<step id="step1">
    <tasklet start-limit="1">
        <chunk reader="itemReader" writer="itemWriter" commit-interval="10"/>
    </tasklet>
</step>
Java Configuration
@Bean
public Step step1() {
        return this.stepBuilderFactory.get("step1")
                                .<String, String>chunk(10)
                                .reader(itemReader())
                                .writer(itemWriter())
                                .startLimit(1)
                                .build();
}
The step above can be run only once. Attempting to run it again causes a StartLimitExceededException to be thrown. Note that the default value for the start-limit is Integer.MAX_VALUE.
Restarting a Completed Step
In the case of a restartable job, there may be one or more steps that should always be run, regardless of whether or not they were successful the first time. An example might be a validation step or a Step that cleans up resources before processing. During normal processing of a restarted job, any step with a status of 'COMPLETED', meaning it has already been completed successfully, is skipped. Setting allow-start-if-complete to "true" overrides this so that the step always runs, as shown in the following example:
XML Configuration
<step id="step1">
    <tasklet allow-start-if-complete="true">
        <chunk reader="itemReader" writer="itemWriter" commit-interval="10"/>
    </tasklet>
</step>
Java Configuration
@Bean
public Step step1() {
        return this.stepBuilderFactory.get("step1")
                                .<String, String>chunk(10)
                                .reader(itemReader())
                                .writer(itemWriter())
                                .allowStartIfComplete(true)
                                .build();
}
Step Restart Configuration Example
The following example shows how to configure a job to have steps that can be restarted:
XML Configuration
<job id="footballJob" restartable="true">
    <step id="playerload" next="gameLoad">
        <tasklet>
            <chunk reader="playerFileItemReader" writer="playerWriter"
                   commit-interval="10" />
        </tasklet>
    </step>
    <step id="gameLoad" next="playerSummarization">
        <tasklet allow-start-if-complete="true">
            <chunk reader="gameFileItemReader" writer="gameWriter"
                   commit-interval="10"/>
        </tasklet>
    </step>
    <step id="playerSummarization">
        <tasklet start-limit="2">
            <chunk reader="playerSummarizationSource" writer="summaryWriter"
                   commit-interval="10"/>
        </tasklet>
    </step>
</job>
Java Configuration
@Bean
public Job footballJob() {
        return this.jobBuilderFactory.get("footballJob")
                                .start(playerLoad())
                                .next(gameLoad())
                                .next(playerSummarization())
                                .end()
                                .build();
}

@Bean
public Step playerLoad() {
        return this.stepBuilderFactory.get("playerLoad")
                        .<String, String>chunk(10)
                        .reader(playerFileItemReader())
                        .writer(playerWriter())
                        .build();
}

@Bean
public Step gameLoad() {
        return this.stepBuilderFactory.get("gameLoad")
                        .allowStartIfComplete(true)
                        .<String, String>chunk(10)
                        .reader(gameFileItemReader())
                        .writer(gameWriter())
                        .build();
}

@Bean
public Step playerSummarization() {
        return this.stepBuilderFactor.get("playerSummarization")
                        .startLimit(2)
                        .<String, String>chunk(10)
                        .reader(playerSummarizationSource())
                        .writer(summaryWriter())
                        .build();
}
The preceding example configuration is for a job that loads in information about football games and summarizes them. It contains three steps: playerLoad, gameLoad, and playerSummarization. The playerLoad step loads player information from a flat file, while the gameLoad step does the same for games. The final step, playerSummarization, then summarizes the statistics for each player, based upon the provided games. It is assumed that the file loaded by playerLoad must be loaded only once, but that gameLoad can load any games found within a particular directory, deleting them after they have been successfully loaded into the database. As a result, the playerLoad step contains no additional configuration. It can be started any number of times, and, if complete, is skipped. The gameLoad step, however, needs to be run every time in case extra files have been added since it last ran. It has 'allow-start-if-complete' set to 'true' in order to always be started. (It is assumed that the database tables games are loaded into has a process indicator on it, to ensure new games can be properly found by the summarization step). The summarization step, which is the most important in the job, is configured to have a start limit of 2. This is useful because if the step continually fails, a new exit code is returned to the operators that control job execution, and it can not start again until manual intervention has taken place.
|
This job provides an example for this document and is not the same as the |
The remainder of this section describes what happens for each of the three runs of the footballJob example.
Run 1:
playerLoadruns and completes successfully, adding 400 players to the 'PLAYERS' table.gameLoadruns and processes 11 files worth of game data, loading their contents into the 'GAMES' table.playerSummarizationbegins processing and fails after 5 minutes.
Run 2:
playerLoaddoes not run, since it has already completed successfully, andallow-start-if-completeis 'false' (the default).gameLoadruns again and processes another 2 files, loading their contents into the 'GAMES' table as well (with a process indicator indicating they have yet to be processed).playerSummarizationbegins processing of all remaining game data (filtering using the process indicator) and fails again after 30 minutes.
Run 3:
playerLoaddoes not run, since it has already completed successfully, andallow-start-if-completeis 'false' (the default).gameLoadruns again and processes another 2 files, loading their contents into the 'GAMES' table as well (with a process indicator indicating they have yet to be processed).playerSummarizationis not started and the job is immediately killed, since this is the third execution ofplayerSummarization, and its limit is only 2. Either the limit must be raised or theJobmust be executed as a newJobInstance.
1.1.5. Configuring Skip Logic
There are many scenarios where errors encountered while processing should not result in Step failure, but should be skipped instead. This is usually a decision that must be made by someone who understands the data itself and what meaning it has. Financial data, for example, may not be skippable because it results in money being transferred, which needs to be completely accurate. Loading a list of vendors, on the other hand, might allow for skips. If a vendor is not loaded because it was formatted incorrectly or was missing necessary information, then there probably are not issues. Usually, these bad records are logged as well, which is covered later when discussing listeners.
The following example shows an example of using a skip limit:
XML Configuration
<step id="step1">
   <tasklet>
      <chunk reader="flatFileItemReader" writer="itemWriter"
             commit-interval="10" skip-limit="10">
         <skippable-exception-classes>
            <include class="org.springframework.batch.item.file.FlatFileParseException"/>
         </skippable-exception-classes>
      </chunk>
   </tasklet>
</step>
Java Configuration
@Bean
public Step step1() {
        return this.stepBuilderFactory.get("step1")
                                .<String, String>chunk(10)
                                .reader(flatFileItemReader())
                                .writer(itemWriter())
                                .faultTolerant()
                                .skipLimit(10)
                                .skip(FlatFileParseException.class)
                                .build();
}
In the preceding example, a FlatFileItemReader is used. If, at any point, a FlatFileParseException is thrown, the item is skipped and counted against the total skip limit of 10. Exceptions (and their subclasses) that are declared might be thrown during any phase of the chunk processing (read, process, write) but separate counts are made of skips on read, process, and write inside the step execution, but the limit applies across all skips. Once the skip limit is reached, the next exception found causes the step to fail. In other words, the eleventh skip triggers the exception, not the tenth.
One problem with the preceding example is that any other exception besides a FlatFileParseException causes the Job to fail. In certain scenarios, this may be the correct behavior. However, in other scenarios, it may be easier to identify which exceptions should cause failure and skip everything else, as shown in the following example:
XML Configuration
<step id="step1">
    <tasklet>
        <chunk reader="flatFileItemReader" writer="itemWriter"
               commit-interval="10" skip-limit="10">
            <skippable-exception-classes>
                <include class="java.lang.Exception"/>
                <exclude class="java.io.FileNotFoundException"/>
            </skippable-exception-classes>
        </chunk>
    </tasklet>
</step>
Java Configuration
@Bean
public Step step1() {
        return this.stepBuilderFactory.get("step1")
                                .<String, String>chunk(10)
                                .reader(flatFileItemReader())
                                .writer(itemWriter())
                                .faultTolerant()
                                .skipLimit(10)
                                .skip(Exception.class)
                                .noSkip(FileNotFoundException.class)
                                .build();
}
By identifying java.lang.Exception as a skippable exception class, the configuration indicates that all Exceptions are skippable. However, by 'excluding' java.io.FileNotFoundException, the configuration refines the list of skippable exception classes to be all Exceptions except FileNotFoundException. Any excluded exception classes is fatal if encountered (that is, they are not skipped).
For any exception encountered, the skippability is determined by the nearest superclass in the class hierarchy. Any unclassified exception is treated as 'fatal'.
The order of the <include/> and <exclude/> elements does not matter.
The order of the skip and noSkip calls does not matter.
1.1.6. Configuring Retry Logic
In most cases, you want an exception to cause either a skip or a Step failure. However, not all exceptions are deterministic. If a FlatFileParseException is encountered while reading, it is always thrown for that record. Resetting the ItemReader does not help. However, for other exceptions, such as a DeadlockLoserDataAccessException, which indicates that the current process has attempted to update a record that another process holds a lock on, waiting and trying again might result in success. In this case, retry should be configured as follows:
<step id="step1">
   <tasklet>
      <chunk reader="itemReader" writer="itemWriter"
             commit-interval="2" retry-limit="3">
         <retryable-exception-classes>
            <include class="org.springframework.dao.DeadlockLoserDataAccessException"/>
         </retryable-exception-classes>
      </chunk>
   </tasklet>
</step>
@Bean
public Step step1() {
return this.stepBuilderFactory.get("step1")
.<String, String>chunk(2)
.reader(itemReader())
.writer(itemWriter())
.faultTolerant()
.retryLimit(3)
.retry(DeadlockLoserDataAccessException.class)
.build();
}The Step allows a limit for the number of times an individual item can be retried and a list of exceptions that are 'retryable'. More details on how retry works can be found in retry.
1.1.7. Controlling Rollback
By default, regardless of retry or skip, any exceptions thrown from the ItemWriter cause the transaction controlled by the Step to rollback. If skip is configured as described earlier, exceptions thrown from the ItemReader do not cause a rollback. However, there are many scenarios in which exceptions thrown from the ItemWriter should not cause a rollback, because no action has taken place to invalidate the transaction. For this reason, the Step can be configured with a list of exceptions that should not cause rollback, as shown in the following example:
XML Configuration
<step id="step1">
   <tasklet>
      <chunk reader="itemReader" writer="itemWriter" commit-interval="2"/>
      <no-rollback-exception-classes>
         <include class="org.springframework.batch.item.validator.ValidationException"/>
      </no-rollback-exception-classes>
   </tasklet>
</step>
Java Configuration
@Bean
public Step step1() {
        return this.stepBuilderFactory.get("step1")
                                .<String, String>chunk(2)
                                .reader(itemReader())
                                .writer(itemWriter())
                                .faultTolerant()
                                .noRollback(ValidationException.class)
                                .build();
}
Transactional Readers
The basic contract of the ItemReader is that it is forward only. The step buffers reader input, so that in the case of a rollback, the items do not need to be re-read from the reader. However, there are certain scenarios in which the reader is built on top of a transactional resource, such as a JMS queue. In this case, since the queue is tied to the transaction that is rolled back, the messages that have been pulled from the queue are put back on. For this reason, the step can be configured to not buffer the items, as shown in the following example:
XML Configuration
<step id="step1">
    <tasklet>
        <chunk reader="itemReader" writer="itemWriter" commit-interval="2"
               is-reader-transactional-queue="true"/>
    </tasklet>
</step>
Java Configuration
@Bean
public Step step1() {
        return this.stepBuilderFactory.get("step1")
                                .<String, String>chunk(2)
                                .reader(itemReader())
                                .writer(itemWriter())
                                .readerIsTransactionalQueue()
                                .build();
}
1.1.8. Transaction Attributes
Transaction attributes can be used to control the isolation, propagation, and timeout settings. More information on setting transaction attributes can be found in the Spring core documentation . The following example sets the isolation, propagation, and timeout transaction attributes:
XML Configuration
<step id="step1">
    <tasklet>
        <chunk reader="itemReader" writer="itemWriter" commit-interval="2"/>
        <transaction-attributes isolation="DEFAULT"
                                propagation="REQUIRED"
                                timeout="30"/>
    </tasklet>
</step>
Java Configuration
@Bean
public Step step1() {
        DefaultTransactionAttribute attribute = new DefaultTransactionAttribute();
        attribute.setPropagationBehavior(Propagation.REQUIRED.value());
        attribute.setIsolationLevel(Isolation.DEFAULT.value());
        attribute.setTimeout(30);

        return this.stepBuilderFactory.get("step1")
                                .<String, String>chunk(2)
                                .reader(itemReader())
                                .writer(itemWriter())
                                .transactionAttribute(attribute)
                                .build();
}
1.1.9. Registering ItemStream with a Step
The step has to take care of ItemStream callbacks at the necessary points in its lifecycle (For more information on the ItemStream interface, see ItemStream). This is vital if a step fails and might need to be restarted, because the ItemStream interface is where the step gets the information it needs about persistent state between executions.
If the ItemReader, ItemProcessor, or ItemWriter itself implements the ItemStream interface, then these are registered automatically. Any other streams need to be registered separately. This is often the case where indirect dependencies, such as delegates, are injected into the reader and writer. A stream can be registered on the Step through the 'streams' element, as illustrated in the following example:
XML Configuration
<step id="step1">
    <tasklet>
        <chunk reader="itemReader" writer="compositeWriter" commit-interval="2">
            <streams>
                <stream ref="fileItemWriter1"/>
                <stream ref="fileItemWriter2"/>
            </streams>
        </chunk>
    </tasklet>
</step>

<beans:bean id="compositeWriter"
            class="org.springframework.batch.item.support.CompositeItemWriter">
    <beans:property name="delegates">
        <beans:list>
            <beans:ref bean="fileItemWriter1" />
            <beans:ref bean="fileItemWriter2" />
        </beans:list>
    </beans:property>
</beans:bean>
Java Configuration
@Bean
public Step step1() {
        return this.stepBuilderFactory.get("step1")
                                .<String, String>chunk(2)
                                .reader(itemReader())
                                .writer(compositeItemWriter())
                                .stream(fileItemWriter1())
                                .stream(fileItemWriter2())
                                .build();
}

/**
 * In Spring Batch 4, the CompositeItemWriter implements ItemStream so this isn't
 * necessary, but used for an example.
 */
@Bean
public CompositeItemWriter compositeItemWriter() {
        List<ItemWriter> writers = new ArrayList<>(2);
        writers.add(fileItemWriter1());
        writers.add(fileItemWriter2());

        CompositeItemWriter itemWriter = new CompositeItemWriter();

        itemWriter.setDelegates(writers);

        return itemWriter;
}
In the example above, the CompositeItemWriter is not an ItemStream, but both of its delegates are. Therefore, both delegate writers must be explicitly registered as streams in order for the framework to handle them correctly. The ItemReader does not need to be explicitly registered as a stream because it is a direct property of the Step. The step is now restartable, and the state of the reader and writer is correctly persisted in the event of a failure.
1.1.10. Intercepting Step Execution
Just as with the Job, there are many events during the execution of a Step where a user may need to perform some functionality. For example, in order to write out to a flat file that requires a footer, the ItemWriter needs to be notified when the Step has been completed, so that the footer can be written. This can be accomplished with one of many Step scoped listeners.
Any class that implements one of the extensions of StepListener (but not that interface itself since it is empty) can be applied to a step through the listeners element. The listeners element is valid inside a step, tasklet, or chunk declaration. It is recommended that you declare the listeners at the level at which its function applies, or, if it is multi-featured (such as StepExecutionListener and ItemReadListener), then declare it at the most granular level where it applies. The following example shows a listener applied at the chunk level:
XML Configuration
<step id="step1">
    <tasklet>
        <chunk reader="reader" writer="writer" commit-interval="10"/>
        <listeners>
            <listener ref="chunkListener"/>
        </listeners>
    </tasklet>
</step>
Java Configuration
@Bean
public Step step1() {
        return this.stepBuilderFactory.get("step1")
                                .<String, String>chunk(10)
                                .reader(reader())
                                .writer(writer())
                                .listener(chunkListener())
                                .build();
}
An ItemReader, ItemWriter or ItemProcessor that itself implements one of the StepListener interfaces is registered automatically with the Step if using the namespace <step> element or one of the the *StepFactoryBean factories. This only applies to components directly injected into the Step. If the listener is nested inside another component, it needs to be explicitly registered (as described previously under Registering ItemStream with a Step).
In addition to the StepListener interfaces, annotations are provided to address the same concerns. Plain old Java objects can have methods with these annotations that are then converted into the corresponding StepListener type. It is also common to annotate custom implementations of chunk components such as ItemReader or ItemWriter or Tasklet. The annotations are analyzed by the XML parser for the <listener/> elements as well as registered with the listener methods in the builders, so all you need to do is use the XML namespace or builders to register the listeners with a step.
StepExecutionListener
StepExecutionListener represents the most generic listener for Step execution. It allows for notification before a Step is started and after it ends, whether it ended normally or failed, as shown in the following example:
public interface StepExecutionListener extends StepListener {

    void beforeStep(StepExecution stepExecution);

    ExitStatus afterStep(StepExecution stepExecution);

}
ExitStatus is the return type of afterStep in order to allow listeners the chance to modify the exit code that is returned upon completion of a Step.
The annotations corresponding to this interface are:
@BeforeStep@AfterStep
ChunkListener
A chunk is defined as the items processed within the scope of a transaction. Committing a transaction, at each commit interval, commits a 'chunk'. A ChunkListener can be used to perform logic before a chunk begins processing or after a chunk has completed successfully, as shown in the following interface definition:
public interface ChunkListener extends StepListener {

    void beforeChunk(ChunkContext context);
    void afterChunk(ChunkContext context);
    void afterChunkError(ChunkContext context);

}
The beforeChunk method is called after the transaction is started but before read is called on the ItemReader. Conversely, afterChunk is called after the chunk has been committed (and not at all if there is a rollback).
The annotations corresponding to this interface are:
@BeforeChunk@AfterChunk@AfterChunkError
A ChunkListener can be applied when there is no chunk declaration. The TaskletStep is responsible for calling the ChunkListener, so it applies to a non-item-oriented tasklet as well (it is called before and after the tasklet).
ItemReadListener
When discussing skip logic previously, it was mentioned that it may be beneficial to log the skipped records, so that they can be dealt with later. In the case of read errors, this can be done with an ItemReaderListener, as shown in the following interface definition:
public interface ItemReadListener<T> extends StepListener {

    void beforeRead();
    void afterRead(T item);
    void onReadError(Exception ex);

}
The beforeRead method is called before each call to read on the ItemReader. The afterRead method is called after each successful call to read and is passed the item that was read. If there was an error while reading, the onReadError method is called. The exception encountered is provided so that it can be logged.
The annotations corresponding to this interface are:
@BeforeRead@AfterRead@OnReadError
ItemProcessListener
Just as with the ItemReadListener, the processing of an item can be 'listened' to, as shown in the following interface definition:
public interface ItemProcessListener<T, S> extends StepListener {

    void beforeProcess(T item);
    void afterProcess(T item, S result);
    void onProcessError(T item, Exception e);

}
The beforeProcess method is called before process on the ItemProcessor and is handed the item that is to be processed. The afterProcess method is called after the item has been successfully processed. If there was an error while processing, the onProcessError method is called. The exception encountered and the item that was attempted to be processed are provided, so that they can be logged.
The annotations corresponding to this interface are:
@BeforeProcess@AfterProcess@OnProcessError
ItemWriteListener
The writing of an item can be 'listened' to with the ItemWriteListener, as shown in the following interface definition:
public interface ItemWriteListener<S> extends StepListener {

    void beforeWrite(List<? extends S> items);
    void afterWrite(List<? extends S> items);
    void onWriteError(Exception exception, List<? extends S> items);

}
The beforeWrite method is called before write on the ItemWriter and is handed the list of items that is written. The afterWrite method is called after the item has been successfully written. If there was an error while writing, the onWriteError method is called. The exception encountered and the item that was attempted to be written are provided, so that they can be logged.
The annotations corresponding to this interface are:
@BeforeWrite@AfterWrite@OnWriteError
SkipListener
ItemReadListener, ItemProcessListener, and ItemWriteListener all provide mechanisms for being notified of errors, but none informs you that a record has actually been skipped. onWriteError, for example, is called even if an item is retried and successful. For this reason, there is a separate interface for tracking skipped items, as shown in the following interface definition:
public interface SkipListener<T,S> extends StepListener {

    void onSkipInRead(Throwable t);
    void onSkipInProcess(T item, Throwable t);
    void onSkipInWrite(S item, Throwable t);

}
onSkipInRead is called whenever an item is skipped while reading. It should be noted that rollbacks may cause the same item to be registered as skipped more than once. onSkipInWrite is called when an item is skipped while writing. Because the item has been read successfully (and not skipped), it is also provided the item itself as an argument.
The annotations corresponding to this interface are:
@OnSkipInRead@OnSkipInWrite@OnSkipInProcess
SkipListeners and Transactions
One of the most common use cases for a SkipListener is to log out a skipped item, so that another batch process or even human process can be used to evaluate and fix the issue leading to the skip. Because there are many cases in which the original transaction may be rolled back, Spring Batch makes two guarantees:
The appropriate skip method (depending on when the error happened) is called only once per item.
The
SkipListeneris always called just before the transaction is committed. This is to ensure that any transactional resources call by the listener are not rolled back by a failure within theItemWriter.
1.2. TaskletStep
Chunk-oriented processing is not the only way to process in a Step. What if a Step must consist of a simple stored procedure call? You could implement the call as an ItemReader and return null after the procedure finishes. However, doing so is a bit unnatural, since there would need to be a no-op ItemWriter. Spring Batch provides the TaskletStep for this scenario.
Tasklet is a simple interface that has one method, execute, which is called repeatedly by the TaskletStep until it either returns RepeatStatus.FINISHED or throws an exception to signal a failure. Each call to a Tasklet is wrapped in a transaction. Tasklet implementors might call a stored procedure, a script, or a simple SQL update statement.
To create a TaskletStep, the 'ref' attribute of the <tasklet/> element should reference a bean that defines a Tasklet object. No <chunk/> element should be used within the <tasklet/>. The following example shows a simple tasklet:
<step id="step1">
    <tasklet ref="myTasklet"/>
</step>
To create a TaskletStep, the bean passed to the tasklet method of the builder should implement the Tasklet interface. No call to chunk should be called when building a TaskletStep. The following example shows a simple tasklet:
@Bean
public Step step1() {
    return this.stepBuilderFactory.get("step1")
                            .tasklet(myTasklet())
                            .build();
}|
|
1.2.1. TaskletAdapter
As with other adapters for the ItemReader and ItemWriter interfaces, the Tasklet interface contains an implementation that allows for adapting itself to any pre-existing class: TaskletAdapter. An example where this may be useful is an existing DAO that is used to update a flag on a set of records. The TaskletAdapter can be used to call this class without having to write an adapter for the Tasklet interface, as shown in the following example:
XML Configuration
<bean id="myTasklet" class="o.s.b.core.step.tasklet.MethodInvokingTaskletAdapter">
    <property name="targetObject">
        <bean class="org.mycompany.FooDao"/>
    </property>
    <property name="targetMethod" value="updateFoo" />
</bean>
Java Configuration
@Bean
public MethodInvokingTaskletAdapter myTasklet() {
        MethodInvokingTaskletAdapter adapter = new MethodInvokingTaskletAdapter();

        adapter.setTargetObject(fooDao());
        adapter.setTargetMethod("updateFoo");

        return adapter;
}
1.2.2. Example Tasklet Implementation
Many batch jobs contain steps that must be done before the main processing begins in order to set up various resources or after processing has completed to cleanup those resources. In the case of a job that works heavily with files, it is often necessary to delete certain files locally after they have been uploaded successfully to another location. The following example (taken from the Spring Batch samples project ) is a Tasklet implementation with just such a responsibility:
public class FileDeletingTasklet implements Tasklet, InitializingBean {

    private Resource directory;

    public RepeatStatus execute(StepContribution contribution,
                                ChunkContext chunkContext) throws Exception {
        File dir = directory.getFile();
        Assert.state(dir.isDirectory());

        File[] files = dir.listFiles();
        for (int i = 0; i < files.length; i++) {
            boolean deleted = files[i].delete();
            if (!deleted) {
                throw new UnexpectedJobExecutionException("Could not delete file " +
                                                          files[i].getPath());
            }
        }
        return RepeatStatus.FINISHED;
    }

    public void setDirectoryResource(Resource directory) {
        this.directory = directory;
    }

    public void afterPropertiesSet() throws Exception {
        Assert.notNull(directory, "directory must be set");
    }
}
The preceding Tasklet implementation deletes all files within a given directory. It should be noted that the execute method is called only once. All that is left is to reference the Tasklet from the Step:
XML Configuration
<job id="taskletJob">
    <step id="deleteFilesInDir">
       <tasklet ref="fileDeletingTasklet"/>
    </step>
</job>

<beans:bean id="fileDeletingTasklet"
            class="org.springframework.batch.sample.tasklet.FileDeletingTasklet">
    <beans:property name="directoryResource">
        <beans:bean id="directory"
                    class="org.springframework.core.io.FileSystemResource">
            <beans:constructor-arg value="target/test-outputs/test-dir" />
        </beans:bean>
    </beans:property>
</beans:bean>
Java Configuration
@Bean
public Job taskletJob() {
        return this.jobBuilderFactory.get("taskletJob")
                                .start(deleteFilesInDir())
                                .build();
}

@Bean
public Step deleteFilesInDir() {
        return this.stepBuilderFactory.get("deleteFilesInDir")
                                .tasklet(fileDeletingTasklet())
                                .build();
}

@Bean
public FileDeletingTasklet fileDeletingTasklet() {
        FileDeletingTasklet tasklet = new FileDeletingTasklet();

        tasklet.setDirectoryResource(new FileSystemResource("target/test-outputs/test-dir"));

        return tasklet;
}
1.3. Controlling Step Flow
With the ability to group steps together within an owning job comes the need to be able to control how the job "flows" from one step to another. The failure of a Step does not necessarily mean that the Job should fail. Furthermore, there may be more than one type of 'success' that determines which Step should be executed next. Depending upon how a group of Steps is configured, certain steps may not even be processed at all.
1.3.1. Sequential Flow
The simplest flow scenario is a job where all of the steps execute sequentially, as shown in the following image:

Figure 3. Sequential Flow
This can be achieved by using the 'next' attribute of the step element, as shown in the following example:
XML Configuration
<job id="job">
    <step id="stepA" parent="s1" next="stepB" />
    <step id="stepB" parent="s2" next="stepC"/>
    <step id="stepC" parent="s3" />
</job>
Java Configuration
@Bean
public Job job() {
        return this.jobBuilderFactory.get("job")
                                .start(stepA())
                                .next(stepB())
                                .next(stepC())
                                .build();
}
In the scenario above, 'step A' runs first because it is the first Step listed. If 'step A' completes normally, then 'step B' runs, and so on. However, if 'step A' fails, then the entire Job fails and 'step B' does not execute.
|
With the Spring Batch namespace, the first step listed in the configuration is always the first step run by the |
1.3.2. Conditional Flow
In the example above, there are only two possibilities:
The
Stepis successful and the nextStepshould be executed.The
Stepfailed and, thus, theJobshould fail.
In many cases, this may be sufficient. However, what about a scenario in which the failure of a Step should trigger a different Step, rather than causing failure? The following image shows such a flow:
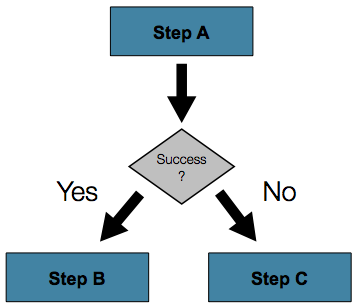
Figure 4. Conditional Flow
In order to handle more complex scenarios, the Spring Batch namespace allows transition elements to be defined within the step element. One such transition is the next element. Like the next attribute, the next element tells the Job which Step to execute next. However, unlike the attribute, any number of next elements are allowed on a given Step, and there is no default behavior in the case of failure. This means that, if transition elements are used, then all of the behavior for the Step transitions must be defined explicitly. Note also that a single step cannot have both a next attribute and a transition element.
The next element specifies a pattern to match and the step to execute next, as shown in the following example:
XML Configuration
<job id="job">
    <step id="stepA" parent="s1">
        <next on="*" to="stepB" />
        <next on="FAILED" to="stepC" />
    </step>
    <step id="stepB" parent="s2" next="stepC" />
    <step id="stepC" parent="s3" />
</job>
Java Configuration
@Bean
public Job job() {
        return this.jobBuilderFactory.get("job")
                                .start(stepA())
                                .on("*").to(stepB())
                                .from(stepA()).on("FAILED").to(stepC())
                                .end()
                                .build();
}
When using XML configuration, the on attribute of a transition element uses a simple pattern-matching scheme to match the ExitStatus that results from the execution of the Step.
When using java configuration the on method uses a simple pattern-matching scheme to match the ExitStatus that results from the execution of the Step.
Only two special characters are allowed in the pattern:
"*" matches zero or more characters
"?" matches exactly one character
For example, "c*t" matches "cat" and "count", while "c?t" matches "cat" but not "count".
While there is no limit to the number of transition elements on a Step, if the Step execution results in an ExitStatus that is not covered by an element, then the framework throws an exception and the Job fails. The framework automatically orders transitions from most specific to least specific. This means that, even if the ordering were swapped for "stepA" in the example above, an ExitStatus of "FAILED" would still go to "stepC".
Batch Status Versus Exit Status
When configuring a Job for conditional flow, it is important to understand the difference between BatchStatus and ExitStatus. BatchStatus is an enumeration that is a property of both JobExecution and StepExecution and is used by the framework to record the status of a Job or Step. It can be one of the following values: COMPLETED, STARTING, STARTED, STOPPING, STOPPED, FAILED, ABANDONED, or UNKNOWN. Most of them are self explanatory: COMPLETED is the status set when a step or job has completed successfully, FAILED is set when it fails, and so on.
The following example contains the 'next' element when using XML configuration:
<next on="FAILED" to="stepB" />The following example contains the 'on' element when using Java Configuration:
...
.from(stepA()).on("FAILED").to(stepB())
...
At first glance, it would appear that 'on' references the BatchStatus of the Step to which it belongs. However, it actually references the ExitStatus of the Step. As the name implies, ExitStatus represents the status of a Step after it finishes execution.
More specifically, when using XML configuration, the 'next' element shown in the preceding XML configuration example references the exit code of ExitStatus.
When using Java configuration, the 'on' method shown in the preceding Java configuration example references the exit code of ExitStatus.
In English, it says: "go to stepB if the exit code is FAILED ". By default, the exit code is always the same as the BatchStatus for the Step, which is why the entry above works. However, what if the exit code needs to be different? A good example comes from the skip sample job within the samples project:
XML Configuration
<step id="step1" parent="s1">
    <end on="FAILED" />
    <next on="COMPLETED WITH SKIPS" to="errorPrint1" />
    <next on="*" to="step2" />
</step>
Java Configuration
@Bean
public Job job() {
        return this.jobBuilderFactory.get("job")
                        .start(step1()).on("FAILED").end()
                        .from(step1()).on("COMPLETED WITH SKIPS").to(errorPrint1())
                        .from(step1()).on("*").to(step2())
                        .end()
                        .build();
}
step1 has three possibilities:
The
Stepfailed, in which case the job should fail.The
Stepcompleted successfully.The
Stepcompleted successfully but with an exit code of 'COMPLETED WITH SKIPS'. In this case, a different step should be run to handle the errors.
The above configuration works. However, something needs to change the exit code based on the condition of the execution having skipped records, as shown in the following example:
public class SkipCheckingListener extends StepExecutionListenerSupport {
    public ExitStatus afterStep(StepExecution stepExecution) {
        String exitCode = stepExecution.getExitStatus().getExitCode();
        if (!exitCode.equals(ExitStatus.FAILED.getExitCode()) &&
              stepExecution.getSkipCount() > 0) {
            return new ExitStatus("COMPLETED WITH SKIPS");
        }
        else {
            return null;
        }
    }
}
The above code is a StepExecutionListener that first checks to make sure the Step was successful and then checks to see if the skip count on the StepExecution is higher than 0. If both conditions are met, a new ExitStatus with an exit code of COMPLETED WITH SKIPS is returned.
1.3.3. Configuring for Stop
After the discussion of BatchStatus and ExitStatus, one might wonder how the BatchStatus and ExitStatus are determined for the Job. While these statuses are determined for the Step by the code that is executed, the statuses for the Job are determined based on the configuration.
So far, all of the job configurations discussed have had at least one final Step with no transitions. For example, after the following step executes, the Job ends, as shown in the following example:
<step id="stepC" parent="s3"/>@Bean
public Job job() {
return this.jobBuilderFactory.get("job")
.start(step1())
.build();
}If no transitions are defined for a Step, then the status of the Job is defined as follows:
If the
Stepends withExitStatusFAILED, then theBatchStatusandExitStatusof theJobare bothFAILED.Otherwise, the
BatchStatusandExitStatusof theJobare bothCOMPLETED.
While this method of terminating a batch job is sufficient for some batch jobs, such as a simple sequential step job, custom defined job-stopping scenarios may be required. For this purpose, Spring Batch provides three transition elements to stop a Job (in addition to the next element that we discussed previously). Each of these stopping elements stops a Job with a particular BatchStatus. It is important to note that the stop transition elements have no effect on either the BatchStatus or ExitStatus of any Steps in the Job. These elements affect only the final statuses of the Job. For example, it is possible for every step in a job to have a status of FAILED but for the job to have a status of COMPLETED.
Ending at a Step
Configuring a step end instructs a Job to stop with a BatchStatus of COMPLETED. A Job that has finished with status COMPLETED cannot be restarted (the framework throws a JobInstanceAlreadyCompleteException).
When using XML configuration, the 'end' element is used for this task. The end element also allows for an optional 'exit-code' attribute that can be used to customize the ExitStatus of the Job. If no 'exit-code' attribute is given, then the ExitStatus is COMPLETED by default, to match the BatchStatus.
When using Java configuration, the 'end' method is used for this task. The end method also allows for an optional 'exitStatus' parameter that can be used to customize the ExitStatus of the Job. If no 'exitStatus' value is provided, then the ExitStatus is COMPLETED by default, to match the BatchStatus.
In the following scenario, if step2 fails, then the Job stops with a BatchStatus of COMPLETED and an ExitStatus of COMPLETED and step3 does not run. Otherwise, execution moves to step3. Note that if step2 fails, the Job is not restartable (because the status is COMPLETED).
<step id="step1" parent="s1" next="step2">

<step id="step2" parent="s2">
    <end on="FAILED"/>
    <next on="*" to="step3"/>
</step>

<step id="step3" parent="s3">
@Bean
public Job job() {
return this.jobBuilderFactory.get("job")
.start(step1())
.next(step2())
.on("FAILED").end()
.from(step2()).on("*").to(step3())
.end()
.build();
}Failing a Step
Configuring a step to fail at a given point instructs a Job to stop with a BatchStatus of FAILED. Unlike end, the failure of a Job does not prevent the Job from being restarted.
When using XML configuration, the 'fail' element also allows for an optional 'exit-code' attribute that can be used to customize the ExitStatus of the Job. If no 'exit-code' attribute is given, then the ExitStatus is FAILED by default, to match the BatchStatus.
In the following scenario, if step2 fails, then the Job stops with a BatchStatus of FAILED and an ExitStatus of EARLY TERMINATION and step3 does not execute. Otherwise, execution moves to step3. Additionally, if step2 fails and the Job is restarted, then execution begins again on step2.
XML Configuration
<step id="step1" parent="s1" next="step2">

<step id="step2" parent="s2">
    <fail on="FAILED" exit-code="EARLY TERMINATION"/>
    <next on="*" to="step3"/>
</step>

<step id="step3" parent="s3">
Java Configuration
@Bean
public Job job() {
        return this.jobBuilderFactory.get("job")
                        .start(step1())
                        .next(step2()).on("FAILED").fail()
                        .from(step2()).on("*").to(step3())
                        .end()
                        .build();
}
Stopping a Job at a Given Step
Configuring a job to stop at a particular step instructs a Job to stop with a BatchStatus of STOPPED. Stopping a Job can provide a temporary break in processing, so that the operator can take some action before restarting the Job.
When using XML configuration 'stop' element requires a 'restart' attribute that specifies the step where execution should pick up when the "Job is restarted".
When using java configuration, the stopAndRestart method requires a 'restart' attribute that specifies the step where execution should pick up when the "Job is restarted".
In the following scenario, if step1 finishes with COMPLETE, then the job stops. Once it is restarted, execution begins on step2.
<step id="step1" parent="s1">
    <stop on="COMPLETED" restart="step2"/>
</step>

<step id="step2" parent="s2"/>
@Bean
public Job job() {
return this.jobBuilderFactory.get("job")
.start(step1()).on("COMPLETED").stopAndRestart(step2())
.end()
.build();
}1.3.4. Programmatic Flow Decisions
In some situations, more information than the ExitStatus may be required to decide which step to execute next. In this case, a JobExecutionDecider can be used to assist in the decision, as shown in the following example:
public class MyDecider implements JobExecutionDecider {
    public FlowExecutionStatus decide(JobExecution jobExecution, StepExecution stepExecution) {
        String status;
        if (someCondition()) {
            status = "FAILED";
        }
        else {
            status = "COMPLETED";
        }
        return new FlowExecutionStatus(status);
    }
}
In the following sample job configuration, a decision specifies the decider to use as well as all of the transitions:
XML Configuration
<job id="job">
    <step id="step1" parent="s1" next="decision" />

    <decision id="decision" decider="decider">
        <next on="FAILED" to="step2" />
        <next on="COMPLETED" to="step3" />
    </decision>

    <step id="step2" parent="s2" next="step3"/>
    <step id="step3" parent="s3" />
</job>

<beans:bean id="decider" class="com.MyDecider"/>
In the following example, a bean implementing the JobExecutionDecider is passed directly to the next call when using Java configuration.
Java Configuration
@Bean
public Job job() {
        return this.jobBuilderFactory.get("job")
                        .start(step1())
                        .next(decider()).on("FAILED").to(step2())
                        .from(decider()).on("COMPLETED").to(step3())
                        .end()
                        .build();
}
1.3.5. Split Flows
Every scenario described so far has involved a Job that executes its steps one at a time in a linear fashion. In addition to this typical style, Spring Batch also allows for a job to be configured with parallel flows.
The XML namespace allows you to use the 'split' element. As the following example shows, the 'split' element contains one or more 'flow' elements, where entire separate flows can be defined. A 'split' element may also contain any of the previously discussed transition elements, such as the 'next' attribute or the 'next', 'end' or 'fail' elements.
<split id="split1" next="step4">
    <flow>
        <step id="step1" parent="s1" next="step2"/>
        <step id="step2" parent="s2"/>
    </flow>
    <flow>
        <step id="step3" parent="s3"/>
    </flow>
</split>
<step id="step4" parent="s4"/>
Java based configuration lets you configure splits through the provided builders. As the following example shows, the 'split' element contains one or more 'flow' elements, where entire separate flows can be defined. A 'split' element may also contain any of the previously discussed transition elements, such as the 'next' attribute or the 'next', 'end' or 'fail' elements.
@Bean
public Job job() {
        Flow flow1 = new FlowBuilder<SimpleFlow>("flow1")
                        .start(step1())
                        .next(step2())
                        .build();
        Flow flow2 = new FlowBuilder<SimpleFlow>("flow2")
                        .start(step3())
                        .build();

        return this.jobBuilderFactory.get("job")
                                .start(flow1)
                                .split(new SimpleAsyncTaskExecutor())
                                .add(flow2)
                                .next(step4())
                                .end()
                                .build();
}
1.3.6. Externalizing Flow Definitions and Dependencies Between Jobs
Part of the flow in a job can be externalized as a separate bean definition and then re-used. There are two ways to do so. The first is to simply declare the flow as a reference to one defined elsewhere, as shown in the following example:
XML Configuration
<job id="job">
    <flow id="job1.flow1" parent="flow1" next="step3"/>
    <step id="step3" parent="s3"/>
</job>

<flow id="flow1">
    <step id="step1" parent="s1" next="step2"/>
    <step id="step2" parent="s2"/>
</flow>
J