22. Web MVC framework
The Spring Web model-view-controller (MVC) framework is designed around a DispatcherServlet that dispatches requests to handlers, with configurable handler mappings, view resolution, locale, time zone and theme resolution as well as support for uploading files. The default handler is based on the @Controller and @RequestMapping annotations, offering a wide range of flexible handling methods. With the introduction of Spring 3.0, the @Controller mechanism also allows you to create RESTful Web sites and applications, through the @PathVariable annotation and other features.
"Open for extension…" A key design principle in Spring Web MVC and in Spring in general is the "Open for extension, closed for modification" principle.
Some methods in the core classes of Spring Web MVC are marked final. As a developer you cannot override these methods to supply your own behavior. This has not been done arbitrarily, but specifically with this principle in mind.
For an explanation of this principle, refer to Expert Spring Web MVC and Web Flow by Seth Ladd and others; specifically see the section "A Look At Design," on page 117 of the first edition. Alternatively, see
You cannot add advice to final methods when you use Spring MVC. For example, you cannot add advice to the AbstractController.setSynchronizeOnSession() method. Refer to Section 11.6.1, “Understanding AOP proxies” for more information on AOP proxies and why you cannot add advice to final methods.
In Spring Web MVC you can use any object as a command or form-backing object; you do not need to implement a framework-specific interface or base class. Spring’s data binding is highly flexible: for example, it treats type mismatches as validation errors that can be evaluated by the application, not as system errors. Thus you do not need to duplicate your business objects' properties as simple, untyped strings in your form objects simply to handle invalid submissions, or to convert the Strings properly. Instead, it is often preferable to bind directly to your business objects.
Spring’s view resolution is extremely flexible. A Controller is typically responsible for preparing a model Map with data and selecting a view name but it can also write directly to the response stream and complete the request. View name resolution is highly configurable through file extension or Accept header content type negotiation, through bean names, a properties file, or even a custom ViewResolver implementation. The model (the M in MVC) is a Map interface, which allows for the complete abstraction of the view technology. You can integrate directly with template based rendering technologies such as JSP, Velocity and Freemarker, or directly generate XML, JSON, Atom, and many other types of content. The model Map is simply transformed into an appropriate format, such as JSP request attributes, a Velocity template model.
Spring Web Flow
Spring Web Flow (SWF) aims to be the best solution for the management of web application page flow.
SWF integrates with existing frameworks like Spring MVC and JSF, in both Servlet and Portlet environments. If you have a business process (or processes) that would benefit from a conversational model as opposed to a purely request model, then SWF may be the solution.
SWF allows you to capture logical page flows as self-contained modules that are reusable in different situations, and as such is ideal for building web application modules that guide the user through controlled navigations that drive business processes.
For more information about SWF, consult the Spring Web Flow website .
Spring’s web module includes many unique web support features:
- Clear separation of roles. Each role — controller, validator, command object, form object, model object,
DispatcherServlet, handler mapping, view resolver, and so on — can be fulfilled by a specialized object. - Powerful and straightforward configuration of both framework and application classes as JavaBeans. This configuration capability includes easy referencing across contexts, such as from web controllers to business objects and validators.
- Adaptability, non-intrusiveness, and flexibility. Define any controller method signature you need, possibly using one of the parameter annotations (such as @RequestParam, @RequestHeader, @PathVariable, and more) for a given scenario.
- Reusable business code, no need for duplication. Use existing business objects as command or form objects instead of mirroring them to extend a particular framework base class.
- Customizable binding and validation. Type mismatches as application-level validation errors that keep the offending value, localized date and number binding, and so on instead of String-only form objects with manual parsing and conversion to business objects.
- Customizable handler mapping and view resolution. Handler mapping and view resolution strategies range from simple URL-based configuration, to sophisticated, purpose-built resolution strategies. Spring is more flexible than web MVC frameworks that mandate a particular technique.
- Flexible model transfer. Model transfer with a name/value
Mapsupports easy integration with any view technology. - Customizable locale, time zone and theme resolution, support for JSPs with or without Spring tag library, support for JSTL, support for Velocity without the need for extra bridges, and so on.
- A simple yet powerful JSP tag library known as the Spring tag library that provides support for features such as data binding and themes. The custom tags allow for maximum flexibility in terms of markup code. For information on the tag library descriptor, see the appendix entitled Chapter 43, spring JSP Tag Library
- A JSP form tag library, introduced in Spring 2.0, that makes writing forms in JSP pages much easier. For information on the tag library descriptor, see the appendix entitled Chapter 44, spring-form JSP Tag Library
- Beans whose lifecycle is scoped to the current HTTP request or HTTP
Session. This is not a specific feature of Spring MVC itself, but rather of theWebApplicationContextcontainer(s) that Spring MVC uses. These bean scopes are described in Section 7.5.4, “Request, session, global session, application, and WebSocket scopes”
Non-Spring MVC implementations are preferable for some projects. Many teams expect to leverage their existing investment in skills and tools, for example with JSF.
If you do not want to use Spring’s Web MVC, but intend to leverage other solutions that Spring offers, you can integrate the web MVC framework of your choice with Spring easily. Simply start up a Spring root application context through its ContextLoaderListener, and access it through its ServletContext attribute (or Spring’s respective helper method) from within any action object. No "plug-ins" are involved, so no dedicated integration is necessary. From the web layer’s point of view, you simply use Spring as a library, with the root application context instance as the entry point.
Your registered beans and Spring’s services can be at your fingertips even without Spring’s Web MVC. Spring does not compete with other web frameworks in this scenario. It simply addresses the many areas that the pure web MVC frameworks do not, from bean configuration to data access and transaction handling. So you can enrich your application with a Spring middle tier and/or data access tier, even if you just want to use, for example, the transaction abstraction with JDBC or Hibernate.
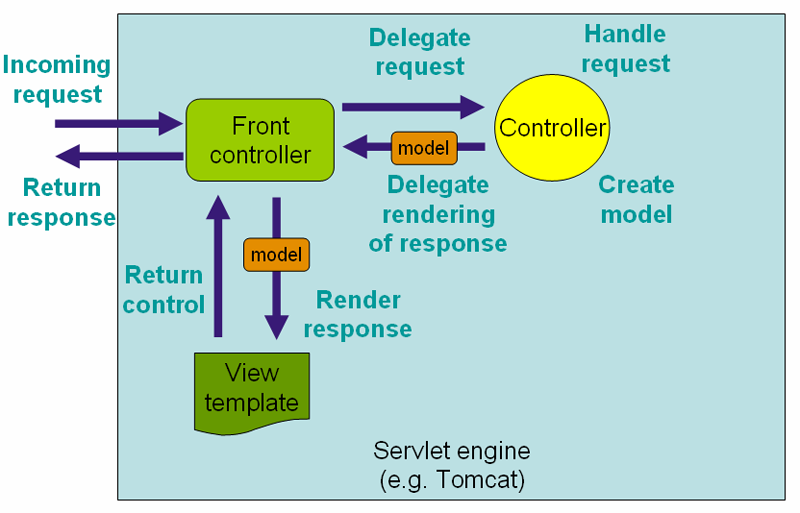
Spring’s web MVC framework is, like many other web MVC frameworks, request-driven, designed around a central Servlet that dispatches requests to controllers and offers other functionality that facilitates the development of web applications. Spring’s DispatcherServlet however, does more than just that. It is completely integrated with the Spring IoC container and as such allows you to use every other feature that Spring has.
The request processing workflow of the Spring Web MVC DispatcherServlet is illustrated in the following diagram. The pattern-savvy reader will recognize that the DispatcherServlet is an expression of the "Front Controller" design pattern (this is a pattern that Spring Web MVC shares with many other leading web frameworks).
The DispatcherServlet is an actual Servlet (it inherits from the HttpServlet base class), and as such is declared in your web application. You need to map requests that you want the DispatcherServlet to handle, by using a URL mapping. Here is a standard Java EE Servlet configuration in a Servlet 3.0+ environment:
public class MyWebApplicationInitializer implements WebApplicationInitializer {

    @Override
    public void onStartup(ServletContext container) {
        ServletRegistration.Dynamic registration = container.addServlet("example", new DispatcherServlet());
        registration.setLoadOnStartup(1);
        registration.addMapping("/example/*");
    }
}
In the preceding example, all requests starting with /example will be handled by the DispatcherServlet instance named example.
WebApplicationInitializer is an interface provided by Spring MVC that ensures your code-based configuration is detected and automatically used to initialize any Servlet 3 container. An abstract base class implementation of this interface named AbstractAnnotationConfigDispatcherServletInitializer makes it even easier to register the DispatcherServlet by simply specifying its servlet mapping and listing configuration classes - it’s even the recommended way to set up your Spring MVC application. See Code-based Servlet container initialization for more details.
The DispatcherServlet is an actual Servlet (it inherits from the HttpServlet base class), and as such is declared in the web.xml of your web application. You need to map requests that you want the DispatcherServlet to handle, by using a URL mapping in the same web.xml file. This is standard Java EE Servlet configuration; the following example shows such a DispatcherServlet declaration and mapping:
Below is the web.xml equivalent of the above code based example:
<web-app>
<servlet>
<servlet-name>example</servlet-name>
<servlet-class>org.springframework.web.servlet.DispatcherServlet</servlet-class>
<load-on-startup>1</load-on-startup>
</servlet>
<servlet-mapping>
<servlet-name>example</servlet-name>
<url-pattern>/example/*</url-pattern>
</servlet-mapping>
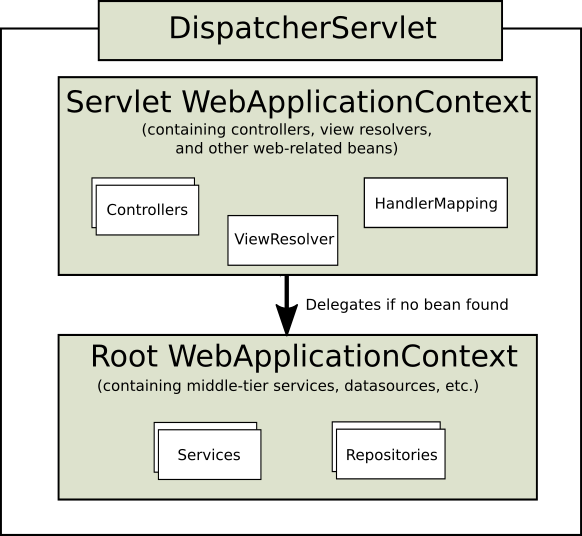
</web-app>As detailed in Section 7.15, “Additional capabilities of the ApplicationContext”, ApplicationContext instances in Spring can be scoped. In the Web MVC framework, each DispatcherServlet has its own WebApplicationContext, which inherits all the beans already defined in the root WebApplicationContext. The root WebApplicationContext should contain all the infrastructure beans that should be shared between your other contexts and Servlet instances. These inherited beans can be overridden in the servlet-specific scope, and you can define new scope-specific beans local to a given Servlet instance.
Upon initialization of a DispatcherServlet, Spring MVC looks for a file named [servlet-name]-servlet.xml in the WEB-INF directory of your web application and creates the beans defined there, overriding the definitions of any beans defined with the same name in the global scope.
Consider the following DispatcherServlet Servlet configuration (in the web.xml file):
<web-app>
    <servlet>
        <servlet-name>golfing</servlet-name>
        <servlet-class>org.springframework.web.servlet.DispatcherServlet</servlet-class>
        <load-on-startup>1</load-on-startup>
    </servlet>
    <servlet-mapping>
        <servlet-name>golfing</servlet-name>
        <url-pattern>/golfing/*</url-pattern>
    </servlet-mapping>
</web-app>
With the above Servlet configuration in place, you will need to have a file called /WEB-INF/golfing-servlet.xml in your application; this file will contain all of your Spring Web MVC-specific components (beans). You can change the exact location of this configuration file through a Servlet initialization parameter (see below for details).
It is also possible to have just one root context for single DispatcherServlet scenarios.
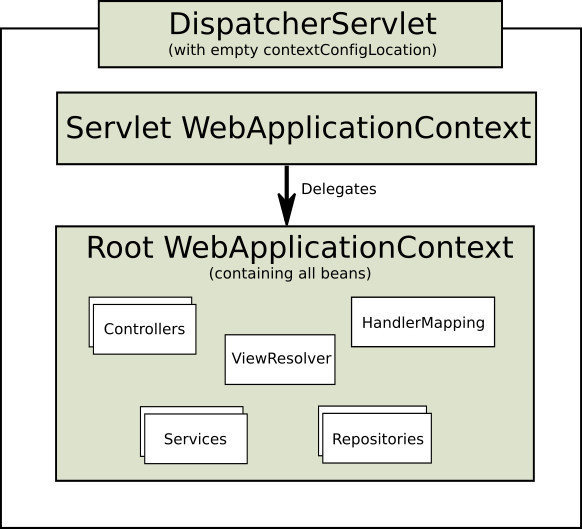
This can be configured by setting an empty contextConfigLocation servlet init parameter, as shown below:
<web-app>
    <context-param>
        <param-name>contextConfigLocation</param-name>
        <param-value>/WEB-INF/root-context.xml</param-value>
    </context-param>
    <servlet>
        <servlet-name>dispatcher</servlet-name>
        <servlet-class>org.springframework.web.servlet.DispatcherServlet</servlet-class>
        <init-param>
            <param-name>contextConfigLocation</param-name>
            <param-value></param-value>
        </init-param>
        <load-on-startup>1</load-on-startup>
    </servlet>
    <servlet-mapping>
        <servlet-name>dispatcher</servlet-name>
        <url-pattern>/*</url-pattern>
    </servlet-mapping>
    <listener>
        <listener-class>org.springframework.web.context.ContextLoaderListener</listener-class>
    </listener>
</web-app>
The WebApplicationContext is an extension of the plain ApplicationContext that has some extra features necessary for web applications. It differs from a normal ApplicationContext in that it is capable of resolving themes (see Section 22.9, “Using themes”), and that it knows which Servlet it is associated with (by having a link to the ServletContext). The WebApplicationContext is bound in the ServletContext, and by using static methods on the RequestContextUtils class you can always look up the WebApplicationContext if you need access to it.
Note that we can achieve the same with java-based configurations:
public class GolfingWebAppInitializer extends AbstractAnnotationConfigDispatcherServletInitializer {

    @Override
    protected Class<?>[] getRootConfigClasses() {
        // GolfingAppConfig defines beans that would be in root-context.xml
        return new Class<?>[] { GolfingAppConfig.class };
    }

    @Override
    protected Class<?>[] getServletConfigClasses() {
        // GolfingWebConfig defines beans that would be in golfing-servlet.xml
        return new Class<?>[] { GolfingWebConfig.class };
    }

    @Override
    protected String[] getServletMappings() {
        return new String[] { "/golfing/*" };
    }
}The Spring DispatcherServlet uses special beans to process requests and render the appropriate views. These beans are part of Spring MVC. You can choose which special beans to use by simply configuring one or more of them in the WebApplicationContext. However, you don’t need to do that initially since Spring MVC maintains a list of default beans to use if you don’t configure any. More on that in the next section. First see the table below listing the special bean types the DispatcherServlet relies on.
Table 22.1. Special bean types in the WebApplicationContext
| Bean type | Explanation |
|---|---|
Maps incoming requests to handlers and a list of pre- and post-processors (handler interceptors) based on some criteria the details of which vary by |
|
HandlerAdapter |
Helps the |
Maps exceptions to views also allowing for more complex exception handling code. |
|
Resolves logical String-based view names to actual |
|
Resolves the locale a client is using and possibly their time zone, in order to be able to offer internationalized views |
|
Resolves themes your web application can use, for example, to offer personalized layouts |
|
Parses multi-part requests for example to support processing file uploads from HTML forms. |
|
Stores and retrieves the "input" and the "output" |
As mentioned in the previous section for each special bean the DispatcherServlet maintains a list of implementations to use by default. This information is kept in the file DispatcherServlet.properties in the package org.springframework.web.servlet.
All special beans have some reasonable defaults of their own. Sooner or later though you’ll need to customize one or more of the properties these beans provide. For example it’s quite common to configure an InternalResourceViewResolver settings its prefix property to the parent location of view files.
Regardless of the details, the important concept to understand here is that once you configure a special bean such as an InternalResourceViewResolver in your WebApplicationContext, you effectively override the list of default implementations that would have been used otherwise for that special bean type. For example if you configure an InternalResourceViewResolver, the default list of ViewResolver implementations is ignored.
In Section 22.16, “Configuring Spring MVC” you’ll learn about other options for configuring Spring MVC including MVC Java config and the MVC XML namespace both of which provide a simple starting point and assume little knowledge of how Spring MVC works. Regardless of how you choose to configure your application, the concepts explained in this section are fundamental should be of help to you.
After you set up a DispatcherServlet, and a request comes in for that specific DispatcherServlet, the DispatcherServlet starts processing the request as follows:
- The
WebApplicationContextis searched for and bound in the request as an attribute that the controller and other elements in the process can use. It is bound by default under the keyDispatcherServlet.WEB_APPLICATION_CONTEXT_ATTRIBUTE. - The locale resolver is bound to the request to enable elements in the process to resolve the locale to use when processing the request (rendering the view, preparing data, and so on). If you do not need locale resolving, you do not need it.
- The theme resolver is bound to the request to let elements such as views determine which theme to use. If you do not use themes, you can ignore it.
- If you specify a multipart file resolver, the request is inspected for multiparts; if multiparts are found, the request is wrapped in a
MultipartHttpServletRequestfor further processing by other elements in the process. See Section 22.10, “Spring’s multipart (file upload) support” for further information about multipart handling. - An appropriate handler is searched for. If a handler is found, the execution chain associated with the handler (preprocessors, postprocessors, and controllers) is executed in order to prepare a model or rendering.
- If a model is returned, the view is rendered. If no model is returned, (may be due to a preprocessor or postprocessor intercepting the request, perhaps for security reasons), no view is rendered, because the request could already have been fulfilled.
Handler exception resolvers that are declared in the WebApplicationContext pick up exceptions that are thrown during processing of the request. Using these exception resolvers allows you to define custom behaviors to address exceptions.
The Spring DispatcherServlet also supports the return of the last-modification-date, as specified by the Servlet API. The process of determining the last modification date for a specific request is straightforward: the DispatcherServlet looks up an appropriate handler mapping and tests whether the handler that is found implements the LastModified interface. If so, the value of the long getLastModified(request) method of the LastModified interface is returned to the client.
You can customize individual DispatcherServlet instances by adding Servlet initialization parameters ( init-param elements) to the Servlet declaration in the web.xml file. See the following table for the list of supported parameters.
Table 22.2. DispatcherServlet initialization parameters
| Parameter | Explanation |
|---|---|
|
Class that implements |
|
String that is passed to the context instance (specified by |
|
Namespace of the |
Controllers provide access to the application behavior that you typically define through a service interface. Controllers interpret user input and transform it into a model that is represented to the user by the view. Spring implements a controller in a very abstract way, which enables you to create a wide variety of controllers.
Spring 2.5 introduced an annotation-based programming model for MVC controllers that uses annotations such as @RequestMapping, @RequestParam, @ModelAttribute, and so on. This annotation support is available for both Servlet MVC and Portlet MVC. Controllers implemented in this style do not have to extend specific base classes or implement specific interfaces. Furthermore, they do not usually have direct dependencies on Servlet or Portlet APIs, although you can easily configure access to Servlet or Portlet facilities.
![[Tip]](/images/spring-framework/4.3.21.RELEASE/tip.png) |
Tip |
|---|---|
Available in the spring-projects Org on Github , a number of web applications leverage the annotation support described in this section including MvcShowcase, MvcAjax, MvcBasic, PetClinic, PetCare, and others. |
@Controller
public class HelloWorldController {

    @RequestMapping("/helloWorld")
    public String helloWorld(Model model) {
        model.addAttribute("message", "Hello World!");
        return "helloWorld";
    }
}
As you can see, the @Controller and @RequestMapping annotations allow flexible method names and signatures. In this particular example the method accepts a Model and returns a view name as a String, but various other method parameters and return values can be used as explained later in this section. @Controller and @RequestMapping and a number of other annotations form the basis for the Spring MVC implementation. This section documents these annotations and how they are most commonly used in a Servlet environment.
The @Controller annotation indicates that a particular class serves the role of a controller. Spring does not require you to extend any controller base class or reference the Servlet API. However, you can still reference Servlet-specific features if you need to.
The @Controller annotation acts as a stereotype for the annotated class, indicating its role. The dispatcher scans such annotated classes for mapped methods and detects @RequestMapping annotations (see the next section).
You can define annotated controller beans explicitly, using a standard Spring bean definition in the dispatcher’s context. However, the @Controller stereotype also allows for autodetection, aligned with Spring general support for detecting component classes in the classpath and auto-registering bean definitions for them.
To enable autodetection of such annotated controllers, you add component scanning to your configuration. Use the spring-context schema as shown in the following XML snippet:
<?xml version="1.0" encoding="UTF-8"?>
<beans xmlns="http://www.springframework.org/schema/beans"
    xmlns:xsi="http://www.w3.org/2001/XMLSchema-instance"
    xmlns:p="http://www.springframework.org/schema/p"
    xmlns:context="http://www.springframework.org/schema/context"
    xsi:schemaLocation="
        http://www.springframework.org/schema/beans
        http://www.springframework.org/schema/beans/spring-beans.xsd
        http://www.springframework.org/schema/context
        http://www.springframework.org/schema/context/spring-context.xsd">

    <context:component-scan base-package="org.springframework.samples.petclinic.web"/>

    <!-- ... -->

</beans>You use the @RequestMapping annotation to map URLs such as /appointments onto an entire class or a particular handler method. Typically the class-level annotation maps a specific request path (or path pattern) onto a form controller, with additional method-level annotations narrowing the primary mapping for a specific HTTP method request method ("GET", "POST", etc.) or an HTTP request parameter condition.
The following example from the Petcare sample shows a controller in a Spring MVC application that uses this annotation:
@Controller
@RequestMapping("/appointments")
public class AppointmentsController {

    private final AppointmentBook appointmentBook;

    @Autowired
    public AppointmentsController(AppointmentBook appointmentBook) {
        this.appointmentBook = appointmentBook;
    }

    @RequestMapping(method = RequestMethod.GET)
    public Map<String, Appointment> get() {
        return appointmentBook.getAppointmentsForToday();
    }

    @RequestMapping(path = "/{day}", method = RequestMethod.GET)
    public Map<String, Appointment> getForDay(@PathVariable @DateTimeFormat(iso=ISO.DATE) Date day, Model model) {
        return appointmentBook.getAppointmentsForDay(day);
    }

    @RequestMapping(path = "/new", method = RequestMethod.GET)
    public AppointmentForm getNewForm() {
        return new AppointmentForm();
    }

    @RequestMapping(method = RequestMethod.POST)
    public String add(@Valid AppointmentForm appointment, BindingResult result) {
        if (result.hasErrors()) {
            return "appointments/new";
        }
        appointmentBook.addAppointment(appointment);
        return "redirect:/appointments";
    }
}
In the above example, @RequestMapping is used in a number of places. The first usage is on the type (class) level, which indicates that all handler methods in this controller are relative to the /appointments path. The get() method has a further @RequestMapping refinement: it only accepts GET requests, meaning that an HTTP GET for /appointments invokes this method. The add() has a similar refinement, and the getNewForm() combines the definition of HTTP method and path into one, so that GET requests for appointments/new are handled by that method.
The getForDay() method shows another usage of @RequestMapping: URI templates. (See the section called “URI Template Patterns”).
A @RequestMapping on the class level is not required. Without it, all paths are simply absolute, and not relative. The following example from the PetClinic sample application shows a multi-action controller using @RequestMapping:
@Controller
public class ClinicController {

    private final Clinic clinic;

    @Autowired
    public ClinicController(Clinic clinic) {
        this.clinic = clinic;
    }

    @RequestMapping("/")
    public void welcomeHandler() {
    }

    @RequestMapping("/vets")
    public ModelMap vetsHandler() {
        return new ModelMap(this.clinic.getVets());
    }

}
The above example does not specify GET vs. PUT, POST, and so forth, because @RequestMapping maps all HTTP methods by default. Use @RequestMapping(method=GET) or @GetMapping to narrow the mapping.
Spring Framework 4.3 introduces the following method-level composed variants of the @RequestMapping annotation that help to simplify mappings for common HTTP methods and better express the semantics of the annotated handler method. For example, a @GetMapping can be read as a GET @RequestMapping.
@GetMapping@PostMapping@PutMapping@DeleteMapping@PatchMapping
The following example shows a modified version of the AppointmentsController from the previous section that has been simplified with composed @RequestMapping annotations.
@Controller
@RequestMapping("/appointments")
public class AppointmentsController {

    private final AppointmentBook appointmentBook;

    @Autowired
    public AppointmentsController(AppointmentBook appointmentBook) {
        this.appointmentBook = appointmentBook;
    }

    @GetMapping
    public Map<String, Appointment> get() {
        return appointmentBook.getAppointmentsForToday();
    }

    @GetMapping("/{day}")
    public Map<String, Appointment> getForDay(@PathVariable @DateTimeFormat(iso=ISO.DATE) Date day, Model model) {
        return appointmentBook.getAppointmentsForDay(day);
    }

    @GetMapping("/new")
    public AppointmentForm getNewForm() {
        return new AppointmentForm();
    }

    @PostMapping
    public String add(@Valid AppointmentForm appointment, BindingResult result) {
        if (result.hasErrors()) {
            return "appointments/new";
        }
        appointmentBook.addAppointment(appointment);
        return "redirect:/appointments";
    }
}In some cases a controller may need to be decorated with an AOP proxy at runtime. One example is if you choose to have @Transactional annotations directly on the controller. When this is the case, for controllers specifically, we recommend using class-based proxying. This is typically the default choice with controllers. However if a controller must implement an interface that is not a Spring Context callback (e.g. InitializingBean, *Aware, etc), you may need to explicitly configure class-based proxying. For example with <tx:annotation-driven/>, change to <tx:annotation-driven proxy-target-class="true"/>.
Spring 3.1 introduced a new set of support classes for @RequestMapping methods called RequestMappingHandlerMapping and RequestMappingHandlerAdapter respectively. They are recommended for use and even required to take advantage of new features in Spring MVC 3.1 and going forward. The new support classes are enabled by default by the MVC namespace and the MVC Java config but must be configured explicitly if using neither. This section describes a few important differences between the old and the new support classes.
Prior to Spring 3.1, type and method-level request mappings were examined in two separate stages — a controller was selected first by the DefaultAnnotationHandlerMapping and the actual method to invoke was narrowed down second by the AnnotationMethodHandlerAdapter.
With the new support classes in Spring 3.1, the RequestMappingHandlerMapping is the only place where a decision is made about which method should process the request. Think of controller methods as a collection of unique endpoints with mappings for each method derived from type and method-level @RequestMapping information.
This enables some new possibilities. For once a HandlerInterceptor or a HandlerExceptionResolver can now expect the Object-based handler to be a HandlerMethod, which allows them to examine the exact method, its parameters and associated annotations. The processing for a URL no longer needs to be split across different controllers.
There are also several things no longer possible:
- Select a controller first with a
SimpleUrlHandlerMappingorBeanNameUrlHandlerMappingand then narrow the method based on@RequestMappingannotations. - Rely on method names as a fall-back mechanism to disambiguate between two
@RequestMappingmethods that don’t have an explicit path mapping URL path but otherwise match equally, e.g. by HTTP method. In the new support classes@RequestMappingmethods have to be mapped uniquely. - Have a single default method (without an explicit path mapping) with which requests are processed if no other controller method matches more concretely. In the new support classes if a matching method is not found a 404 error is raised.
The above features are still supported with the existing support classes. However to take advantage of new Spring MVC 3.1 features you’ll need to use the new support classes.
URI templates can be used for convenient access to selected parts of a URL in a @RequestMapping method.
A URI Template is a URI-like string, containing one or more variable names. When you substitute values for these variables, the template becomes a URI. The proposed RFC for URI Templates defines how a URI is parameterized. For example, the URI Template http://www.example.com/users/{userId} contains the variable userId. Assigning the value fred to the variable yields http://www.example.com/users/fred .
In Spring MVC you can use the @PathVariable annotation on a method argument to bind it to the value of a URI template variable:
@GetMapping("/owners/{ownerId}")
public String findOwner(@PathVariable String ownerId, Model model) {
    Owner owner = ownerService.findOwner(ownerId);
    model.addAttribute("owner", owner);
    return "displayOwner";
}
The URI Template " /owners/{ownerId}`" specifies the variable name `ownerId. When the controller handles this request, the value of ownerId is set to the value found in the appropriate part of the URI. For example, when a request comes in for /owners/fred, the value of ownerId is fred.
|
Tip |
|---|---|
To process the @PathVariable annotation, Spring MVC needs to find the matching URI template variable by name. You can specify it in the annotation: Or if the URI template variable name matches the method argument name you can omit that detail. As long as your code is compiled with debugging information or the |
A method can have any number of @PathVariable annotations:
@GetMapping("/owners/{ownerId}/pets/{petId}")
public String findPet(@PathVariable String ownerId, @PathVariable String petId, Model model) {
    Owner owner = ownerService.findOwner(ownerId);
    Pet pet = owner.getPet(petId);
    model.addAttribute("pet", pet);
    return "displayPet";
}
When a @PathVariable annotation is used on a Map<String, String> argument, the map is populated with all URI template variables.
A URI template can be assembled from type and method level @RequestMapping annotations. As a result the findPet() method can be invoked with a URL such as /owners/42/pets/21.
@Controller
@RequestMapping("/owners/{ownerId}")
public class RelativePathUriTemplateController {

    @RequestMapping("/pets/{petId}")
    public void findPet(@PathVariable String ownerId, @PathVariable String petId, Model model) {
        // implementation omitted
    }

}
A @PathVariable argument can be of any simple type such as int, long, Date, etc. Spring automatically converts to the appropriate type or throws a TypeMismatchException if it fails to do so. You can also register support for parsing additional data types. See the section called “Method Parameters And Type Conversion” and the section called “Customizing WebDataBinder initialization”.
Sometimes you need more precision in defining URI template variables. Consider the URL "/spring-web/spring-web-3.0.5.jar". How do you break it down into multiple parts?
The @RequestMapping annotation supports the use of regular expressions in URI template variables. The syntax is {varName:regex} where the first part defines the variable name and the second - the regular expression. For example:
@RequestMapping("/spring-web/{symbolicName:[a-z-]+}-{version:\\d\\.\\d\\.\\d}{extension:\\.[a-z]+}")
public void handle(@PathVariable String version, @PathVariable String extension) {
    // ...
}In addition to URI templates, the @RequestMapping annotation and all composed @RequestMapping variants also support Ant-style path patterns (for example, /myPath/*.do). A combination of URI template variables and Ant-style globs is also supported (e.g. /owners/*/pets/{petId}).
When a URL matches multiple patterns, a sort is used to find the most specific match.
A pattern with a lower count of URI variables and wild cards is considered more specific. For example /hotels/{hotel}/* has 1 URI variable and 1 wild card and is considered more specific than /hotels/{hotel}/** which as 1 URI variable and 2 wild cards.
If two patterns have the same count, the one that is longer is considered more specific. For example /foo/bar* is longer and considered more specific than /foo/*.
When two patterns have the same count and length, the pattern with fewer wild cards is considered more specific. For example /hotels/{hotel} is more specific than /hotels/*.
There are also some additional special rules:
- The default mapping pattern
/**is less specific than any other pattern. For example/api/{a}/{b}/{c}is more specific. - A prefix pattern such as
/public/**is less specific than any other pattern that doesn’t contain double wildcards. For example/public/path3/{a}/{b}/{c}is more specific.
For the full details see AntPatternComparator in AntPathMatcher. Note that the PathMatcher can be customized (see Section 22.16.11, “Path Matching” in the section on configuring Spring MVC).
Patterns in @RequestMapping annotations support ${…} placeholders against local properties and/or system properties and environment variables. This may be useful in cases where the path a controller is mapped to may need to be customized through configuration. For more information on placeholders, see the javadocs of the PropertyPlaceholderConfigurer class.
By default Spring MVC performs ".*" suffix pattern matching so that a controller mapped to /person is also implicitly mapped to /person.*. This makes it easy to request different representations of a resource through the URL path (e.g. /person.pdf, /person.xml).
Suffix pattern matching can be turned off or restricted to a set of path extensions explicitly registered for content negotiation purposes. This is generally recommended to minimize ambiguity with common request mappings such as /person/{id} where a dot might not represent a file extension, e.g. /person/[email protected] vs /person/[email protected] . Furthermore as explained in the note below suffix pattern matching as well as content negotiation may be used in some circumstances to attempt malicious attacks and there are good reasons to restrict them meaningfully.
See Section 22.16.11, “Path Matching” for suffix pattern matching configuration and also Section 22.16.6, “Content Negotiation” for content negotiation configuration.
Reflected file download (RFD) attack was first described in a paper by Trustwave in 2014. The attack is similar to XSS in that it relies on input (e.g. query parameter, URI variable) being reflected in the response. However instead of inserting JavaScript into HTML, an RFD attack relies on the browser switching to perform a download and treating the response as an executable script if double-clicked based on the file extension (e.g. .bat, .cmd).
In Spring MVC @ResponseBody and ResponseEntity methods are at risk because they can render different content types which clients can request including via URL path extensions. Note however that neither disabling suffix pattern matching nor disabling the use of path extensions for content negotiation purposes alone are effective at preventing RFD attacks.
For comprehensive protection against RFD, prior to rendering the response body Spring MVC adds a Content-Disposition:inline;filename=f.txt header to suggest a fixed and safe download file filename. This is done only if the URL path contains a file extension that is neither whitelisted nor explicitly registered for content negotiation purposes. However it may potentially have side effects when URLs are typed directly into a browser.
Many common path extensions are whitelisted by default. Furthermore REST API calls are typically not meant to be used as URLs directly in browsers. Nevertheless applications that use custom HttpMessageConverter implementations can explicitly register file extensions for content negotiation and the Content-Disposition header will not be added for such extensions. See Section 22.16.6, “Content Negotiation”.
![[Note]](/images/spring-framework/4.3.21.RELEASE/note.png) |
Note |
|---|---|
This was originally introduced as part of work for CVE-2015-5211 . Below are additional recommendations from the report:
|
The URI specification RFC 3986 defines the possibility of including name-value pairs within path segments. There is no specific term used in the spec. The general "URI path parameters" could be applied although the more unique "Matrix URIs" , originating from an old post by Tim Berners-Lee, is also frequently used and fairly well known. Within Spring MVC these are referred to as matrix variables.
Matrix variables can appear in any path segment, each matrix variable separated with a ";" (semicolon). For example: "/cars;color=red;year=2012". Multiple values may be either "," (comma) separated "color=red,green,blue" or the variable name may be repeated "color=red;color=green;color=blue".
If a URL is expected to contain matrix variables, the request mapping pattern must represent them with a URI template. This ensures the request can be matched correctly regardless of whether matrix variables are present or not and in what order they are provided.
Below is an example of extracting the matrix variable "q":
// GET /pets/42;q=11;r=22

@GetMapping("/pets/{petId}")
public void findPet(@PathVariable String petId, @MatrixVariable int q) {

    // petId == 42
    // q == 11

}
Since all path segments may contain matrix variables, in some cases you need to be more specific to identify where the variable is expected to be:
// GET /owners/42;q=11/pets/21;q=22

@GetMapping("/owners/{ownerId}/pets/{petId}")
public void findPet(
        @MatrixVariable(name="q", pathVar="ownerId") int q1,
        @MatrixVariable(name="q", pathVar="petId") int q2) {

    // q1 == 11
    // q2 == 22

}
A matrix variable may be defined as optional and a default value specified:
// GET /pets/42

@GetMapping("/pets/{petId}")
public void findPet(@MatrixVariable(required=false, defaultValue="1") int q) {

    // q == 1

}
All matrix variables may be obtained in a Map:
// GET /owners/42;q=11;r=12/pets/21;q=22;s=23

@GetMapping("/owners/{ownerId}/pets/{petId}")
public void findPet(
        @MatrixVariable MultiValueMap<String, String> matrixVars,
        @MatrixVariable(pathVar="petId"") MultiValueMap<String, String> petMatrixVars) {

    // matrixVars: ["q" : [11,22], "r" : 12, "s" : 23]
    // petMatrixVars: ["q" : 11, "s" : 23]

}
Note that to enable the use of matrix variables, you must set the removeSemicolonContent property of RequestMappingHandlerMapping to false. By default it is set to true.
|
Tip |
|---|---|
The MVC Java config and the MVC namespace both provide options for enabling the use of matrix variables. If you are using Java config, The Advanced Customizations with MVC Java Config section describes how the In the MVC namespace, the |
You can narrow the primary mapping by specifying a list of consumable media types. The request will be matched only if the Content-Type request header matches the specified media type. For example:
@PostMapping(path = "/pets", consumes = "application/json")
public void addPet(@RequestBody Pet pet, Model model) {
    // implementation omitted
}
Consumable media type expressions can also be negated as in !text/plain to match to all requests other than those with Content-Type of text/plain. Also consider using constants provided in MediaType such as APPLICATION_JSON_VALUE and APPLICATION_JSON_UTF8_VALUE.
|
Tip |
|---|---|
The consumes condition is supported on the type and on the method level. Unlike most other conditions, when used at the type level, method-level consumable types override rather than extend type-level consumable types. |
You can narrow the primary mapping by specifying a list of producible media types. The request will be matched only if the Accept request header matches one of these values. Furthermore, use of the produces condition ensures the actual content type used to generate the response respects the media types specified in the produces condition. For example:
@GetMapping(path = "/pets/{petId}", produces = MediaType.APPLICATION_JSON_UTF8_VALUE)
@ResponseBody
public Pet getPet(@PathVariable String petId, Model model) {
    // implementation omitted
} |
Note |
|---|---|
Be aware that the media type specified in the produces condition can also optionally specify a character set. For example, in the code snippet above we specify the same media type than the default one configured in |
Just like with consumes, producible media type expressions can be negated as in !text/plain to match to all requests other than those with an Accept header value of text/plain. Also consider using constants provided in MediaType such as APPLICATION_JSON_VALUE and APPLICATION_JSON_UTF8_VALUE.
|
Tip |
|---|---|
The produces condition is supported on the type and on the method level. Unlike most other conditions, when used at the type level, method-level producible types override rather than extend type-level producible types. |
You can narrow request matching through request parameter conditions such as "myParam", "!myParam", or "myParam=myValue". The first two test for request parameter presence/absence and the third for a specific parameter value. Here is an example with a request parameter value condition:
@Controller
@RequestMapping("/owners/{ownerId}")
public class RelativePathUriTemplateController {

    @GetMapping(path = "/pets/{petId}", params = "myParam=myValue")
    public void findPet(@PathVariable String ownerId, @PathVariable String petId, Model model) {
        // implementation omitted
    }

}
The same can be done to test for request header presence/absence or to match based on a specific request header value:
@Controller
@RequestMapping("/owners/{ownerId}")
public class RelativePathUriTemplateController {

    @GetMapping(path = "/pets", headers = "myHeader=myValue")
    public void findPet(@PathVariable String ownerId, @PathVariable String petId, Model model) {
        // implementation omitted
    }

} |
Tip |
|---|---|
Although you can match to Content-Type and Accept header values using media type wild cards (for example "content-type=text/*" will match to "text/plain" and "text/html"), it is recommended to use the consumes and produces conditions respectively instead. They are intended specifically for that purpose. |
@RequestMapping methods mapped to "GET" are also implicitly mapped to "HEAD", i.e. there is no need to have "HEAD" explicitly declared. An HTTP HEAD request is processed as if it were an HTTP GET except instead of writing the body only the number of bytes are counted and the "Content-Length" header set.
@RequestMapping methods have built-in support for HTTP OPTIONS. By default an HTTP OPTIONS request is handled by setting the "Allow" response header to the HTTP methods explicitly declared on all @RequestMapping methods with matching URL patterns. When no HTTP methods are explicitly declared the "Allow" header is set to "GET,HEAD,POST,PUT,PATCH,DELETE,OPTIONS". Ideally always declare the HTTP method(s) that an @RequestMapping method is intended to handle, or alternatively use one of the dedicated composed @RequestMapping variants (see the section called “Composed @RequestMapping Variants”).
Although not necessary an @RequestMapping method can be mapped to and handle either HTTP HEAD or HTTP OPTIONS, or both.
@RequestMapping handler methods can have very flexible signatures. The supported method arguments and return values are described in the following section. Most arguments can be used in arbitrary order with the only exception being BindingResult arguments. This is described in the next section.
|
Note |
|---|---|
Spring 3.1 introduced a new set of support classes for |
The following are the supported method arguments:
- Request or response objects (Servlet API). Choose any specific request or response type, for example
ServletRequestorHttpServletRequest. - Session object (Servlet API): of type
HttpSession. An argument of this type enforces the presence of a corresponding session. As a consequence, such an argument is nevernull.
|
Note |
|---|---|
Session access may not be thread-safe, in particular in a Servlet environment. Consider setting the |
org.springframework.web.context.request.WebRequestororg.springframework.web.context.request.NativeWebRequest. Allows for generic request parameter access as well as request/session attribute access, without ties to the native Servlet/Portlet API.java.util.Localefor the current request locale, determined by the most specific locale resolver available, in effect, the configuredLocaleResolver/LocaleContextResolverin an MVC environment.java.util.TimeZone(Java 6+) /java.time.ZoneId(on Java 8) for the time zone associated with the current request, as determined by aLocaleContextResolver.java.io.InputStream/java.io.Readerfor access to the request’s content. This value is the raw InputStream/Reader as exposed by the Servlet API.java.io.OutputStream/java.io.Writerfor generating the response’s content. This value is the raw OutputStream/Writer as exposed by the Servlet API.org.springframework.http.HttpMethodfor the HTTP request method.java.security.Principalcontaining the currently authenticated user.@PathVariableannotated parameters for access to URI template variables. See the section called “URI Template Patterns”.@MatrixVariableannotated parameters for access to name-value pairs located in URI path segments. See the section called “Matrix Variables”.@RequestParamannotated parameters for access to specific Servlet request parameters. Parameter values are converted to the declared method argument type. See the section called “Binding request parameters to method parameters with @RequestParam”.@RequestHeaderannotated parameters for access to specific Servlet request HTTP headers. Parameter values are converted to the declared method argument type. See the section called “Mapping request header attributes with the @RequestHeader annotation”.@RequestBodyannotated parameters for access to the HTTP request body. Parameter values are converted to the declared method argument type usingHttpMessageConverters. See the section called “Mapping the request body with the @RequestBody annotation”.@RequestPartannotated parameters for access to the content of a "multipart/form-data" request part. See Section 22.10.5, “Handling a file upload request from programmatic clients” and Section 22.10, “Spring’s multipart (file upload) support”.@SessionAttributeannotated parameters for access to existing, permanent session attributes (e.g. user authentication object) as opposed to model attributes temporarily stored in the session as part of a controller workflow via@SessionAttributes.@RequestAttributeannotated parameters for access to request attributes.HttpEntity<?>parameters for access to the Servlet request HTTP headers and contents. The request stream will be converted to the entity body usingHttpMessageConverters. See the section called “Using HttpEntity”.java.util.Map/org.springframework.ui.Model/org.springframework.ui.ModelMapfor enriching the implicit model that is exposed to the web view.org.springframework.web.servlet.mvc.support.RedirectAttributesto specify the exact set of attributes to use in case of a redirect and also to add flash attributes (attributes stored temporarily on the server-side to make them available to the request after the redirect). See the section called “Passing Data To the Redirect Target” and Section 22.6, “Using flash attributes”.- Command or form objects to bind request parameters to bean properties (via setters) or directly to fields, with customizable type conversion, depending on
@InitBindermethods and/or the HandlerAdapter configuration. See thewebBindingInitializerproperty onRequestMappingHandlerAdapter. Such command objects along with their validation results will be exposed as model attributes by default, using the command class name - e.g. model attribute "orderAddress" for a command object of type "some.package.OrderAddress". TheModelAttributeannotation can be used on a method argument to customize the model attribute name used. org.springframework.validation.Errors/org.springframework.validation.BindingResultvalidation results for a preceding command or form object (the immediately preceding method argument).org.springframework.web.bind.support.SessionStatusstatus handle for marking form processing as complete, which triggers the cleanup of session attributes that have been indicated by the@SessionAttributesannotation at the handler type level.org.springframework.web.util.UriComponentsBuildera builder for preparing a URL relative to the current request’s host, port, scheme, context path, and the literal part of the servlet mapping.
The Errors or BindingResult parameters have to follow the model object that is being bound immediately as the method signature might have more than one model object and Spring will create a separate BindingResult instance for each of them so the following sample won’t work:
Invalid ordering of BindingResult and @ModelAttribute.
@PostMapping
public String processSubmit(@ModelAttribute("pet") Pet pet, Model model, BindingResult result) { ... }
Note, that there is a Model parameter in between Pet and BindingResult. To get this working you have to reorder the parameters as follows:
@PostMapping
public String processSubmit(@ModelAttribute("pet") Pet pet, BindingResult result, Model model) { ... } |
Note |
|---|---|
JDK 1.8’s |
The following are the supported return types:
- A
ModelAndViewobject, with the model implicitly enriched with command objects and the results of@ModelAttributeannotated reference data accessor methods. - A
Modelobject, with the view name implicitly determined through aRequestToViewNameTranslatorand the model implicitly enriched with command objects and the results of@ModelAttributeannotated reference data accessor methods. - A
Mapobject for exposing a model, with the view name implicitly determined through aRequestToViewNameTranslatorand the model implicitly enriched with command objects and the results of@ModelAttributeannotated reference data accessor methods. - A
Viewobject, with the model implicitly determined through command objects and@ModelAttributeannotated reference data accessor methods. The handler method may also programmatically enrich the model by declaring aModelargument (see above). - A
Stringvalue that is interpreted as the logical view name, with the model implicitly determined through command objects and@ModelAttributeannotated reference data accessor methods. The handler method may also programmatically enrich the model by declaring aModelargument (see above). voidif the method handles the response itself (by writing the response content directly, declaring an argument of typeServletResponse/HttpServletResponsefor that purpose) or if the view name is supposed to be implicitly determined through aRequestToViewNameTranslator(not declaring a response argument in the handler method signature).- If the method is annotated with
@ResponseBody, the return type is written to the response HTTP body. The return value will be converted to the declared method argument type usingHttpMessageConverters. See the section called “Mapping the response body with the @ResponseBody annotation”. - An
HttpEntity<?>orResponseEntity<?>object to provide access to the Servlet response HTTP headers and contents. The entity body will be converted to the response stream usingHttpMessageConverters. See the section called “Using HttpEntity”. - An
HttpHeadersobject to return a response with no body. - A
Callable<?>can be returned when the application wants to produce the return value asynchronously in a thread managed by Spring MVC. - A
DeferredResult<?>can be returned when the application wants to produce the return value from a thread of its own choosing. - A
ListenableFuture<?>orCompletableFuture<?>/CompletionStage<?>can be returned when the application wants to produce the value from a thread pool submission. - A
ResponseBodyEmittercan be returned to write multiple objects to the response asynchronously; also supported as the body within aResponseEntity. - An
SseEmittercan be returned to write Server-Sent Events to the response asynchronously; also supported as the body within aResponseEntity. - A
StreamingResponseBodycan be returned to write to the response OutputStream asynchronously; also supported as the body within aResponseEntity. - Any other return type is considered to be a single model attribute to be exposed to the view, using the attribute name specified through
@ModelAttributeat the method level (or the default attribute name based on the return type class name). The model is implicitly enriched with command objects and the results of@ModelAttributeannotated reference data accessor methods.
Use the @RequestParam annotation to bind request parameters to a method parameter in your controller.
The following code snippet shows the usage:
@Controller
@RequestMapping("/pets")
@SessionAttributes("pet")
public class EditPetForm {

    // ...

    @GetMapping
    public String setupForm(@RequestParam("petId") int petId, ModelMap model) {
        Pet pet = this.clinic.loadPet(petId);
        model.addAttribute("pet", pet);
        return "petForm";
    }

    // ...

}
Parameters using this annotation are required by default, but you can specify that a parameter is optional by setting @RequestParam's required attribute to false (e.g., @RequestParam(name="id", required=false)).
Type conversion is applied automatically if the target method parameter type is not String. See the section called “Method Parameters And Type Conversion”.
When an @RequestParam annotation is used on a Map<String, String> or MultiValueMap<String, String> argument, the map is populated with all request parameters.
The @RequestBody method parameter annotation indicates that a method parameter should be bound to the value of the HTTP request body. For example:
@PutMapping("/something")
public void handle(@RequestBody String body, Writer writer) throws IOException {
    writer.write(body);
}
You convert the request body to the method argument by using an HttpMessageConverter. HttpMessageConverter is responsible for converting from the HTTP request message to an object and converting from an object to the HTTP response body. The RequestMappingHandlerAdapter supports the @RequestBody annotation with the following default HttpMessageConverters:
ByteArrayHttpMessageConverterconverts byte arrays.StringHttpMessageConverterconverts strings.FormHttpMessageConverterconverts form data to/from a MultiValueMap<String, String>.SourceHttpMessageConverterconverts to/from a javax.xml.transform.Source.
For more information on these converters, see Message Converters. Also note that if using the MVC namespace or the MVC Java config, a wider range of message converters are registered by default. See Section 22.16.1, “Enabling the MVC Java Config or the MVC XML Namespace” for more information.
If you intend to read and write XML, you will need to configure the MarshallingHttpMessageConverter with a specific Marshaller and an Unmarshaller implementation from the org.springframework.oxm package. The example below shows how to do that directly in your configuration but if your application is configured through the MVC namespace or the MVC Java config see Section 22.16.1, “Enabling the MVC Java Config or the MVC XML Namespace” instead.
<bean class="org.springframework.web.servlet.mvc.method.annotation.RequestMappingHandlerAdapter">
    <property name="messageConverters">
        <util:list id="beanList">
            <ref bean="stringHttpMessageConverter"/>
            <ref bean="marshallingHttpMessageConverter"/>
        </util:list>
    </property
</bean>

<bean id="stringHttpMessageConverter"
        class="org.springframework.http.converter.StringHttpMessageConverter"/>

<bean id="marshallingHttpMessageConverter"
        class="org.springframework.http.converter.xml.MarshallingHttpMessageConverter">
    <property name="marshaller" ref="castorMarshaller"/>
    <property name="unmarshaller" ref="castorMarshaller"/>
</bean>

<bean id="castorMarshaller" class="org.springframework.oxm.castor.CastorMarshaller"/>
An @RequestBody method parameter can be annotated with @Valid, in which case it will be validated using the configured Validator instance. When using the MVC namespace or the MVC Java config, a JSR-303 validator is configured automatically assuming a JSR-303 implementation is available on the classpath.
Just like with @ModelAttribute parameters, an Errors argument can be used to examine the errors. If such an argument is not declared, a MethodArgumentNotValidException will be raised. The exception is handled in the DefaultHandlerExceptionResolver, which sends a 400 error back to the client.
|
Note |
|---|---|
Also see Section 22.16.1, “Enabling the MVC Java Config or the MVC XML Namespace” for information on configuring message converters and a validator through the MVC namespace or the MVC Java config. |
The @ResponseBody annotation is similar to @RequestBody. This annotation can be placed on a method and indicates that the return type should be written straight to the HTTP response body (and not placed in a Model, or interpreted as a view name). For example:
@GetMapping("/something")
@ResponseBody
public String helloWorld() {
    return "Hello World";
}
The above example will result in the text Hello World being written to the HTTP response stream.
As with @RequestBody, Spring converts the returned object to a response body by using an HttpMessageConverter. For more information on these converters, see the previous section and Message Converters.
It’s a very common use case to have Controllers implement a REST API, thus serving only JSON, XML or custom MediaType content. For convenience, instead of annotating all your @RequestMapping methods with @ResponseBody, you can annotate your controller Class with @RestController.
@RestController is a stereotype annotation that combines @ResponseBody and @Controller. More than that, it gives more meaning to your Controller and also may carry additional semantics in future releases of the framework.
As with regular @Controllers, a @RestController may be assisted by @ControllerAdvice or @RestControllerAdvice beans. See the the section called “Advising controllers with @ControllerAdvice and @RestControllerAdvice” section for more details.
The HttpEntity is similar to @RequestBody and @ResponseBody. Besides getting access to the request and response body, HttpEntity (and the response-specific subclass ResponseEntity) also allows access to the request and response headers, like so:
@RequestMapping("/something")
public ResponseEntity<String> handle(HttpEntity<byte[]> requestEntity) throws UnsupportedEncodingException {
    String requestHeader = requestEntity.getHeaders().getFirst("MyRequestHeader"));
    byte[] requestBody = requestEntity.getBody();

    // do something with request header and body

    HttpHeaders responseHeaders = new HttpHeaders();
    responseHeaders.set("MyResponseHeader", "MyValue");
    return new ResponseEntity<String>("Hello World", responseHeaders, HttpStatus.CREATED);
}
The above example gets the value of the MyRequestHeader request header, and reads the body as a byte array. It adds the MyResponseHeader to the response, writes Hello World to the response stream, and sets the response status code to 201 (Created).
As with @RequestBody and @ResponseBody, Spring uses HttpMessageConverter to convert from and to the request and response streams. For more information on these converters, see the previous section and Message Converters.
The @ModelAttribute annotation can be used on methods or on method arguments. This section explains its usage on methods while the next section explains its usage on method arguments.
An @ModelAttribute on a method indicates the purpose of that method is to add one or more model attributes. Such methods support the same argument types as @RequestMapping methods but cannot be mapped directly to requests. Instead @ModelAttribute methods in a controller are invoked before @RequestMapping methods, within the same controller. A couple of examples:
// Add one attribute
// The return value of the method is added to the model under the name "account"
// You can customize the name via @ModelAttribute("myAccount")

@ModelAttribute
public Account addAccount(@RequestParam String number) {
    return accountManager.findAccount(number);
}

// Add multiple attributes

@ModelAttribute
public void populateModel(@RequestParam String number, Model model) {
    model.addAttribute(accountManager.findAccount(number));
    // add more ...
}
@ModelAttribute methods are used to populate the model with commonly needed attributes for example to fill a drop-down with states or with pet types, or to retrieve a command object like Account in order to use it to represent the data on an HTML form. The latter case is further discussed in the next section.
Note the two styles of @ModelAttribute methods. In the first, the method adds an attribute implicitly by returning it. In the second, the method accepts a Model and adds any number of model attributes to it. You can choose between the two styles depending on your needs.
A controller can have any number of @ModelAttribute methods. All such methods are invoked before @RequestMapping methods of the same controller.
@ModelAttribute methods can also be defined in an @ControllerAdvice-annotated class and such methods apply to many controllers. See the the section called “Advising controllers with @ControllerAdvice and @RestControllerAdvice” section for more details.
|
Tip |
|---|---|
What happens when a model attribute name is not explicitly specified? In such cases a default name is assigned to the model attribute based on its type. For example if the method returns an object of type |
The @ModelAttribute annotation can be used on @RequestMapping methods as well. In that case the return value of the @RequestMapping method is interpreted as a model attribute rather than as a view name. The view name is then derived based on view name conventions instead, much like for methods returning void — see Section 22.13.3, “Default view name”.
As explained in the previous section @ModelAttribute can be used on methods or on method arguments. This section explains its usage on method arguments.
An @ModelAttribute on a method argument indicates the argument should be retrieved from the model. If not present in the model, the argument should be instantiated first and then added to the model. Once present in the model, the argument’s fields should be populated from all request parameters that have matching names. This is known as data binding in Spring MVC, a very useful mechanism that saves you from having to parse each form field individually.
@PostMapping("/owners/{ownerId}/pets/{petId}/edit")
public String processSubmit(@ModelAttribute Pet pet) { }
Given the above example where can the Pet instance come from? There are several options:
- It may already be in the model due to use of
@SessionAttributes— see the section called “Using @SessionAttributes to store model attributes in the HTTP session between requests”. - It may already be in the model due to an
@ModelAttributemethod in the same controller — as explained in the previous section. - It may be retrieved based on a URI template variable and type converter (explained in more detail below).
- It may be instantiated using its default constructor.
An @ModelAttribute method is a common way to retrieve an attribute from the database, which may optionally be stored between requests through the use of @SessionAttributes. In some cases it may be convenient to retrieve the attribute by using an URI template variable and a type converter. Here is an example:
@PutMapping("/accounts/{account}")
public String save(@ModelAttribute("account") Account account) {
    // ...
}
In this example the name of the model attribute (i.e. "account") matches the name of a URI template variable. If you register Converter<String, Account> that can turn the String account value into an Account instance, then the above example will work without the need for an @ModelAttribute method.
The next step is data binding. The WebDataBinder class matches request parameter names — including query string parameters and form fields — to model attribute fields by name. Matching fields are populated after type conversion (from String to the target field type) has been applied where necessary. Data binding and validation are covered in Chapter 9, Validation, Data Binding, and Type Conversion. Customizing the data binding process for a controller level is covered in the section called “Customizing WebDataBinder initialization”.
As a result of data binding there may be errors such as missing required fields or type conversion errors. To check for such errors add a BindingResult argument immediately following the @ModelAttribute argument:
@PostMapping("/owners/{ownerId}/pets/{petId}/edit")
public String processSubmit(@ModelAttribute("pet") Pet pet, BindingResult result) {

    if (result.hasErrors()) {
        return "petForm";
    }

    // ...

}
With a BindingResult you can check if errors were found in which case it’s common to render the same form where the errors can be shown with the help of Spring’s <errors> form tag.
Note that in some cases it may be useful to gain access to an attribute in the model without data binding. For such cases you may inject the Model into the controller or alternatively use the binding flag on the annotation:
@ModelAttribute
public AccountForm setUpForm() {
    return new AccountForm();
}

@ModelAttribute
public Account findAccount(@PathVariable String accountId) {
    return accountRepository.findOne(accountId);
}

@PostMapping("update")
public String update(@Valid AccountUpdateForm form, BindingResult result,
        @ModelAttribute(binding=false) Account account) {

    // ...
}
In addition to data binding you can also invoke validation using your own custom validator passing the same BindingResult that was used to record data binding errors. That allows for data binding and validation errors to be accumulated in one place and subsequently reported back to the user:
@PostMapping("/owners/{ownerId}/pets/{petId}/edit")
public String processSubmit(@ModelAttribute("pet") Pet pet, BindingResult result) {

    new PetValidator().validate(pet, result);
    if (result.hasErrors()) {
        return "petForm";
    }

    // ...

}
Or you can have validation invoked automatically by adding the JSR-303 @Valid annotation:
@PostMapping("/owners/{ownerId}/pets/{petId}/edit")
public String processSubmit(@Valid @ModelAttribute("pet") Pet pet, BindingResult result) {

    if (result.hasErrors()) {
        return "petForm";
    }

    // ...

}
See Section 9.8, “Spring Validation” and Chapter 9, Validation, Data Binding, and Type Conversion for details on how to configure and use validation.
The type-level @SessionAttributes annotation declares session attributes used by a specific handler. This will typically list the names of model attributes or types of model attributes which should be transparently stored in the session or some conversational storage, serving as form-backing beans between subsequent requests.
The following code snippet shows the usage of this annotation, specifying the model attribute name:
@Controller
@RequestMapping("/editPet.do")
@SessionAttributes("pet")
public class EditPetForm {
    // ...
}If you need access to pre-existing session attributes that are managed globally, i.e. outside the controller (e.g. by a filter), and may or may not be present use the @SessionAttribute annotation on a method parameter:
@RequestMapping("/")
public String handle(@SessionAttribute User user) {
    // ...
}
For use cases that require adding or removing session attributes consider injecting org.springframework.web.context.request.WebRequest or javax.servlet.http.HttpSession into the controller method.
For temporary storage of model attributes in the session as part of a controller workflow consider using SessionAttributes as described in the section called “Using @SessionAttributes to store model attributes in the HTTP session between requests”.
Similar to @SessionAttribute the @RequestAttribute annotation can be used to access pre-existing request attributes created by a filter or interceptor:
@RequestMapping("/")
public String handle(@RequestAttribute Client client) {
    // ...
}The previous sections covered use of @ModelAttribute to support form submission requests from browser clients. The same annotation is recommended for use with requests from non-browser clients as well. However there is one notable difference when it comes to working with HTTP PUT requests. Browsers can submit form data via HTTP GET or HTTP POST. Non-browser clients can also submit forms via HTTP PUT. This presents a challenge because the Servlet specification requires the ServletRequest.getParameter*() family of methods to support form field access only for HTTP POST, not for HTTP PUT.
To support HTTP PUT and PATCH requests, the spring-web module provides the filter HttpPutFormContentFilter, which can be configured in web.xml:
<filter>
    <filter-name>httpPutFormFilter</filter-name>
    <filter-class>org.springframework.web.filter.HttpPutFormContentFilter</filter-class>
</filter>

<filter-mapping>
    <filter-name>httpPutFormFilter</filter-name>
    <servlet-name>dispatcherServlet</servlet-name>
</filter-mapping>

<servlet>
    <servlet-name>dispatcherServlet</servlet-name>
    <servlet-class>org.springframework.web.servlet.DispatcherServlet</servlet-class>
</servlet>
The above filter intercepts HTTP PUT and PATCH requests with content type application/x-www-form-urlencoded, reads the form data from the body of the request, and wraps the ServletRequest in order to make the form data available through the ServletRequest.getParameter*() family of methods.
|
Note |
|---|---|
As |
The @CookieValue annotation allows a method parameter to be bound to the value of an HTTP cookie.
Let us consider that the following cookie has been received with an http request:
JSESSIONID=415A4AC178C59DACE0B2C9CA727CDD84The following code sample demonstrates how to get the value of the JSESSIONID cookie:
@RequestMapping("/displayHeaderInfo.do")
public void displayHeaderInfo(@CookieValue("JSESSIONID") String cookie) {
    //...
}
Type conversion is applied automatically if the target method parameter type is not String. See the section called “Method Parameters And Type Conversion”.
This annotation is supported for annotated handler methods in Servlet and Portlet environments.
The @RequestHeader annotation allows a method parameter to be bound to a request header.
Here is a sample request header:
Host                    localhost:8080
Accept                  text/html,application/xhtml+xml,application/xml;q=0.9
Accept-Language         fr,en-gb;q=0.7,en;q=0.3
Accept-Encoding         gzip,deflate
Accept-Charset          ISO-8859-1,utf-8;q=0.7,*;q=0.7
Keep-Alive              300
The following code sample demonstrates how to get the value of the Accept-Encoding and Keep-Alive headers:
@RequestMapping("/displayHeaderInfo.do")
public void displayHeaderInfo(@RequestHeader("Accept-Encoding") String encoding,
        @RequestHeader("Keep-Alive") long keepAlive) {
    //...
}
Type conversion is applied automatically if the method parameter is not String. See the section called “Method Parameters And Type Conversion”.
When an @RequestHeader annotation is used on a Map<String, String>, MultiValueMap<String, String>, or HttpHeaders argument, the map is populated with all header values.
|
Tip |
|---|---|
Built-in support is available for converting a comma-separated string into an array/collection of strings or other types known to the type conversion system. For example a method parameter annotated with |
This annotation is supported for annotated handler methods in Servlet and Portlet environments.
String-based values extracted from the request including request parameters, path variables, request headers, and cookie values may need to be converted to the target type of the method parameter or field (e.g., binding a request parameter to a field in an @ModelAttribute parameter) they’re bound to. If the target type is not String, Spring automatically converts to the appropriate type. All simple types such as int, long, Date, etc. are supported. You can further customize the conversion process through a WebDataBinder (see the section called “Customizing WebDataBinder initialization”) or by registering Formatters with the FormattingConversionService (see Section 9.6, “Spring Field Formatting”).
To customize request parameter binding with PropertyEditors through Spring’s WebDataBinder, you can use @InitBinder-annotated methods within your controller, @InitBinder methods within an @ControllerAdvice class, or provide a custom WebBindingInitializer. See the the section called “Advising controllers with @ControllerAdvice and @RestControllerAdvice” section for more details.
Annotating controller methods with @InitBinder allows you to configure web data binding directly within your controller class. @InitBinder identifies methods that initialize the WebDataBinder that will be used to populate command and form object arguments of annotated handler methods.
Such init-binder methods support all arguments that @RequestMapping methods support, except for command/form objects and corresponding validation result objects. Init-binder methods must not have a return value. Thus, they are usually declared as void. Typical arguments include WebDataBinder in combination with WebRequest or java.util.Locale, allowing code to register context-specific editors.
The following example demonstrates the use of @InitBinder to configure a CustomDateEditor for all java.util.Date form properties.
@Controller
public class MyFormController {

    @InitBinder
    protected void initBinder(WebDataBinder binder) {
        SimpleDateFormat dateFormat = new SimpleDateFormat("yyyy-MM-dd");
        dateFormat.setLenient(false);
        binder.registerCustomEditor(Date.class, new CustomDateEditor(dateFormat, false));
    }

    // ...
}
Alternatively, as of Spring 4.2, consider using addCustomFormatter to specify Formatter implementations instead of PropertyEditor instances. This is particularly useful if you happen to have a Formatter-based setup in a shared FormattingConversionService as well, with the same approach to be reused for controller-specific tweaking of the binding rules.
@Controller
public class MyFormController {

    @InitBinder
    protected void initBinder(WebDataBinder binder) {
        binder.addCustomFormatter(new DateFormatter("yyyy-MM-dd"));
    }

    // ...
}To externalize data binding initialization, you can provide a custom implementation of the WebBindingInitializer interface, which you then enable by supplying a custom bean configuration for an AnnotationMethodHandlerAdapter, thus overriding the default configuration.
The following example from the PetClinic application shows a configuration using a custom implementation of the WebBindingInitializer interface, org.springframework.samples.petclinic.web.ClinicBindingInitializer, which configures PropertyEditors required by several of the PetClinic controllers.
<bean class="org.springframework.web.servlet.mvc.method.annotation.RequestMappingHandlerAdapter">
    <property name="cacheSeconds" value="0"/>
    <property name="webBindingInitializer">
        <bean class="org.springframework.samples.petclinic.web.ClinicBindingInitializer"/>
    </property>
</bean>
@InitBinder methods can also be defined in an @ControllerAdvice-annotated class in which case they apply to matching controllers. This provides an alternative to using a WebBindingInitializer. See the the section called “Advising controllers with @ControllerAdvice and @RestControllerAdvice” section for more details.
The @ControllerAdvice annotation is a component annotation allowing implementation classes to be auto-detected through classpath scanning. It is automatically enabled when using the MVC namespace or the MVC Java config.
Classes annotated with @ControllerAdvice can contain @ExceptionHandler, @InitBinder, and @ModelAttribute annotated methods, and these methods will apply to @RequestMapping methods across all controller hierarchies as opposed to the controller hierarchy within which they are declared.
@RestControllerAdvice is an alternative where @ExceptionHandler methods assume @ResponseBody semantics by default.
Both @ControllerAdvice and @RestControllerAdvice can target a subset of controllers:
// Target all Controllers annotated with @RestController
@ControllerAdvice(annotations = RestController.class)
public class AnnotationAdvice {}

// Target all Controllers within specific packages
@ControllerAdvice("org.example.controllers")
public class BasePackageAdvice {}

// Target all Controllers assignable to specific classes
@ControllerAdvice(assignableTypes = {ControllerInterface.class, AbstractController.class})
public class AssignableTypesAdvice {}
Check out the @ControllerAdvice documentation for more details.
It can sometimes be useful to filter contextually the object that will be serialized to the HTTP response body. In order to provide such capability, Spring MVC has built-in support for rendering with Jackson’s Serialization Views .
To use it with an @ResponseBody controller method or controller methods that return ResponseEntity, simply add the @JsonView annotation with a class argument specifying the view class or interface to be used:
@RestController
public class UserController {

    @GetMapping("/user")
    @JsonView(User.WithoutPasswordView.class)
    public User getUser() {
        return new User("eric", "7!jd#h23");
    }
}

public class User {

    public interface WithoutPasswordView {};
    public interface WithPasswordView extends WithoutPasswordView {};

    private String username;
    private String password;

    public User() {
    }

    public User(String username, String password) {
        this.username = username;
        this.password = password;
    }

    @JsonView(WithoutPasswordView.class)
    public String getUsername() {
        return this.username;
    }

    @JsonView(WithPasswordView.class)
    public String getPassword() {
        return this.password;
    }
} |
Note |
|---|---|
Note that despite |
For controllers relying on view resolution, simply add the serialization view class to the model:
@Controller
public class UserController extends AbstractController {

    @GetMapping("/user")
    public String getUser(Model model) {
        model.addAttribute("user", new User("eric", "7!jd#h23"));
        model.addAttribute(JsonView.class.getName(), User.WithoutPasswordView.class);
        return "userView";
    }
}In order to enable JSONP support for @ResponseBody and ResponseEntity methods, declare an @ControllerAdvice bean that extends AbstractJsonpResponseBodyAdvice as shown below where the constructor argument indicates the JSONP query parameter name(s):
@ControllerAdvice
public class JsonpAdvice extends AbstractJsonpResponseBodyAdvice {

    public JsonpAdvice() {
        super("callback");
    }
}
For controllers relying on view resolution, JSONP is automatically enabled when the request has a query parameter named jsonp or callback. Those names can be customized through jsonpParameterNames property.
|
Note |
|---|---|
As of Spring Framework 4.3.18, JSONP support is deprecated and will be removed as of Spring Framework 5.1, CORS should be used instead. |
Spring MVC 3.2 introduced Servlet 3 based asynchronous request processing. Instead of returning a value, as usual, a controller method can now return a java.util.concurrent.Callable and produce the return value from a Spring MVC managed thread. Meanwhile the main Servlet container thread is exited and released and allowed to process other requests. Spring MVC invokes the Callable in a separate thread with the help of a TaskExecutor and when the Callable returns, the request is dispatched back to the Servlet container to resume processing using the value returned by the Callable. Here is an example of such a controller method:
@PostMapping
public Callable<String> processUpload(final MultipartFile file) {

    return new Callable<String>() {
        public String call() throws Exception {
            // ...
            return "someView";
        }
    };

}
Another option is for the controller method to return an instance of DeferredResult. In this case the return value will also be produced from any thread, i.e. one that is not managed by Spring MVC. For example the result may be produced in response to some external event such as a JMS message, a scheduled task, and so on. Here is an example of such a controller method:
@RequestMapping("/quotes")
@ResponseBody
public DeferredResult<String> quotes() {
    DeferredResult<String> deferredResult = new DeferredResult<String>();
    // Save the deferredResult somewhere..
    return deferredResult;
}

// In some other thread...
deferredResult.setResult(data);
This may be difficult to understand without any knowledge of the Servlet 3.0 asynchronous request processing features. It would certainly help to read up on that. Here are a few basic facts about the underlying mechanism:
- A
ServletRequestcan be put in asynchronous mode by callingrequest.startAsync(). The main effect of doing so is that the Servlet, as well as any Filters, can exit but the response will remain open to allow processing to complete later. - The call to
request.startAsync()returnsAsyncContextwhich can be used for further control over async processing. For example it provides the methoddispatch, that is similar to a forward from the Servlet API except it allows an application to resume request processing on a Servlet container thread. - The
ServletRequestprovides access to the currentDispatcherTypethat can be used to distinguish between processing the initial request, an async dispatch, a forward, and other dispatcher types.
With the above in mind, the following is the sequence of events for async request processing with a Callable:
- Controller returns a
Callable. - Spring MVC starts asynchronous processing and submits the
Callableto aTaskExecutorfor processing in a separate thread. - The
DispatcherServletand all Filter’s exit the Servlet container thread but the response remains open. - The
Callableproduces a result and Spring MVC dispatches the request back to the Servlet container to resume processing. - The
DispatcherServletis invoked again and processing resumes with the asynchronously produced result from theCallable.
The sequence for DeferredResult is very similar except it’s up to the application to produce the asynchronous result from any thread:
- Controller returns a
DeferredResultand saves it in some in-memory queue or list where it can be accessed. - Spring MVC starts async processing.
- The
DispatcherServletand all configured Filter’s exit the request processing thread but the response remains open. - The application sets the
DeferredResultfrom some thread and Spring MVC dispatches the request back to the Servlet container. - The
DispatcherServletis invoked again and processing resumes with the asynchronously produced result.
For further background on the motivation for async request processing and when or why to use it please read this blog post series .
What happens if a Callable returned from a controller method raises an Exception while being executed? The short answer is the same as what happens when a controller method raises an exception. It goes through the regular exception handling mechanism. The longer explanation is that when a Callable raises an Exception Spring MVC dispatches to the Servlet container with the Exception as the result and that leads to resume request processing with the Exception instead of a controller method return value. When using a DeferredResult you have a choice whether to call setResult or setErrorResult with an Exception instance.
A HandlerInterceptor can also implement AsyncHandlerInterceptor in order to implement the afterConcurrentHandlingStarted callback, which is called instead of postHandle and afterCompletion when asynchronous processing starts.
A HandlerInterceptor can also register a CallableProcessingInterceptor or a DeferredResultProcessingInterceptor in order to integrate more deeply with the lifecycle of an asynchronous request and for example handle a timeout event. See the Javadoc of AsyncHandlerInterceptor for more details.
The DeferredResult type also provides methods such as onTimeout(Runnable) and onCompletion(Runnable). See the Javadoc of DeferredResult for more details.
When using a Callable you can wrap it with an instance of WebAsyncTask which also provides registration methods for timeout and completion.
A controller method can use DeferredResult and Callable to produce its return value asynchronously and that can be used to implement techniques such as long polling where the server can push an event to the client as soon as possible.
What if you wanted to push multiple events on a single HTTP response? This is a technique related to "Long Polling" that is known as "HTTP Streaming". Spring MVC makes this possible through the ResponseBodyEmitter return value type which can be used to send multiple Objects, instead of one as is normally the case with @ResponseBody, where each Object sent is written to the response with an HttpMessageConverter.
Here is an example of that:
@RequestMapping("/events")
public ResponseBodyEmitter handle() {
    ResponseBodyEmitter emitter = new ResponseBodyEmitter();
    // Save the emitter somewhere..
    return emitter;
}

// In some other thread
emitter.send("Hello once");

// and again later on
emitter.send("Hello again");

// and done at some point
emitter.complete();
Note that ResponseBodyEmitter can also be used as the body in a ResponseEntity in order to customize the status and headers of the response.
SseEmitter is a subclass of ResponseBodyEmitter providing support for Server-Sent Events . Server-sent events is a just another variation on the same "HTTP Streaming" technique except events pushed from the server are formatted according to the W3C Server-Sent Events specification.
Server-Sent Events can be used for their intended purpose, that is to push events from the server to clients. It is quite easy to do in Spring MVC and requires simply returning a value of type SseEmitter.
Note however that Internet Explorer does not support Server-Sent Events and that for more advanced web application messaging scenarios such as online games, collaboration, financial applicatinos, and others it’s better to consider Spring’s WebSocket support that includes SockJS-style WebSocket emulation falling back to a very wide range of browsers (including Internet Explorer) and also higher-level messaging patterns for interacting with clients through a publish-subscribe model within a more messaging-centric architecture. For further background on this see the following blog post .
ResponseBodyEmitter allows sending events by writing Objects to the response through an HttpMessageConverter. This is probably the most common case, for example when writing JSON data. However sometimes it is useful to bypass message conversion and write directly to the response OutputStream for example for a file download. This can be done with the help of the StreamingResponseBody return value type.
Here is an example of that:
@RequestMapping("/download")
public StreamingResponseBody handle() {
    return new StreamingResponseBody() {
        @Override
        public void writeTo(OutputStream outputStream) throws IOException {
            // write...
        }
    };
}
Note that StreamingResponseBody can also be used as the body in a ResponseEntity in order to customize the status and headers of the response.
For applications configured with a web.xml be sure to update to version 3.0:
<web-app xmlns="http://java.sun.com/xml/ns/javaee"
    xmlns:xsi="http://www.w3.org/2001/XMLSchema-instance"
            http://java.sun.com/xml/ns/javaee
            http://java.sun.com/xml/ns/javaee/web-app_3_0.xsd"
    version="3.0">

    ...

</web-app>
Asynchronous support must be enabled on the DispatcherServlet through the <async-supported>true</async-supported> sub-element in web.xml. Additionally any Filter that participates in asyncrequest processing must be configured to support the ASYNC dispatcher type. It should be safe to enable the ASYNC dispatcher type for all filters provided with the Spring Framework since they usually extend OncePerRequestFilter and that has runtime checks for whether the filter needs to be involved in async dispatches or not.
Below is some example web.xml configuration:
<web-app xmlns="http://java.sun.com/xml/ns/javaee"
    xmlns:xsi="http://www.w3.org/2001/XMLSchema-instance"
    xsi:schemaLocation="
            http://java.sun.com/xml/ns/javaee
            http://java.sun.com/xml/ns/javaee/web-app_3_0.xsd"
    version="3.0">

    <filter>
        <filter-name>Spring OpenEntityManagerInViewFilter</filter-name>
        <filter-class>org.springframework.~.OpenEntityManagerInViewFilter</filter-class>
        <async-supported>true</async-supported>
    </filter>

    <filter-mapping>
        <filter-name>Spring OpenEntityManagerInViewFilter</filter-name>
        <url-pattern>/*</url-pattern>
        <dispatcher>REQUEST</dispatcher>
        <dispatcher>ASYNC</dispatcher>
    </filter-mapping>

</web-app>
If using Servlet 3, Java based configuration for example via WebApplicationInitializer, you’ll also need to set the "asyncSupported" flag as well as the ASYNC dispatcher type just like with web.xml. To simplify all this configuration, consider extending AbstractDispatcherServletInitializer, or better AbstractAnnotationConfigDispatcherServletInitializer which automatically set those options and make it very easy to register Filter instances.
The MVC Java config and the MVC namespace provide options for configuring asynchronous request processing. WebMvcConfigurer has the method configureAsyncSupport while <mvc:annotation-driven> has an <async-support> sub-element.
Those allow you to configure the default timeout value to use for async requests, which if not set depends on the underlying Servlet container (e.g. 10 seconds on Tomcat). You can also configure an AsyncTaskExecutor to use for executing Callable instances returned from controller methods. It is highly recommended to configure this property since by default Spring MVC uses SimpleAsyncTaskExecutor. The MVC Java config and the MVC namespace also allow you to register CallableProcessingInterceptor and DeferredResultProcessingInterceptor instances.
If you need to override the default timeout value for a specific DeferredResult, you can do so by using the appropriate class constructor. Similarly, for a Callable, you can wrap it in a WebAsyncTask and use the appropriate class constructor to customize the timeout value. The class constructor of WebAsyncTask also allows providing an AsyncTaskExecutor.
The spring-test module offers first class support for testing annotated controllers. See Section 15.6, “Spring MVC Test Framework”.
In previous versions of Spring, users were required to define one or more HandlerMapping beans in the web application context to map incoming web requests to appropriate handlers. With the introduction of annotated controllers, you generally don’t need to do that because the RequestMappingHandlerMapping automatically looks for @RequestMapping annotations on all @Controller beans. However, do keep in mind that all HandlerMapping classes extending from AbstractHandlerMapping have the following properties that you can use to customize their behavior:
interceptorsList of interceptors to use.HandlerInterceptors are discussed in Section 22.4.1, “Intercepting requests with a HandlerInterceptor”.defaultHandlerDefault handler to use, when this handler mapping does not result in a matching handler.orderBased on the value of the order property (see theorg.springframework.core.Orderedinterface), Spring sorts all handler mappings available in the context and applies the first matching handler.alwaysUseFullPathIftrue, Spring uses the full path within the current Servlet context to find an appropriate handler. Iffalse(the default), the path within the current Servlet mapping is used. For example, if a Servlet is mapped using/testing/*and thealwaysUseFullPathproperty is set to true,/testing/viewPage.htmlis used, whereas if the property is set to false,/viewPage.htmlis used.urlDecodeDefaults totrue, as of Spring 2.5. If you prefer to compare encoded paths, set this flag tofalse. However, theHttpServletRequestalways exposes the Servlet path in decoded form. Be aware that the Servlet path will not match when compared with encoded paths.
The following example shows how to configure an interceptor:
<beans>
    <bean class="org.springframework.web.servlet.mvc.method.annotation.RequestMappingHandlerMapping">
        <property name="interceptors">
            <bean class="example.MyInterceptor"/>
        </property>
    </bean>
<beans>Spring’s handler mapping mechanism includes handler interceptors, which are useful when you want to apply specific functionality to certain requests, for example, checking for a principal.
Interceptors located in the handler mapping must implement HandlerInterceptor from the org.springframework.web.servlet package. This interface defines three methods: preHandle(..) is called before the actual handler is executed; postHandle(..) is called after the handler is executed; and afterCompletion(..) is called after the complete request has finished. These three methods should provide enough flexibility to do all kinds of preprocessing and postprocessing.
The preHandle(..) method returns a boolean value. You can use this method to break or continue the processing of the execution chain. When this method returns true, the handler execution chain will continue; when it returns false, the DispatcherServlet assumes the interceptor itself has taken care of requests (and, for example, rendered an appropriate view) and does not continue executing the other interceptors and the actual handler in the execution chain.
Interceptors can be configured using the interceptors property, which is present on all HandlerMapping classes extending from AbstractHandlerMapping. This is shown in the example below:
<beans>
    <bean id="handlerMapping"
            class="org.springframework.web.servlet.mvc.method.annotation.RequestMappingHandlerMapping">
        <property name="interceptors">
            <list>
                <ref bean="officeHoursInterceptor"/>
            </list>
        </property>
    </bean>

    <bean id="officeHoursInterceptor"
            class="samples.TimeBasedAccessInterceptor">
        <property name="openingTime" value="9"/>
        <property name="closingTime" value="18"