Web on Reactive Stack
This part of the documentation covers support for reactive-stack web applications built on a Reactive Streams API to run on non-blocking servers, such as Netty, Undertow, and Servlet 3.1+ containers. Individual chapters cover the Spring WebFlux framework, the reactive WebClient, support for testing, and reactive libraries. For Servlet-stack web applications, see Web on Servlet Stack.
1. Spring WebFlux
The original web framework included in the Spring Framework, Spring Web MVC, was purpose-built for the Servlet API and Servlet containers. The reactive-stack web framework, Spring WebFlux, was added later in version 5.0. It is fully non-blocking, supports Reactive Streams back pressure, and runs on such servers as Netty, Undertow, and Servlet 3.1+ containers.
Both web frameworks mirror the names of their source modules (spring-webmvc and spring-webflux ) and co-exist side by side in the Spring Framework. Each module is optional. Applications can use one or the other module or, in some cases, both — for example, Spring MVC controllers with the reactive WebClient.
1.1. Overview
Why was Spring WebFlux created?
Part of the answer is the need for a non-blocking web stack to handle concurrency with a small number of threads and scale with fewer hardware resources. Servlet 3.1 did provide an API for non-blocking I/O. However, using it leads away from the rest of the Servlet API, where contracts are synchronous (Filter, Servlet) or blocking (getParameter, getPart). This was the motivation for a new common API to serve as a foundation across any non-blocking runtime. That is important because of servers (such as Netty) that are well-established in the async, non-blocking space.
The other part of the answer is functional programming. Much as the addition of annotations in Java 5 created opportunities (such as annotated REST controllers or unit tests), the addition of lambda expressions in Java 8 created opportunities for functional APIs in Java. This is a boon for non-blocking applications and continuation-style APIs (as popularized by CompletableFuture and ReactiveX ) that allow declarative composition of asynchronous logic. At the programming-model level, Java 8 enabled Spring WebFlux to offer functional web endpoints alongside annotated controllers.
1.1.1. Define “Reactive”
We touched on “non-blocking” and “functional” but what does reactive mean?
The term, “reactive,” refers to programming models that are built around reacting to change — network components reacting to I/O events, UI controllers reacting to mouse events, and others. In that sense, non-blocking is reactive, because, instead of being blocked, we are now in the mode of reacting to notifications as operations complete or data becomes available.
There is also another important mechanism that we on the Spring team associate with “reactive” and that is non-blocking back pressure. In synchronous, imperative code, blocking calls serve as a natural form of back pressure that forces the caller to wait. In non-blocking code, it becomes important to control the rate of events so that a fast producer does not overwhelm its destination.
Reactive Streams is a small spec (also adopted in Java 9) that defines the interaction between asynchronous components with back pressure. For example a data repository (acting as Publisher ) can produce data that an HTTP server (acting as Subscriber ) can then write to the response. The main purpose of Reactive Streams is to let the subscriber to control how quickly or how slowly the publisher produces data.
| Common question: what if a publisher cannot slow down? The purpose of Reactive Streams is only to establish the mechanism and a boundary. If a publisher cannot slow down, it has to decide whether to buffer, drop, or fail. |
1.1.2. Reactive API
Reactive Streams plays an important role for interoperability. It is of interest to libraries and infrastructure components but less useful as an application API, because it is too low-level. Applications need a higher-level and richer, functional API to compose async logic — similar to the Java 8 Stream API but not only for collections. This is the role that reactive libraries play.
Reactor is the reactive library of choice for Spring WebFlux. It provides the Mono and Flux API types to work on data sequences of 0..1 (Mono) and 0..N (Flux) through a rich set of operators aligned with the ReactiveX vocabulary of operators . Reactor is a Reactive Streams library and, therefore, all of its operators support non-blocking back pressure. Reactor has a strong focus on server-side Java. It is developed in close collaboration with Spring.
WebFlux requires Reactor as a core dependency but it is interoperable with other reactive libraries via Reactive Streams. As a general rule, a WebFlux API accepts a plain Publisher as input, adapts it to a Reactor type internally, uses that, and returns either a Flux or a Mono as output. So, you can pass any Publisher as input and you can apply operations on the output, but you need to adapt the output for use with another reactive library. Whenever feasible (for example, annotated controllers), WebFlux adapts transparently to the use of RxJava or another reactive library. See Reactive Libraries for more details.
1.1.3. Programming Models
The spring-web module contains the reactive foundation that underlies Spring WebFlux, including HTTP abstractions, Reactive Streams adapters for supported servers, codecs, and a core WebHandler API comparable to the Servlet API but with non-blocking contracts.
On that foundation, Spring WebFlux provides a choice of two programming models:
Annotated Controllers: Consistent with Spring MVC and based on the same annotations from the
spring-webmodule. Both Spring MVC and WebFlux controllers support reactive (Reactor and RxJava) return types, and, as a result, it is not easy to tell them apart. One notable difference is that WebFlux also supports reactive@RequestBodyarguments.Functional Endpoints: Lambda-based, lightweight, and functional programming model. You can think of this as a small library or a set of utilities that an application can use to route and handle requests. The big difference with annotated controllers is that the application is in charge of request handling from start to finish versus declaring intent through annotations and being called back.
1.1.4. Applicability
Spring MVC or WebFlux?
A natural question to ask but one that sets up an unsound dichotomy. Actually, both work together to expand the range of available options. The two are designed for continuity and consistency with each other, they are available side by side, and feedback from each side benefits both sides. The following diagram shows how the two relate, what they have in common, and what each supports uniquely:
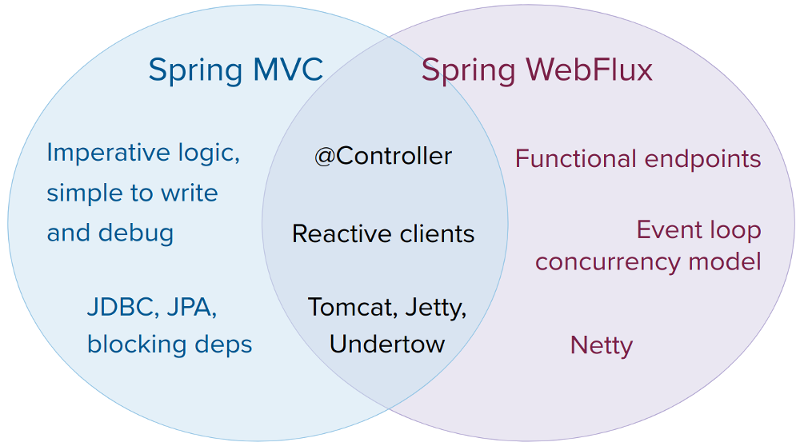
We suggest that you consider the following specific points:
If you have a Spring MVC application that works fine, there is no need to change. Imperative programming is the easiest way to write, understand, and debug code. You have maximum choice of libraries, since, historically, most are blocking.
If you are already shopping for a non-blocking web stack, Spring WebFlux offers the same execution model benefits as others in this space and also provides a choice of servers (Netty, Tomcat, Jetty, Undertow, and Servlet 3.1+ containers), a choice of programming models (annotated controllers and functional web endpoints), and a choice of reactive libraries (Reactor, RxJava, or other).
If you are interested in a lightweight, functional web framework for use with Java 8 lambdas or Kotlin, you can use the Spring WebFlux functional web endpoints. That can also be a good choice for smaller applications or microservices with less complex requirements that can benefit from greater transparency and control.
In a microservice architecture, you can have a mix of applications with either Spring MVC or Spring WebFlux controllers or with Spring WebFlux functional endpoints. Having support for the same annotation-based programming model in both frameworks makes it easier to re-use knowledge while also selecting the right tool for the right job.
A simple way to evaluate an application is to check its dependencies. If you have blocking persistence APIs (JPA, JDBC) or networking APIs to use, Spring MVC is the best choice for common architectures at least. It is technically feasible with both Reactor and RxJava to perform blocking calls on a separate thread but you would not be making the most of a non-blocking web stack.
If you have a Spring MVC application with calls to remote services, try the reactive
WebClient. You can return reactive types (Reactor, RxJava, or other) directly from Spring MVC controller methods. The greater the latency per call or the interdependency among calls, the more dramatic the benefits. Spring MVC controllers can call other reactive components too.If you have a large team, keep in mind the steep learning curve in the shift to non-blocking, functional, and declarative programming. A practical way to start without a full switch is to use the reactive
WebClient. Beyond that, start small and measure the benefits. We expect that, for a wide range of applications, the shift is unnecessary. If you are unsure what benefits to look for, start by learning about how non-blocking I/O works (for example, concurrency on single-threaded Node.js) and its effects.
1.1.5. Servers
Spring WebFlux is supported on Tomcat, Jetty, Servlet 3.1+ containers, as well as on non-Servlet runtimes such as Netty and Undertow. All servers are adapted to a low-level, common API so that higher-level programming models can be supported across servers.
Spring WebFlux does not have built-in support to start or stop a server. However, it is easy to assemble an application from Spring configuration and WebFlux infrastructure and run it with a few lines of code.
Spring Boot has a WebFlux starter that automates these steps. By default, the starter uses Netty, but it is easy to switch to Tomcat, Jetty, or Undertow by changing your Maven or Gradle dependencies. Spring Boot defaults to Netty, because it is more widely used in the asynchronous, non-blocking space and lets a client and a server share resources.
Tomcat and Jetty can be used with both Spring MVC and WebFlux. Keep in mind, however, that the way they are used is very different. Spring MVC relies on Servlet blocking I/O and lets applications use the Servlet API directly if they need to. Spring WebFlux relies on Servlet 3.1 non-blocking I/O and uses the Servlet API behind a low-level adapter and not exposed for direct use.
For Undertow, Spring WebFlux uses Undertow APIs directly without the Servlet API.
1.1.6. Performance
Performance has many characteristics and meanings. Reactive and non-blocking generally do not make applications run faster. They can, in some cases, (for example, if using the WebClient to execute remote calls in parallel). On the whole, it requires more work to do things the non-blocking way and that can increase slightly the required processing time.
The key expected benefit of reactive and non-blocking is the ability to scale with a small, fixed number of threads and less memory. That makes applications more resilient under load, because they scale in a more predictable way. In order to observe those benefits, however, you need to have some latency (including a mix of slow and unpredictable network I/O). That is where the reactive stack begins to show its strengths, and the differences can be dramatic.
1.1.7. Concurrency Model
Both Spring MVC and Spring WebFlux support annotated controllers, but there is a key difference in the concurrency model and the default assumptions for blocking and threads.
In Spring MVC (and servlet applications in general), it is assumed that applications can block the current thread, (for example, for remote calls), and, for this reason, servlet containers use a large thread pool to absorb potential blocking during request handling.
In Spring WebFlux (and non-blocking servers in general), it is assumed that applications do not block, and, therefore, non-blocking servers use a small, fixed-size thread pool (event loop workers) to handle requests.
| “To scale” and “small number of threads” may sound contradictory but to never block the current thread (and rely on callbacks instead) means that you do not need extra threads, as there are no blocking calls to absorb. |
Invoking a Blocking API
What if you do need to use a blocking library? Both Reactor and RxJava provide the publishOn operator to continue processing on a different thread. That means there is an easy escape hatch. Keep in mind, however, that blocking APIs are not a good fit for this concurrency model.
Mutable State
In Reactor and RxJava, you declare logic through operators, and, at runtime, a reactive pipeline is formed where data is processed sequentially, in distinct stages. A key benefit of this is that it frees applications from having to protect mutable state because application code within that pipeline is never invoked concurrently.
Threading Model
What threads should you expect to see on a server running with Spring WebFlux?
On a “vanilla” Spring WebFlux server (for example, no data access nor other optional dependencies), you can expect one thread for the server and several others for request processing (typically as many as the number of CPU cores). Servlet containers, however, may start with more threads (for example, 10 on Tomcat), in support of both servlet (blocking) I/O and servlet 3.1 (non-blocking) I/O usage.
The reactive
WebClientoperates in event loop style. So you can see a small, fixed number of processing threads related to that (for example,reactor-http-nio-with the Reactor Netty connector). However, if Reactor Netty is used for both client and server, the two share event loop resources by default.Reactor and RxJava provide thread pool abstractions, called Schedulers, to use with the
publishOnoperator that is used to switch processing to a different thread pool. The schedulers have names that suggest a specific concurrency strategy — for example, “parallel” (for CPU-bound work with a limited number of threads) or “elastic” (for I/O-bound work with a large number of threads). If you see such threads, it means some code is using a specific thread poolSchedulerstrategy.Data access libraries and other third party dependencies can also create and use threads of their own.
Configuring
The Spring Framework does not provide support for starting and stopping servers. To configure the threading model for a server, you need to use server-specific configuration APIs, or, if you use Spring Boot, check the Spring Boot configuration options for each server. You can configure The WebClient directly. For all other libraries, see their respective documentation.
1.2. Reactive Core
The spring-web module contains the following foundational support for reactive web applications:
For server request processing there are two levels of support.
HttpHandler: Basic contract for HTTP request handling with non-blocking I/O and Reactive Streams back pressure, along with adapters for Reactor Netty, Undertow, Tomcat, Jetty, and any Servlet 3.1+ container.
WebHandlerAPI: Slightly higher level, general-purpose web API for request handling, on top of which concrete programming models such as annotated controllers and functional endpoints are built.
For the client side, there is a basic
ClientHttpConnectorcontract to perform HTTP requests with non-blocking I/O and Reactive Streams back pressure, along with adapters for Reactor Netty and for the reactive Jetty HtpClient . The higher level WebClient used in applications builds on this basic contract.For client and server, codecs to use to serialize and deserialize HTTP request and response content.
1.2.1. HttpHandler
HttpHandler is a simple contract with a single method to handle a request and response. It is intentionally minimal, and its main, and only purpose is to be a minimal abstraction over different HTTP server APIs.
The following table describes the supported server APIs:
| Server name | Server API used | Reactive Streams support |
|---|---|---|
Netty |
Netty API |
|
Undertow |
Undertow API |
spring-web: Undertow to Reactive Streams bridge |
Tomcat |
Servlet 3.1 non-blocking I/O; Tomcat API to read and write ByteBuffers vs byte[] |
spring-web: Servlet 3.1 non-blocking I/O to Reactive Streams bridge |
Jetty |
Servlet 3.1 non-blocking I/O; Jetty API to write ByteBuffers vs byte[] |
spring-web: Servlet 3.1 non-blocking I/O to Reactive Streams bridge |
Servlet 3.1 container |
Servlet 3.1 non-blocking I/O |
spring-web: Servlet 3.1 non-blocking I/O to Reactive Streams bridge |
The following table describes server dependencies (also see supported versions ):
| Server name | Group id | Artifact name |
|---|---|---|
Reactor Netty |
io.projectreactor.netty |
reactor-netty |
Undertow |
io.undertow |
undertow-core |
Tomcat |
org.apache.tomcat.embed |
tomcat-embed-core |
Jetty |
org.eclipse.jetty |
jetty-server, jetty-servlet |
The code snippets below show using the HttpHandler adapters with each server API:
Reactor Netty
HttpHandler handler = ...
ReactorHttpHandlerAdapter adapter = new ReactorHttpHandlerAdapter(handler);
HttpServer.create(host, port).newHandler(adapter).block();
Undertow
HttpHandler handler = ...
UndertowHttpHandlerAdapter adapter = new UndertowHttpHandlerAdapter(handler);
Undertow server = Undertow.builder().addHttpListener(port, host).setHandler(adapter).build();
server.start();
Tomcat
HttpHandler handler = ...
Servlet servlet = new TomcatHttpHandlerAdapter(handler);

Tomcat server = new Tomcat();
File base = new File(System.getProperty("java.io.tmpdir"));
Context rootContext = server.addContext("", base.getAbsolutePath());
Tomcat.addServlet(rootContext, "main", servlet);
rootContext.addServletMappingDecoded("/", "main");
server.setHost(host);
server.setPort(port);
server.start();
Jetty
HttpHandler handler = ...
Servlet servlet = new JettyHttpHandlerAdapter(handler);

Server server = new Server();
ServletContextHandler contextHandler = new ServletContextHandler(server, "");
contextHandler.addServlet(new ServletHolder(servlet), "/");
contextHandler.start();

ServerConnector connector = new ServerConnector(server);
connector.setHost(host);
connector.setPort(port);
server.addConnector(connector);
server.start();
Servlet 3.1+ Container
To deploy as a WAR to any Servlet 3.1+ container, you can extend and include AbstractReactiveWebInitializer in the WAR. That class wraps an HttpHandler with ServletHttpHandlerAdapter and registers that as a Servlet.
1.2.2. WebHandler API
The org.springframework.web.server package builds on the HttpHandler contract to provide a general-purpose web API for processing requests through a chain of multiple WebExceptionHandler , multiple WebFilter , and a single WebHandler component. The chain can be put together with WebHttpHandlerBuilder by simply pointing to a Spring ApplicationContext where components are auto-detected, and/or by registering components with the builder.
While HttpHandler has a simple goal to abstract the use of different HTTP servers, the WebHandler API aims to provide a broader set of features commonly used in web applications such as:
User session with attributes.
Request attributes.
Resolved
LocaleorPrincipalfor the request.Access to parsed and cached form data.
Abstractions for multipart data.
and more..
Special bean types
The table below lists the components that WebHttpHandlerBuilder can auto-detect in a Spring ApplicationContext, or that can be registered directly with it:
| Bean name | Bean type | Count | Description |
|---|---|---|---|
<any> |
|
0..N |
Provide handling for exceptions from the chain of |
<any> |
|
0..N |
Apply interception style logic to before and after the rest of the filter chain and the target |
|
|
1 |
The handler for the request. |
|
|
0..1 |
The manager for |
|
|
0..1 |
For access to |
|
|
0..1 |
The resolver for |
|
|
0..1 |
For processing forwarded type headers, either by extracting and removing them or by removing them only. Not used by default. |
Form Data
ServerWebExchange exposes the following method for access to form data:
Mono<MultiValueMap<String, String>> getFormData();The DefaultServerWebExchange uses the configured HttpMessageReader to parse form data (application/x-www-form-urlencoded) into a MultiValueMap. By default, FormHttpMessageReader is configured for use by the ServerCodecConfigurer bean (see the Web Handler API).
Multipart Data
ServerWebExchange exposes the following method for access to multipart data:
Mono<MultiValueMap<String, Part>> getMultipartData();The DefaultServerWebExchange uses the configured HttpMessageReader<MultiValueMap<String, Part>> to parse multipart/form-data content into a MultiValueMap. At present, Synchronoss NIO Multipart is the only third-party library supported and the only library we know for non-blocking parsing of multipart requests. It is enabled through the ServerCodecConfigurer bean (see the Web Handler API).
To parse multipart data in streaming fashion, you can use the Flux<Part> returned from an HttpMessageReader<Part> instead. For example, in an annotated controller, use of @RequestPart implies Map-like access to individual parts by name and, hence, requires parsing multipart data in full. By contrast, you can use @RequestBody to decode the content to Flux<Part> without collecting to a MultiValueMap.
Forwarded Headers
As a request goes through proxies (such as load balancers), the host, port, and scheme may change, and that makes it a challenge, from a client perspective, to create links that point to the correct host, port, and scheme.
RFC 7239 defines the Forwarded HTTP header that proxies can use to provide information about the original request. There are other non-standard headers, too, including X-Forwarded-Host, X-Forwarded-Port, X-Forwarded-Proto, X-Forwarded-Ssl, and X-Forwarded-Prefix.
ForwardedHeaderTransformer is a component that modifies the host, port, and scheme of the request, based on forwarded headers, and then removes those headers. You can declare it as a bean with a name of forwardedHeaderTransformer, and it is detected and used.
There are security considerations for forwarded headers, since an application cannot know if the headers were added by a proxy, as intended, or by a malicious client. This is why a proxy at the boundary of trust should be configured to remove untrusted forwarded traffic coming from the outside. You can also configure the ForwardedHeaderTransformer with removeOnly=true, in which case it removes but does not use the headers.
In 5.1 ForwardedHeaderFilter was deprecated and superceded by ForwardedHeaderTransformer so forwarded headers can be processed earlier, before the exchange is created. If the filter is configured anyway, it is taken out of the list of filters, and ForwardedHeaderTransformer is used instead. |
1.2.3. Filters
In the WebHandler API, you can use a WebFilter to apply interception-style logic before and after the rest of the processing chain of filters and the target WebHandler. When using the WebFlux Config, registering a WebFilter is as simple as declaring it as a Spring bean and (optionally) expressing precedence by using @Order on the bean declaration or by implementing Ordered.
CORS
Spring WebFlux provides fine-grained support for CORS configuration through annotations on controllers. However, when you use it with Spring Security, we advise relying on the built-in CorsFilter, which must be ordered ahead of Spring Security’s chain of filters.
See the section on CORS and the CORS WebFilter for more details.
1.2.4. Exceptions
In the WebHandler API, you can use a WebExceptionHandler to handle exceptions from the chain of WebFilter instances and the target WebHandler. When using the WebFlux Config, registering a WebExceptionHandler is as simple as declaring it as a Spring bean and (optionally) expressing precedence by using @Order on the bean declaration or by implementing Ordered.
The following table describes the available WebExceptionHandler implementations:
| Exception Handler | Description |
|---|---|
|
Provides handling for exceptions of type |
|
Extension of This handler is declared in the WebFlux Config. |
1.2.5. Codecs
The spring-web and spring-core modules provide support for serializing and deserializing byte content to and from higher level objects through non-blocking I/O with Reactive Streams back pressure. The following describes this support:
EncoderandDecoderare low level contracts to encode and decode content independent of HTTP.HttpMessageReaderandHttpMessageWriterare contracts to encode and decode HTTP message content.An
Encodercan be wrapped withEncoderHttpMessageWriterto adapt it for use in a web application, while aDecodercan be wrapped withDecoderHttpMessageReader.DataBufferabstracts different byte buffer representations (e.g. NettyByteBuf,java.nio.ByteBuffer, etc.) and is what all codecs work on. See Data Buffers and Codecs in the "Spring Core" section for more on this topic.
The spring-core module provides byte[], ByteBuffer, DataBuffer, Resource, and String encoder and decoder implementations. The spring-web module provides Jackson JSON, Jackson Smile, JAXB2, Protocol Buffers and other encoders and decoders along with web-only HTTP message reader and writer implementations for form data, multipart content, server-sent events, and others.
ClientCodecConfigurer and ServerCodecConfigurer are typically used to configure and customize the codecs to use in an application. See the section on configuring HTTP message codecs.
Jackson JSON
JSON and binary JSON (Smile ) are both supported when the Jackson library is present.
The Jackson2Decoder works as follows:
Jackson’s asynchronous, non-blocking parser is used to aggregate a stream of byte chunks into
TokenBuffer's each representing a JSON object.Each
TokenBufferis passed to Jackson’sObjectMapperto create a higher level object.When decoding to a single-value publisher (e.g.
Mono), there is oneTokenBuffer.When decoding to a multi-value publisher (e.g.
Flux), eachTokenBufferis passed to theObjectMapperas soon as enough bytes are received for a fully formed object. The input content can be a JSON array, or line-delimited JSON if the content-type is "application/stream+json".
The Jackson2Encoder works as follows:
For a single value publisher (e.g.
Mono), simply serialize it through theObjectMapper.For a multi-value publisher with "application/json", by default collect the values with
Flux#collectToList()and then serialize the resulting collection.For a multi-value publisher with a streaming media type such as
application/stream+jsonorapplication/stream+x-jackson-smile, encode, write, and flush each value individually using a line-delimited JSON format.For SSE the
Jackson2Encoderis invoked per event and the output is flushed to ensure delivery without delay.
|
By default both |
Form Data
FormHttpMessageReader and FormHttpMessageWriter support decoding and encoding "application/x-www-form-urlencoded" content.
On the server side where form content often needs to be accessed from multiple places, ServerWebExchange provides a dedicated getFormData() method that parses the content through FormHttpMessageReader and then caches the result for repeated access. See Form Data in the WebHandler API section.
Once getFormData() is used, the original raw content can no longer be read from the request body. For this reason, applications are expected to go through ServerWebExchange consistently for access to the cached form data versus reading from the raw request body.
Multipart
MultipartHttpMessageReader and MultipartHttpMessageWriter support decoding and encoding "multipart/form-data" content. In turn MultipartHttpMessageReader delegates to another HttpMessageReader for the actual parsing to a Flux<Part> and then simply collects the parts into a MultiValueMap. At present the Synchronoss NIO Multipart is used for the actual parsing.
On the server side where multipart form content may need to be accessed from multiple places, ServerWebExchange provides a dedicated getMultipartData() method that parses the content through MultipartHttpMessageReader and then caches the result for repeated access. See Multipart Data in the WebHandler API section.
Once getMultipartData() is used, the original raw content can no longer be read from the request body. For this reason applications have to consistently use getMultipartData() for repeated, map-like access to parts, or otherwise rely on the SynchronossPartHttpMessageReader for a one-time access to Flux<Part>.
Streaming
When streaming to the HTTP response (for example, text/event-stream, application/stream+json), it is important to send data periodically, in order to reliably detect a disconnected client sooner rather than later. Such a send could be an comment-only, empty SSE event or any other "no-op" data that would effectively serve as a heartbeat.
DataBuffer
DataBuffer is the representation for a byte buffer in WebFlux. The Spring Core part of the reference has more on that in the section on Data Buffers and Codecs. The key point to understand is that on some servers like Netty, byte buffers are pooled and reference counted, and must be released when consumed to avoid memory leaks.
WebFlux applications generally do not need to be concerned with such issues, unless they consume or produce data buffers directly, as opposed to relying on codecs to convert to and from higher level objects. Or unless they choose to create custom codecs. For such cases please review the the information in Data Buffers and Codecs, especially the section on Using DataBuffer.
1.2.6. Logging
DEBUG level logging in Spring WebFlux is designed to be compact, minimal, and human-friendly. It focuses on high value bits of information that are useful over and over again vs others that are useful only when debugging a specific issue.
TRACE level logging generally follows the same principles as DEBUG (and for example also should not be a firehose) but can be used for debugging any issue. In addition some log messages may show a different level of detail at TRACE vs DEBUG.
Good logging comes from the experience of using the logs. If you spot anything that does not meet the stated goals, please let us know.
Log Id
In WebFlux, a single request can be executed over multiple threads and the thread ID is not useful for correlating log messages that belong to a specific request. This is why WebFlux log messages are prefixed with a request-specific ID by default.
On the server side, the log ID is stored in the ServerWebExchange attribute (LOG_ID_ATTRIBUTE ), while a fully formatted prefix based on that ID is available from ServerWebExchange#getLogPrefix(). On the WebClient side, the log ID is stored in the ClientRequest attribute (LOG_ID_ATTRIBUTE ) ,while a fully formatted prefix is available from ClientRequest#logPrefix().
Sensitive Data
DEBUG and TRACE logging can log sensitive information. This is why form parameters and headers are masked by default and you must explicitly enable their logging in full.
The followig example shows how to do so for server-side requests:
@Configuration
@EnableWebFlux
class MyConfig implements WebFluxConfigurer {

    @Override
    public void configureHttpMessageCodecs(ServerCodecConfigurer configurer) {
        configurer.defaultCodecs().enableLoggingRequestDetails(true);
    }
}
The following example shows how to do so for client-side requests:
Consumer<ClientCodecConfigurer> consumer = configurer ->
        configurer.defaultCodecs().enableLoggingRequestDetails(true);

WebClient webClient = WebClient.builder()
        .exchangeStrategies(ExchangeStrategies.builder().codecs(consumer).build())
        .build();
1.3. DispatcherHandler
Spring WebFlux, similarly to Spring MVC, is designed around the front controller pattern, where a central WebHandler, the DispatcherHandler, provides a shared algorithm for request processing, while actual work is performed by configurable, delegate components. This model is flexible and supports diverse workflows.
DispatcherHandler discovers the delegate components it needs from Spring configuration. It is also designed to be a Spring bean itself and implements ApplicationContextAware for access to the context in which it runs. If DispatcherHandler is declared with a bean name of webHandler, it is, in turn, discovered by WebHttpHandlerBuilder , which puts together a request-processing chain, as described in WebHandler API.
Spring configuration in a WebFlux application typically contains:
DispatcherHandlerwith the bean name,webHandlerWebFilterandWebExceptionHandlerbeansOthers
The configuration is given to WebHttpHandlerBuilder to build the processing chain, as the following example shows:
ApplicationContext context = ...
HttpHandler handler = WebHttpHandlerBuilder.applicationContext(context);
The resulting HttpHandler is ready for use with a server adapter.
1.3.1. Special Bean Types
The DispatcherHandler delegates to special beans to process requests and render the appropriate responses. By “special beans,” we mean Spring-managed Object instances that implement WebFlux framework contracts. Those usually come with built-in contracts, but you can customize their properties, extend them, or replace them.
The following table lists the special beans detected by the DispatcherHandler. Note that there are also some other beans detected at a lower level (see Special bean types in the Web Handler API).
| Bean type | Explanation |
|---|---|
|
Map a request to a handler. The mapping is based on some criteria, the details of which vary by The main |
|
Help the |
|
Process the result from the handler invocation and finalize the response. See Result Handling. |
1.3.2. WebFlux Config
Applications can declare the infrastructure beans (listed under Web Handler API and DispatcherHandler) that are required to process requests. However, in most cases, the WebFlux Config is the best starting point. It declares the required beans and provides a higher-level configuration callback API to customize it.
| Spring Boot relies on the WebFlux config to configure Spring WebFlux and also provides many extra convenient options. |
1.3.3. Processing
DispatcherHandler processes requests as follows:
Each
HandlerMappingis asked to find a matching handler, and the first match is used.If a handler is found, it is executed through an appropriate
HandlerAdapter, which exposes the return value from the execution asHandlerResult.The
HandlerResultis given to an appropriateHandlerResultHandlerto complete processing by writing to the response directly or by using a view to render.
1.3.4. Result Handling
The return value from the invocation of a handler, through a HandlerAdapter, is wrapped as a HandlerResult, along with some additional context, and passed to the first HandlerResultHandler that claims support for it. The following table shows the available HandlerResultHandler implementations, all of which are declared in the WebFlux Config:
| Result Handler Type | Return Values | Default Order |
|---|---|---|
|
|
0 |
|
|
0 |
|
Handle return values from |
100 |
|
See also View Resolution. |
|
1.3.5. Exceptions
The HandlerResult returned from a HandlerAdapter can expose a function for error handling based on some handler-specific mechanism. This error function is called if:
The handler (for example,
@Controller) invocation fails.The handling of the handler return value through a
HandlerResultHandlerfails.
The error function can change the response (for example, to an error status), as long as an error signal occurs before the reactive type returned from the handler produces any data items.
This is how @ExceptionHandler methods in @Controller classes are supported. By contrast, support for the same in Spring MVC is built on a HandlerExceptionResolver. This generally should not matter. However, keep in mind that, in WebFlux, you cannot use a @ControllerAdvice to handle exceptions that occur before a handler is chosen.
See also Managing Exceptions in the “Annotated Controller” section or Exceptions in the WebHandler API section.
1.3.6. View Resolution
View resolution enables rendering to a browser with an HTML template and a model without tying you to a specific view technology. In Spring WebFlux, view resolution is supported through a dedicated HandlerResultHandler that uses ViewResolver instances to map a String (representing a logical view name) to a View instance. The View is then used to render the response.
Handling
The HandlerResult passed into ViewResolutionResultHandler contains the return value from the handler and the model that contains attributes added during request handling. The return value is processed as one of the following:
String,CharSequence: A logical view name to be resolved to aViewthrough the list of configuredViewResolverimplementations.void: Select a default view name based on the request path, minus the leading and trailing slash, and resolve it to aView. The same also happens when a view name was not provided (for example, model attribute was returned) or an async return value (for example,Monocompleted empty).Rendering : API for view resolution scenarios. Explore the options in your IDE with code completion.
Model,Map: Extra model attributes to be added to the model for the request.Any other: Any other return value (except for simple types, as determined by BeanUtils#isSimpleProperty ) is treated as a model attribute to be added to the model. The attribute name is derived from the class name by using conventions , unless a handler method
@ModelAttributeannotation is present.
The model can contain asynchronous, reactive types (for example, from Reactor or RxJava). Prior to rendering, AbstractView resolves such model attributes into concrete values and updates the model. Single-value reactive types are resolved to a single value or no value (if empty), while multi-value reactive types (for example, Flux<T>) are collected and resolved to List<T>.
To configure view resolution is as simple as adding a ViewResolutionResultHandler bean to your Spring configuration. WebFlux Config provides a dedicated configuration API for view resolution.
See View Technologies for more on the view technologies integrated with Spring WebFlux.
Redirecting
The special redirect: prefix in a view name lets you perform a redirect. The UrlBasedViewResolver (and sub-classes) recognize this as an instruction that a redirect is needed. The rest of the view name is the redirect URL.
The net effect is the same as if the controller had returned a RedirectView or Rendering.redirectTo("abc").build(), but now the controller itself can operate in terms of logical view names. A view name such as redirect:/some/resource is relative to the current application, while a view name such as redirect:http://example.com/arbitrary/path redirects to an absolute URL.
Content Negotiation
ViewResolutionResultHandler supports content negotiation. It compares the request media types with the media types supported by each selected View. The first View that supports the requested media type(s) is used.
In order to support media types such as JSON and XML, Spring WebFlux provides HttpMessageWriterView, which is a special View that renders through an HttpMessageWriter. Typically, you would configure these as default views through the WebFlux Configuration. Default views are always selected and used if they match the requested media type.
1.4. Annotated Controllers
Spring WebFlux provides an annotation-based programming model, where @Controller and @RestController components use annotations to express request mappings, request input, handle exceptions, and more. Annotated controllers have flexible method signatures and do not have to extend base classes nor implement specific interfaces.
The following listing shows a basic example:
@RestController
public class HelloController {

    @GetMapping("/hello")
    public String handle() {
        return "Hello WebFlux";
    }
}
In the preceding example, the method returns a String to be written to the response body.
1.4.1. @Controller
You can define controller beans by using a standard Spring bean definition. The @Controller stereotype allows for auto-detection and is aligned with Spring general support for detecting @Component classes in the classpath and auto-registering bean definitions for them. It also acts as a stereotype for the annotated class, indicating its role as a web component.
To enable auto-detection of such @Controller beans, you can add component scanning to your Java configuration, as the following example shows:
@Configuration
@ComponentScan("org.example.web") (1)
public class WebConfig {

    // ...
}| 1 | Scan the org.example.web package. |
@RestController is a composed annotation that is itself meta-annotated with @Controller and @ResponseBody, indicating a controller whose every method inherits the type-level @ResponseBody annotation and, therefore, writes directly to the response body versus view resolution and rendering with an HTML template.
1.4.2. Request Mapping
The @RequestMapping annotation is used to map requests to controllers methods. It has various attributes to match by URL, HTTP method, request parameters, headers, and media types. You can use it at the class level to express shared mappings or at the method level to narrow down to a specific endpoint mapping.
There are also HTTP method specific shortcut variants of @RequestMapping:
@GetMapping@PostMapping@PutMapping@DeleteMapping@PatchMapping
The preceding annotations are Custom Annotations that are provided because, arguably, most controller methods should be mapped to a specific HTTP method versus using @RequestMapping, which, by default, matches to all HTTP methods. At the same time, a @RequestMapping is still needed at the class level to express shared mappings.
The following example uses type and method level mappings:
@RestController
@RequestMapping("/persons")
class PersonController {

    @GetMapping("/{id}")
    public Person getPerson(@PathVariable Long id) {
        // ...
    }

    @PostMapping
    @ResponseStatus(HttpStatus.CREATED)
    public void add(@RequestBody Person person) {
        // ...
    }
}
URI Patterns
You can map requests by using glob patterns and wildcards:
?matches one character*matches zero or more characters within a path segment**match zero or more path segments
You can also declare URI variables and access their values with @PathVariable, as the following example shows:
@GetMapping("/owners/{ownerId}/pets/{petId}")
public Pet findPet(@PathVariable Long ownerId, @PathVariable Long petId) {
    // ...
}
You can declare URI variables at the class and method levels, as the following example shows:
@Controller
@RequestMapping("/owners/{ownerId}") (1)
public class OwnerController {

    @GetMapping("/pets/{petId}") (2)
    public Pet findPet(@PathVariable Long ownerId, @PathVariable Long petId) {
        // ...
    }
}| 1 | Class-level URI mapping. |
| 2 | Method-level URI mapping. |
URI variables are automatically converted to the appropriate type or a TypeMismatchException is raised. Simple types (int, long, Date, and so on) are supported by default and you can register support for any other data type. See Type Conversion and DataBinder.
URI variables can be named explicitly (for example, @PathVariable("customId")), but you can leave that detail out if the names are the same and you compile your code with debugging information or with the -parameters compiler flag on Java 8.
The syntax {*varName} declares a URI variable that matches zero or more remaining path segments. For example /resources/{*path} matches all files /resources/ and the "path" variable captures the complete relative path.
The syntax {varName:regex} declares a URI variable with a regular expression that has the syntax: {varName:regex}. For example, given a URL of /spring-web-3.0.5 .jar, the following method extracts the name, version, and file extension:
@GetMapping("/{name:[a-z-]+}-{version:\\d\\.\\d\\.\\d}{ext:\\.[a-z]+}")
public void handle(@PathVariable String version, @PathVariable String ext) {
    // ...
}
URI path patterns can also have embedded ${…} placeholders that are resolved on startup through PropertyPlaceHolderConfigurer against local, system, environment, and other property sources. You ca use this to, for example, parameterize a base URL based on some external configuration.
Spring WebFlux uses PathPattern and the PathPatternParser for URI path matching support. Both classes are located in spring-web and are expressly designed for use with HTTP URL paths in web applications where a large number of URI path patterns are matched at runtime. |
Spring WebFlux does not support suffix pattern matching — unlike Spring MVC, where a mapping such as /person also matches to /person.*. For URL-based content negotiation, if needed, we recommend using a query parameter, which is simpler, more explicit, and less vulnerable to URL path based exploits.
Pattern Comparison
When multiple patterns match a URL, they must be compared to find the best match. This is done with PathPattern.SPECIFICITY_COMPARATOR, which looks for patterns that are more specific.
For every pattern, a score is computed, based on the number of URI variables and wildcards, where a URI variable scores lower than a wildcard. A pattern with a lower total score wins. If two patterns have the same score, the longer is chosen.
Catch-all patterns (for example, **, {*varName}) are excluded from the scoring and are always sorted last instead. If two patterns are both catch-all, the longer is chosen.
Consumable Media Types
You can narrow the request mapping based on the Content-Type of the request, as the following example shows:
@PostMapping(path = "/pets", consumes = "application/json")
public void addPet(@RequestBody Pet pet) {
    // ...
}
The consumes attribute also supports negation expressions — for example, !text/plain means any content type other than text/plain.
You can declare a shared consumes attribute at the class level. Unlike most other request mapping attributes, however, when used at the class level, a method-level consumes attribute overrides rather than extends the class-level declaration.
MediaType provides constants for commonly used media types — for example, APPLICATION_JSON_VALUE and APPLICATION_XML_VALUE. |
Producible Media Types
You can narrow the request mapping based on the Accept request header and the list of content types that a controller method produces, as the following example shows:
@GetMapping(path = "/pets/{petId}", produces = "application/json;charset=UTF-8")
@ResponseBody
public Pet getPet(@PathVariable String petId) {
    // ...
}
The media type can specify a character set. Negated expressions are supported — for example, !text/plain means any content type other than text/plain.
For JSON content type, you should specify the UTF-8 charset even if RFC7159 clearly states that “no charset parameter is defined for this registration,” because some browsers require it to correctly interpret UTF-8 special characters. |
You can declare a shared produces attribute at the class level. Unlike most other request mapping attributes, however, when used at the class level, a method-level produces attribute overrides rather than extend the class level declaration.
MediaType provides constants for commonly used media types — e.g. APPLICATION_JSON_UTF8_VALUE, APPLICATION_XML_VALUE. |
Parameters and Headers
You can narrow request mappings based on query parameter conditions. You can test for the presence of a query parameter (myParam), for its absence (!myParam), or for a specific value (myParam=myValue). The following examples tests for a parameter with a value:
@GetMapping(path = "/pets/{petId}", params = "myParam=myValue") (1)
public void findPet(@PathVariable String petId) {
    // ...
}| 1 | Check that myParam equals myValue. |
You can also use the same with request header conditions, as the follwing example shows:
@GetMapping(path = "/pets", headers = "myHeader=myValue") (1)
public void findPet(@PathVariable String petId) {
    // ...
}| 1 | Check that myHeader equals myValue. |
HTTP HEAD, OPTIONS
@GetMapping and @RequestMapping(method=HttpMethod.GET) support HTTP HEAD transparently for request mapping purposes. Controller methods need not change. A response wrapper, applied in the HttpHandler server adapter, ensures a Content-Length header is set to the number of bytes written without actually writing to the response.
By default, HTTP OPTIONS is handled by setting the Allow response header to the list of HTTP methods listed in all @RequestMapping methods with matching URL patterns.
For a @RequestMapping without HTTP method declarations, the Allow header is set to GET,HEAD,POST,PUT,PATCH,DELETE,OPTIONS. Controller methods should always declare the supported HTTP methods (for example, by using the HTTP method specific variants — @GetMapping, @PostMapping, and others).
You can explicitly map a @RequestMapping method to HTTP HEAD and HTTP OPTIONS, but that is not necessary in the common case.
Custom Annotations
Spring WebFlux supports the use of composed annotations for request mapping. Those are annotations that are themselves meta-annotated with @RequestMapping and composed to redeclare a subset (or all) of the @RequestMapping attributes with a narrower, more specific purpose.
@GetMapping, @PostMapping, @PutMapping, @DeleteMapping, and @PatchMapping are examples of composed annotations. They are provided, because, arguably, most controller methods should be mapped to a specific HTTP method versus using @RequestMapping, which, by default, matches to all HTTP methods. If you need an example of composed annotations, look at how those are declared.
Spring WebFlux also supports custom request mapping attributes with custom request matching logic. This is a more advanced option that requires sub-classing RequestMappingHandlerMapping and overriding the getCustomMethodCondition method, where you can check the custom attribute and return your own RequestCondition.
Explicit Registrations
You can programmatically register Handler methods, which can be used for dynamic registrations or for advanced cases, such as different instances of the same handler under different URLs. The following example shows how to do so:
@Configuration
public class MyConfig {

    @Autowired
    public void setHandlerMapping(RequestMappingHandlerMapping mapping, UserHandler handler) (1)
            throws NoSuchMethodException {

        RequestMappingInfo info = RequestMappingInfo
                .paths("/user/{id}").methods(RequestMethod.GET).build(); (2)

        Method method = UserHandler.class.getMethod("getUser", Long.class); (3)

        mapping.registerMapping(info, handler, method); (4)
    }

}| 1 | Inject target handlers and the handler mapping for controllers. |
| 2 | Prepare the request mapping metadata. |
| 3 | Get the handler method. |
| 4 | Add the registration. |
1.4.3. Handler Methods
@RequestMapping handler methods have a flexible signature and can choose from a range of supported controller method arguments and return values.
Method Arguments
The following table shows the supported controller method arguments.
Reactive types (Reactor, RxJava, or other) are supported on arguments that require blocking I/O (for example, reading the request body) to be resolved. This is marked in the Description column. Reactive types are not expected on arguments that do not require blocking.
JDK 1.8’s java.util.Optional is supported as a method argument in combination with annotations that have a required attribute (for example, @RequestParam, @RequestHeader, and others) and is equivalent to required=false.
| Controller method argument | Description |
|---|---|
|
Access to the full |
|
Access to the HTTP request or response. |
|
Access to the session. This does not force the start of a new session unless attributes are added. Supports reactive types. |
|
The currently authenticated user — possibly a specific |
|
The HTTP method of the request. |
|
The current request locale, determined by the most specific |
|
The time zone associated with the current request, as determined by a |
|
For access to URI template variables. See URI Patterns. |
|
For access to name-value pairs in URI path segments. See Matrix Variables. |
|
For access to Servlet request parameters. Parameter values are converted to the declared method argument type. See Note that use of |
|
For access to request headers. Header values are converted to the declared method argument type. See |
|
For access to cookies. Cookie values are converted to the declared method argument type. See |
|
For access to the HTTP request body. Body content is converted to the declared method argument type by using |
|
For access to request headers and body. The body is converted with |
|
For access to a part in a |
|
For access to the model that is used in HTML controllers and is exposed to templates as part of view rendering. |
|
For access to an existing attribute in the model (instantiated if not present) with data binding and validation applied. See Note that use of |
|
For access to errors from validation and data binding for a command object (that is, a |
|
For marking form processing complete, which triggers cleanup of session attributes declared through a class-level |
|
For preparing a URL relative to the current request’s host, port, scheme, and path. See URI Links. |
|
For access to any session attribute — in contrast to model attributes stored in the session as a result of a class-level |
|
For access to request attributes. See |
Any other argument |
If a method argument is not matched to any of the above, it is, by default, resolved as a |
Return Values
The following table shows the supported controller method return values. Note that reactive types from libraries such as Reactor, RxJava, or other are generally supported for all return values.
| Controller method return value | Description |
|---|---|
|
The return value is encoded through |
|
The return value specifies the full response, including HTTP headers, and the body is encoded through |
|
For returning a response with headers and no body. |
|
A view name to be resolved with |
|
A |
|
Attributes to be added to the implicit model, with the view name implicitly determined based on the request path. |
|
An attribute to be added to the model, with the view name implicitly determined based on the request path. Note that |
|
An API for model and view rendering scenarios. |
|
A method with a If none of the above is true, a |
|
Emit server-sent events. The |
Any other return value |
If a return value is not matched to any of the above, it is, by default, treated as a view name, if it is |
Type Conversion
Some annotated controller method arguments that represent String-based request input (for example, @RequestParam, @RequestHeader, @PathVariable, @MatrixVariable, and @CookieValue) can require type conversion if the argument is declared as something other than String.
For such cases, type conversion is automatically applied based on the configured converters. By default, simple types (such as int, long, Date, and others) are supported. Type conversion can be customized through a WebDataBinder (see [mvc-ann-initbinder]) or by registering Formatters with the FormattingConversionService (see Spring Field Formatting).
Matrix Variables
RFC 3986 discusses name-value pairs in path segments. In Spring WebFlux, we refer to those as “matrix variables” based on an “old post” by Tim Berners-Lee, but they can be also be referred to as URI path parameters.
Matrix variables can appear in any path segment, with each variable separated by a semicolon and multiple values separated by commas — for example, "/cars;color=red,green;year=2012". Multiple values can also be specified through repeated variable names — for example, "color=red;color=green;color=blue".
Unlike Spring MVC, in WebFlux, the presence or absence of matrix variables in a URL does not affect request mappings. In other words, you are not required to use a URI variable to mask variable content. That said, if you want to access matrix variables from a controller method, you need to add a URI variable to the path segment where matrix variables are expected. The following example shows how to do so:
// GET /pets/42;q=11;r=22

@GetMapping("/pets/{petId}")
public void findPet(@PathVariable String petId, @MatrixVariable int q) {

    // petId == 42
    // q == 11
}
Given that all path segments can contain matrix variables, you may sometimes need to disambiguate which path variable the matrix variable is expected to be in, as the following example shows:
// GET /owners/42;q=11/pets/21;q=22

@GetMapping("/owners/{ownerId}/pets/{petId}")
public void findPet(
        @MatrixVariable(name="q", pathVar="ownerId") int q1,
        @MatrixVariable(name="q", pathVar="petId") int q2) {

    // q1 == 11
    // q2 == 22
}
You can define a matrix variable may be defined as optional and specify a default value as the following example shows:
// GET /pets/42

@GetMapping("/pets/{petId}")
public void findPet(@MatrixVariable(required=false, defaultValue="1") int q) {

    // q == 1
}
To get all matrix variables, use a MultiValueMap, as the following example shows:
// GET /owners/42;q=11;r=12/pets/21;q=22;s=23

@GetMapping("/owners/{ownerId}/pets/{petId}")
public void findPet(
        @MatrixVariable MultiValueMap<String, String> matrixVars,
        @MatrixVariable(pathVar="petId"") MultiValueMap<String, String> petMatrixVars) {

    // matrixVars: ["q" : [11,22], "r" : 12, "s" : 23]
    // petMatrixVars: ["q" : 22, "s" : 23]
}
@RequestParam
You can use the @RequestParam annotation to bind query parameters to a method argument in a controller. The following code snippet shows the usage:
@Controller
@RequestMapping("/pets")
public class EditPetForm {

    // ...

    @GetMapping
    public String setupForm(@RequestParam("petId") int petId, Model model) { (1)
        Pet pet = this.clinic.loadPet(petId);
        model.addAttribute("pet", pet);
        return "petForm";
    }

    // ...

}| 1 | Using @RequestParam. |
The Servlet API “request parameter” concept conflates query parameters, form data, and multiparts into one. However, in WebFlux, each is accessed individually through ServerWebExchange. While @RequestParam binds to query parameters only, you can use data binding to apply query parameters, form data, and multiparts to a command object. |
Method parameters that use the @RequestParam annotation are required by default, but you can specify that a method parameter is optional by setting the required flag of a @RequestParam to false or by declaring the argument with a java.util.Optional wrapper.
Type conversion is applied automatically if the target method parameter type is not String. See [mvc-ann-typeconversion].
When a @RequestParam annotation is declared on a Map<String, String> or MultiValueMap<String, String> argument, the map is populated with all query parameters.
Note that use of @RequestParam is optional — for example, to set its attributes. By default, any argument that is a simple value type (as determined by BeanUtils#isSimpleProperty ) and is not resolved by any other argument resolver is treated as if it were annotated with @RequestParam.
@RequestHeader
You can use the @RequestHeader annotation to bind a request header to a method argument in a controller.
The following example shows a request with headers:
Host                    localhost:8080
Accept                  text/html,application/xhtml+xml,application/xml;q=0.9
Accept-Language         fr,en-gb;q=0.7,en;q=0.3
Accept-Encoding         gzip,deflate
Accept-Charset          ISO-8859-1,utf-8;q=0.7,*;q=0.7
Keep-Alive              300
The following example gets the value of the Accept-Encoding and Keep-Alive headers:
@GetMapping("/demo")
public void handle(
        @RequestHeader("Accept-Encoding") String encoding, (1)
        @RequestHeader("Keep-Alive") long keepAlive) { (2)
    //...
}| 1 | Get the value of the Accept-Encoging header. |
| 2 | Get the value of the Keep-Alive header. |
Type conversion is applied automatically if the target method parameter type is not String. See [mvc-ann-typeconversion].
When a @RequestHeader annotation is used on a Map<String, String>, MultiValueMap<String, String>, or HttpHeaders argument, the map is populated with all header values.
Built-in support is available for converting a comma-separated string into an array or collection of strings or other types known to the type conversion system. For example, a method parameter annotated with @RequestHeader("Accept") may be of type String but also of String[] or List<String>. |
@CookieValue
You can use the @CookieValue annotation to bind the value of an HTTP cookie to a method argument in a controller.
The following example shows a request with a cookie:
JSESSIONID=415A4AC178C59DACE0B2C9CA727CDD84The following code sample demonstrates how to get the cookie value:
@GetMapping("/demo")
public void handle(@CookieValue("JSESSIONID") String cookie) { (1)
    //...
}| 1 | Get the cookie value. |
Type conversion is applied automatically if the target method parameter type is not String. See [mvc-ann-typeconversion].
@ModelAttribute
You can use the @ModelAttribute annotation on a method argument to access an attribute from the model or have it instantiated if not present. The model attribute is also overlain with the values of query parameters and form fields whose names match to field names. This is referred to as data binding, and it saves you from having to deal with parsing and converting individual query parameters and form fields. The following example binds an instance of Pet:
@PostMapping("/owners/{ownerId}/pets/{petId}/edit")
public String processSubmit(@ModelAttribute Pet pet) { } (1)| 1 | Bind an instance of Pet. |
The Pet instance in the preceding example is resolved as follows:
From the model if already added through
Model.From the HTTP session through
@SessionAttributes.From the invocation of a default constructor.
From the invocation of a “primary constructor” with arguments that match query parameters or form fields. Argument names are determined through JavaBeans
@ConstructorPropertiesor through runtime-retained parameter names in the bytecode.
After the model attribute instance is obtained, data binding is applied. The WebExchangeDataBinder class matches names of query parameters and form fields to field names on the target Object. Matching fields are populated after type conversion is applied where necessary. For more on data binding (and validation), see Validation. For more on customizing data binding, see DataBinder.
Data binding can result in errors. By default, a WebExchangeBindException is raised, but, to check for such errors in the controller method, you can add a BindingResult argument immediately next to the @ModelAttribute, as the following example shows:
@PostMapping("/owners/{ownerId}/pets/{petId}/edit")
public String processSubmit(@ModelAttribute("pet") Pet pet, BindingResult result) { (1)
    if (result.hasErrors()) {
        return "petForm";
    }
    // ...
}| 1 | Adding a BindingResult. |
You can automatically apply validation after data binding by adding the javax.validation.Valid annotation or Spring’s @Validated annotation (see also Bean validation and Spring validation). The following example uses the @Valid annotation:
@PostMapping("/owners/{ownerId}/pets/{petId}/edit")
public String processSubmit(@Valid @ModelAttribute("pet") Pet pet, BindingResult result) { (1)
    if (result.hasErrors()) {
        return "petForm";
    }
    // ...
}| 1 | Using @Valid on a model attribute argument. |
Spring WebFlux, unlike Spring MVC, supports reactive types in the model — for example, Mono<Account> or io.reactivex.Single<Account>. You can declare a @ModelAttribute argument with or without a reactive type wrapper, and it will be resolved accordingly, to the actual value if necessary. However, note that, to use a BindingResult argument, you must declare the @ModelAttribute argument before it without a reactive type wrapper, as shown earlier. Alternatively, you can handle any errors through the reactive type, as the following example shows:
@PostMapping("/owners/{ownerId}/pets/{petId}/edit")
public Mono<String> processSubmit(@Valid @ModelAttribute("pet") Mono<Pet> petMono) {
    return petMono
        .flatMap(pet -> {
            // ...
        })
        .onErrorResume(ex -> {
            // ...
        });
}
Note that use of @ModelAttribute is optional — for example, to set its attributes. By default, any argument that is not a simple value type( as determined by BeanUtils#isSimpleProperty ) and is not resolved by any other argument resolver is treated as if it were annotated with @ModelAttribute.
@SessionAttributes
@SessionAttributes is used to store model attributes in the WebSession between requests. It is a type-level annotation that declares session attributes used by a specific controller. This typically lists the names of model attributes or types of model attributes that should be transparently stored in the session for subsequent requests to access.
Consider the following example:
@Controller
@SessionAttributes("pet") (1)
public class EditPetForm {
    // ...
}| 1 | Using the @SessionAttributes annotation. |
On the first request, when a model attribute with the name, pet, is added to the model, it is automatically promoted to and saved in the WebSession. It remains there until another controller method uses a SessionStatus method argument to clear the storage, as the following example shows:
@Controller
@SessionAttributes("pet") (1)
public class EditPetForm {

    // ...

    @PostMapping("/pets/{id}")
    public String handle(Pet pet, BindingResult errors, SessionStatus status) { (2)
        if (errors.hasErrors) {
            // ...
        }
            status.setComplete();
            // ...
        }
    }
}| 1 | Using the @SessionAttributes annotation. |
| 2 | Using a SessionStatus variable. |
@SessionAttribute
If you need access to pre-existing session attributes that are managed globally (that is, outside the controller — for example, by a filter) and may or may not be present, you can use the @SessionAttribute annotation on a method parameter, as the following example shows:
@GetMapping("/")
public String handle(@SessionAttribute User user) { (1)
    // ...
}| 1 | Using @SessionAttribute. |
For use cases that require adding or removing session attributes, consider injecting WebSession into the controller method.
For temporary storage of model attributes in the session as part of a controller workflow, consider using SessionAttributes, as described in @SessionAttributes.
@RequestAttribute
Similarly to @SessionAttribute, you can use the @RequestAttribute annotation to access pre-existing request attributes created earlier (for example, by a WebFilter), as the following example shows:
@GetMapping("/")
public String handle(@RequestAttribute Client client) { (1)
    // ...
}| 1 | Using @RequestAttribute. |
Multipart Content
As explained in Multipart Data, ServerWebExchange provides access to multipart content. The best way to handle a file upload form (for example, from a browser) in a controller is through data binding to a command object, as the following example shows:
class MyForm {

    private String name;

    private MultipartFile file;

    // ...

}

@Controller
public class FileUploadController {

    @PostMapping("/form")
    public String handleFormUpload(MyForm form, BindingResult errors) {
        // ...
    }

}
You can also submit multipart requests from non-browser clients in a RESTful service scenario. The following example uses a file along with JSON:
POST /someUrl
Content-Type: multipart/mixed

--edt7Tfrdusa7r3lNQc79vXuhIIMlatb7PQg7Vp
Content-Disposition: form-data; name="meta-data"
Content-Type: application/json; charset=UTF-8
Content-Transfer-Encoding: 8bit

{
    "name": "value"
}
--edt7Tfrdusa7r3lNQc79vXuhIIMlatb7PQg7Vp
Content-Disposition: form-data; name="file-data"; filename="file.properties"
Content-Type: text/xml
Content-Transfer-Encoding: 8bit
... File Data ...
You can access individual parts with @RequestPart, as the following example shows:
@PostMapping("/")
public String handle(@RequestPart("meta-data") Part metadata, (1)
        @RequestPart("file-data") FilePart file) { (2)
    // ...
}| 1 | Using @RequestPart to get the metadata. |
| 2 | Using @RequestPart to get the file. |
To deserialize the raw part content (for example, to JSON — similar to @RequestBody), you can declare a concrete target Object, instead of Part, as the following example shows:
@PostMapping("/")
public String handle(@RequestPart("meta-data") MetaData metadata) { (1)
    // ...
}| 1 | Using @RequestPart to get the metadata. |
You can use @RequestPart combination with javax.validation.Valid or Spring’s @Validated annotation, which causes Standard Bean Validation to be applied. By default, validation errors cause a WebExchangeBindException, which is turned into a 400 (BAD_REQUEST) response. Alternatively, you can handle validation errors locally within the controller through an Errors or BindingResult argument, as the following example shows:
@PostMapping("/")
public String handle(@Valid @RequestPart("meta-data") MetaData metadata, (1)
        BindingResult result) { (2)
    // ...
}| 1 | Using a @Valid annotation. |
| 2 | Using a BindingResult argument. |
To access all multipart data as a MultiValueMap, you can use @RequestBody, as the following example shows:
@PostMapping("/")
public String handle(@RequestBody Mono<MultiValueMap<String, Part>> parts) { (1)
    // ...
}| 1 | Using @RequestBody. |
To access multipart data sequentially, in streaming fashion, you can use @RequestBody with Flux<Part> instead, as the following example shows:
@PostMapping("/")
public String handle(@RequestBody Flux<Part> parts) { (1)
    // ...
}| 1 | Using @RequestBody. |
@RequestBody
You can use the @RequestBody annotation to have the request body read and deserialized into an Object through an HttpMessageReader. The following example uses a @RequestBody argument:
@PostMapping("/accounts")
public void handle(@RequestBody Account account) {
    // ...
}