27. 编程模型
要了解编程 model,您应该熟悉以下核心概念:
**Destination Binders:**负责向外部邮件系统提供 integration 的组件。
目标绑定: Bridge 在外部消息传递系统和 application 之间提供消息的生产者和消费者(由 Destination Binders 创建)。
**消息:**生产者和消费者用于与 Destination Binders(以及其他通过外部消息传递系统的应用程序)通信的规范数据结构。
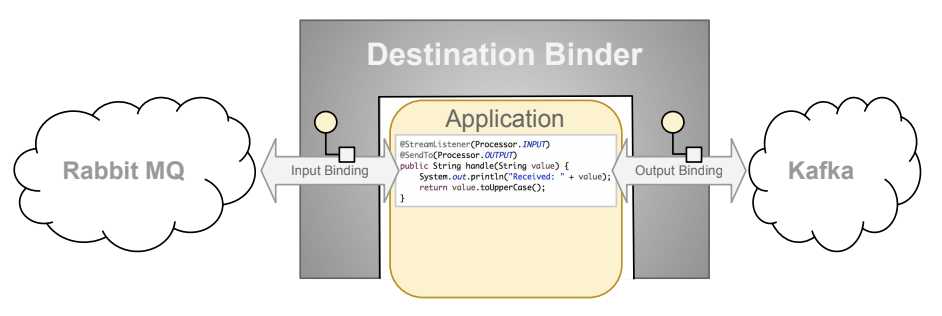
27.1 目的地 Binder
Destination Binders 是 Spring Cloud Stream 的扩展组件,负责提供必要的 configuration 和 implementation,以便于与外部邮件系统进行整合。此 integration 负责与生产者和使用者之间的消息的连接,委派和路由,数据类型转换,用户 code 的调用等。
Binder 处理许多锅炉板的责任,否则会落在你的肩膀上。但是,为了实现这一点,binder 仍然需要一些来自用户的简约但必需的指令形式的帮助,这些指令通常以某种类型的 configuration 的形式出现。
虽然讨论所有可用的 binder 和 binding configuration 选项(本手册的 rest 广泛涵盖它们)超出了本节的范围,但 Destination Binding 确实需要特别注意。下一节将详细讨论它。
27.2 目的地绑定
如前所述,Destination Bindings 在外部消息传递系统和 application-provided Producers and Consumers 之间提供了 bridge。
将 @EnableBinding annotation 应用于其中一个 application 的 configuration classes 定义目标 binding。 @EnableBinding annotation 本身是 meta-annotated,@Configuration并触发 Spring Cloud Stream 基础结构的 configuration。
以下 example 显示了一个完全配置且正常运行的 Spring Cloud Stream application,它将INPUT目标中的消息的有效负载作为String类型接收(请参阅第 30 章,Content Type Negotiation节),将其记录到 console 并在将其转换为OUTPUT目的地后将其发送到OUTPUT目的地大写。
@SpringBootApplication
@EnableBinding(Processor.class)
public class MyApplication {

	public static void main(String[] args) {
		SpringApplication.run(MyApplication.class, args);
	}

	@StreamListener(Processor.INPUT)
	@SendTo(Processor.OUTPUT)
	public String handle(String value) {
		System.out.println("Received: " + value);
		return value.toUpperCase();
	}
}
如您所见,@EnableBinding annotation 可以将一个或多个接口 classes 作为参数。这些参数称为绑定,它们包含表示可绑定组件的方法。这些组件通常是 channel-based binders 的消息 channels(请参阅Spring Messaging)(例如 Rabbit,Kafka 等)。但是,其他类型的绑定可以为相应技术的本机 features 提供支持。对于 example Kafka Streams binder(以前称为 KStream)允许本地绑定直接到 Kafka Streams(有关详细信息,请参阅Kafka Streams)。
Spring Cloud Stream 已经为典型的消息交换 contracts 提供了 binding 接口,其中包括:
**Sink:**通过提供消息消息的目标来标识消息 consumer 的 contract。
**来源:**通过提供生成的消息发送目标,识别消息 producer 的 contract。
**处理器:**通过暴露两个允许消费和消息生成的目的地来封装 sink 和源 contracts。
public interface Sink {

  String INPUT = "input";

  @Input(Sink.INPUT)
  SubscribableChannel input();
}
public interface Source {

  String OUTPUT = "output";

  @Output(Source.OUTPUT)
  MessageChannel output();
}
public interface Processor extends Source, Sink {}
虽然前面的 example 满足了大多数情况,但您也可以通过定义自己的绑定接口来定义自己的 contracts,并使用@Input和@Output annotations 来标识实际的可绑定组件。
例如:
public interface Barista {

    @Input
    SubscribableChannel orders();

    @Output
    MessageChannel hotDrinks();

    @Output
    MessageChannel coldDrinks();
}
使用前面 example 中显示的接口作为@EnableBinding的参数,分别触发创建名为orders,hotDrinks和coldDrinks的三个绑定 channel。
您可以根据需要提供尽可能多的 binding 接口,作为@EnableBinding annotation 的 arguments,如下面的示例所示:
@EnableBinding(value = { Orders.class, Payment.class })
在 Spring Cloud Stream 中,可绑定的MessageChannel组件是 Spring Messaging MessageChannel(用于出站)及其扩展名SubscribableChannel(用于入站)。
可销售目的地绑定
虽然之前描述的绑定支持 event-based 消息消耗,但有时您需要更多控制,例如消耗率。
从 version 2.0 开始,您现在可以绑定可轮询的 consumer:
以下 example 显示了如何绑定 pollable consumer:
public interface PolledBarista {

    @Input
    PollableMessageSource orders();
	. . .
}
在这种情况下,PollableMessageSource的_imple 实现绑定到orders“ channel”。有关详细信息,请参阅第 27.3.4 节,“使用被轮询的消费者”。
自定义 Channel 名称
通过使用@Input和@Output 注释,您可以为 channel 指定自定义的 channel name,如下面的示例所示:
public interface Barista {
    @Input("inboundOrders")
    SubscribableChannel orders();
}
在前面的 example 中,创建的绑定 channel 名为inboundOrders。
通常,您不需要直接访问单个 channels 或绑定(除了通过@EnableBinding annotation 配置它们)。但是,有时可能会出现测试或其他角落情况。
除了为每个 binding 生成 channels 并将它们注册为 Spring beans 之外,对于每个绑定的接口,Spring Cloud Stream 生成一个实现该接口的 bean。这意味着您可以在 application 中通过 auto-wiring 访问表示绑定或单个 channels 的接口,如以下两个示例所示:
Autowire Binding 接口
@Autowire
private Source source

public void sayHello(String name) {
    source.output().send(MessageBuilder.withPayload(name).build());
}
自动装配个人 channel
@Autowire
private MessageChannel output;

public void sayHello(String name) {
    output.send(MessageBuilder.withPayload(name).build());
}
对于自定义 channel 名称的情况,或者在需要专门命名的 channels 的 multiple-channel 场景中,您还可以使用标准 Spring 的@Qualifier annotation。
以下 example 显示了如何以这种方式使用 @Qualifier annotation:
@Autowire
@Qualifier("myChannel")
private MessageChannel output;
27.3 Producing 和 Consuming Messages
您可以使用 Spring Integration annotations 或 Spring Cloud Stream native annotation 来编写 Spring Cloud Stream application。
27.3.1 Spring Integration 支持
Spring Cloud Stream 建立在企业 Integration 模式定义的概念和模式之上,并依赖于其内部 implementation,在 Spring 项目组合中已经建立且流行的_Implegration 模式_Implegration 模式实现:Spring Integration framework。
所以它唯一的理由就是支持 Spring Integration 已经建立的基础,语义和 configuration 选项
对于 example,您可以将Source的输出 channel 附加到MessageSource并使用熟悉的@InboundChannelAdapter annotation,如下所示:
@EnableBinding(Source.class)
public class TimerSource {

  @Bean
  @InboundChannelAdapter(value = Source.OUTPUT, poller = @Poller(fixedDelay = "10", maxMessagesPerPoll = "1"))
  public MessageSource<String> timerMessageSource() {
    return () -> new GenericMessage<>("Hello Spring Cloud Stream");
  }
}
同样,您可以使用 @Transformer 或 @ServiceActivator ,同时为 Processor binding contract 提供消息处理程序方法的 implementation,如下面的示例所示:
@EnableBinding(Processor.class)
public class TransformProcessor {
  @Transformer(inputChannel = Processor.INPUT, outputChannel = Processor.OUTPUT)
  public Object transform(String message) {
    return message.toUpperCase();
  }
}
虽然这可能会略微提前一点,但重要的是要理解,当您使用
@StreamListenerannotation 从相同的 binding 使用时,会使用 pub-sub model。每个使用@StreamListener注释的方法都会收到自己的消息副本,并且每个方法都有自己的 consumer group。但是,如果使用 Spring Integration annotation 之一(例如@Aggregator,@Transformer或@ServiceActivator)从相同的 binding 中使用它们,则会在竞争的 model 中使用它们。没有为每个订阅创建单独的 consumer group。
27.3.2 使用 @StreamListener Annotation
作为对 Spring Integration 支持的补充,Spring Cloud Stream 提供了自己的@StreamListener annotation,模仿其他 Spring Messaging annotations(@MessageMapping,@JmsListener,@RabbitListener等),并提供了诸如 content-based 路由等方便的便利。
@EnableBinding(Sink.class)
public class VoteHandler {

  @Autowired
  VotingService votingService;

  @StreamListener(Sink.INPUT)
  public void handle(Vote vote) {
    votingService.record(vote);
  }
}
与其他 Spring Messaging 方法一样,方法 arguments 可以使用@Payload,@Headers和@Header进行批注。
对于 return 数据的方法,必须使用@SendTo annotation 指定方法返回的数据的输出 binding 目标,如下面的示例所示:
@EnableBinding(Processor.class)
public class TransformProcessor {

  @Autowired
  VotingService votingService;

  @StreamListener(Processor.INPUT)
  @SendTo(Processor.OUTPUT)
  public VoteResult handle(Vote vote) {
    return votingService.record(vote);
  }
}
27.3.3 使用 @StreamListener 进行 Content-based 路由
Spring Cloud Stream 支持根据条件将消息分派给使用@StreamListener注释的多个处理程序方法。
在 order 有资格支持条件分派,方法必须满足以下条件:
它不能 return value。
它必须是单独的消息处理方法(不支持 reactive API 方法)。
条件由 annotation 的condition参数中的 SpEL 表达式指定,并针对每条消息进行评估。 match 条件的所有处理程序都在同一个线程中调用,并且不必对发生调用的 order 进行任何假设。
在带有调度条件的@StreamListener的以下示例中,带有带有 value bogey的头type的所有消息都被分派到receiveBogey方法,并且带有_val的头type的所有消息被分派到receiveBacall方法。
@EnableBinding(Sink.class)
@EnableAutoConfiguration
public static class TestPojoWithAnnotatedArguments {

    @StreamListener(target = Sink.INPUT, condition = "headers['type']=='bogey'")
    public void receiveBogey(@Payload BogeyPojo bogeyPojo) {
       // handle the message
    }

    @StreamListener(target = Sink.INPUT, condition = "headers['type']=='bacall'")
    public void receiveBacall(@Payload BacallPojo bacallPojo) {
       // handle the message
    }
}
Content Type Negotiation in Context of condition
使用@StreamListener的condition参数来理解 content-based 路由背后的一些机制非常重要,特别是在整个消息类型的 context 中。如果您在继续之前熟悉第 30 章,Content Type Negotiation,这也可能有所帮助。
请考虑以下情形:
@EnableBinding(Sink.class)
@EnableAutoConfiguration
public static class CatsAndDogs {

    @StreamListener(target = Sink.INPUT, condition = "payload.class.simpleName=='Dog'")
    public void bark(Dog dog) {
       // handle the message
    }

    @StreamListener(target = Sink.INPUT, condition = "payload.class.simpleName=='Cat'")
    public void purr(Cat cat) {
       // handle the message
    }
}
前面的 code 完全有效。它编译和部署没有任何问题,但它永远不会产生您期望的结果。
那是因为你正在测试你期望的 state 中尚不存在的东西。这是因为消息的有效负载尚未从有线格式(byte[])转换为所需类型。换句话说,它还没有经过第 30 章,Content Type Negotiation中描述的类型转换 process。
因此,除非使用评估原始数据的 SPeL 表达式(对于 example,字节 array 中第一个字节的 value),否则请使用消息 header-based 表达式(例如condition = "headers['type']=='dog'")。
在 moment 中,仅支持 channel-based binders(不支持 reactive 编程)支持,通过
@StreamListener条件进行调度。
27.3.4 使用轮询消费者
使用轮询的使用者时,您可以根据需要轮询PollableMessageSource。考虑以下轮询 consumer 的示例:
public interface PolledConsumer {

    @Input
    PollableMessageSource destIn();

    @Output
    MessageChannel destOut();

}
鉴于前面的 example 中的轮询 consumer,您可以按如下方式使用它:
@Bean
public ApplicationRunner poller(PollableMessageSource destIn, MessageChannel destOut) {
    return args -> {
        while (someCondition()) {
            try {
                if (!destIn.poll(m -> {
                    String newPayload = ((String) m.getPayload()).toUpperCase();
                    destOut.send(new GenericMessage<>(newPayload));
                })) {
                    Thread.sleep(1000);
                }
            }
            catch (Exception e) {
                // handle failure (throw an exception to reject the message);
            }
        }
    };
}
PollableMessageSource.poll()方法采用MessageHandler参数(通常是 lambda 表达式,如此处所示)。如果收到并成功处理了消息,则返回true。
与 message-driven 使用者一样,如果MessageHandler抛出 exception,则会将消息发布到错误 channels,如“???”中所述。
通常,poll()方法在MessageHandler退出时确认消息。如果方法异常退出,则拒绝该消息(不是 re-queued)。您可以通过承担确认责任来覆盖该行为,如以下 example 所示:
@Bean
public ApplicationRunner poller(PollableMessageSource dest1In, MessageChannel dest2Out) {
    return args -> {
        while (someCondition()) {
            if (!dest1In.poll(m -> {
                StaticMessageHeaderAccessor.getAcknowledgmentCallback(m).noAutoAck();
                // e.g. hand off to another thread which can perform the ack
                // or acknowledge(Status.REQUEUE)

            })) {
                Thread.sleep(1000);
            }
        }
    };
}
您必须在某个时刻
ack(或nack)消息,以避免资源泄漏。
某些消息传递系统(例如 Apache Kafka)在 log 中维护一个简单的偏移量。如果传递失败且 re-queued 为
StaticMessageHeaderAccessor.getAcknowledgmentCallback(m).acknowledge(Status.REQUEUE);,则会重新传递任何以后成功获得的消息。
还有一个重载的poll方法,其定义如下:
poll(MessageHandler handler, ParameterizedTypeReference<?> type)
type是一个转换提示,允许转换传入的消息有效负载,如下面的示例所示:
boolean result = pollableSource.poll(received -> {
			Map<String, Foo> payload = (Map<String, Foo>) received.getPayload();
            ...

		}, new ParameterizedTypeReference<Map<String, Foo>>() {});
27.4 错误处理
错误发生,Spring Cloud Stream 提供了几种灵活的机制来处理它们。错误处理有两种形式:
**application:**错误处理在 application(自定义错误处理程序)中完成。
**system:**将错误处理委托给 binder(re-queue,DL 和其他)。请注意,这些技术依赖于 binder implementation 和底层消息传递中间件的功能。
Spring Cloud Stream 使用Spring 重试 library 来促进成功的消息处理。有关详细信息,请参阅第 27.4.3 节,“重试模板”。但是,当全部失败时,消息处理程序抛出的 exceptions 将传播回 binder。此时,binder 调用自定义错误处理程序或将错误传回消息传递系统(re-queue,DLQ 和其他)。
27.4.1 Application 错误处理
有两种类型的 application-level 错误处理。可以在每个 binding 订阅处理错误,或者 global 处理程序可以处理所有 binding 订阅错误。我们来看看细节。
图 1_.Spring Cloud Stream Sink Application with Custom 和 Global Error Handlers
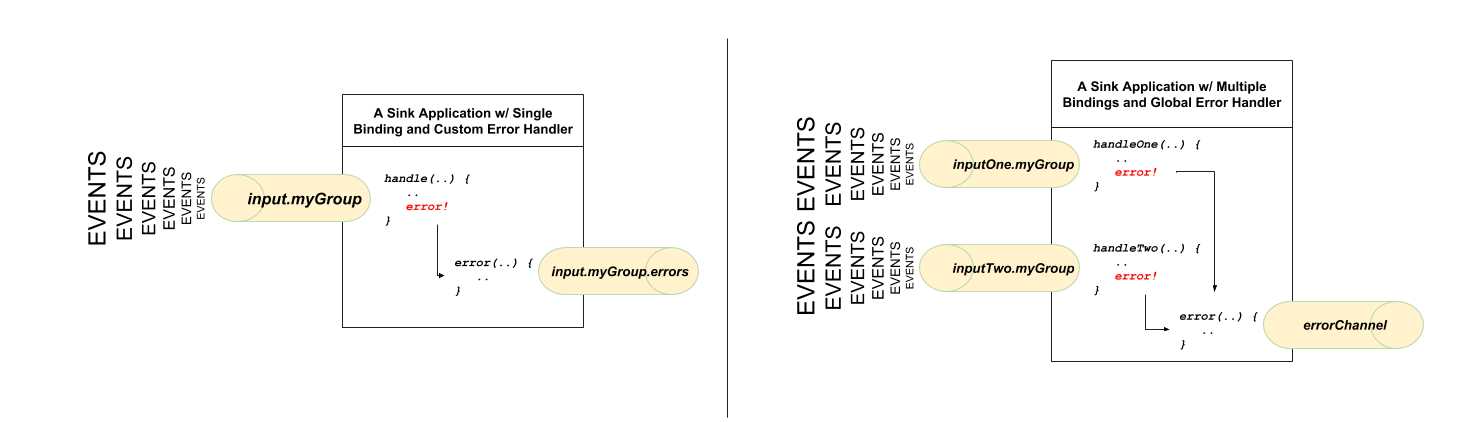
对于每个输入 binding,Spring Cloud Stream 使用以下语义<destinationName>.errors创建专用错误 channel。
<destinationName>由 binding 的 name(例如input)和 group 的 name(例如myGroup)组成。
考虑以下:
spring.cloud.stream.bindings.input.group=myGroup
@StreamListener(Sink.INPUT) // destination name 'input.myGroup'
public void handle(Person value) {
	throw new RuntimeException("BOOM!");
}

@ServiceActivator(inputChannel = Processor.INPUT + ".myGroup.errors") //channel name 'input.myGroup.errors'
public void error(Message<?> message) {
	System.out.println("Handling ERROR: " + message);
}
在前面的 example 中,目标 name 是input.myGroup,专用错误 channel name 是input.myGroup.errors。
@StreamListener annotation 的使用专门用于定义 bridge 内部 channels 和外部目标的绑定。鉴于目标特定错误 channel 没有关联的外部目标,这样的 channel 是 Spring Integration(SI)的特权。这意味着必须使用 SI 处理程序注释之一(i.e.,@ServiceActivator, @Transformer etc.))来定义此类目标的处理程序。
如果未指定
group,则使用匿名 group(类似于input.anonymous.2K37rb06Q6m2r51-SPIDDQ),这不适合错误处理,因为在创建目标之前您不知道它会是什么。
此外,在 event 中,您将绑定到现有目标,例如:
spring.cloud.stream.bindings.input.destination=myFooDestination
spring.cloud.stream.bindings.input.group=myGroup
完整目标 name 是myFooDestination.myGroup然后专用错误 channel name 是myFooDestination.myGroup.errors。
回到 example ...
订阅名为input的 channel 的handle(..)方法抛出 exception。鉴于还存在错误 channel input.myGroup.errors的订户,所有错误消息都由该订户处理。
如果您有多个绑定,则可能需要一个错误处理程序。 Spring Cloud Stream 通过将每个错误 channel 桥接到名为errorChannel的 channel 自动提供对 global 错误 channel 的支持,允许单个订阅者处理所有错误,如下面的示例所示:
@StreamListener("errorChannel")
public void error(Message<?> message) {
	System.out.println("Handling ERROR: " + message);
}
如果错误处理逻辑相同,无论哪个处理程序产生错误,这可能是一个方便的选项。
此外,通过为出站目标配置名为error的_bin,可以将发送到errorChannel的错误消息发布到 broker 上的特定目标。此选项提供了一种机制,可以自动将错误消息发送到绑定到该目标的另一个 application,或供以后检索(用于 example,audit)。对于 example,要将错误消息发布到名为myErrors的 broker 目标,请设置以下 property:
spring.cloud.stream.bindings.error.destination=myErrors.
bridge global error channel 到 broker 目的地的能力本质上提供了一种机制,它将 application-level 错误处理与 system-level 错误处理连接起来。
27.4.2 系统错误处理
System-level 错误处理意味着将错误传递回消息传递系统,并且假设并非每个消息传递系统都相同,则 binder 与 binder 的功能可能不同。
也就是说,在本节中我们将解释系统 level 错误处理背后的一般 idea,并使用 Rabbit binder 作为 example。注意:Kafka binder 提供类似的支持,尽管一些 configuration properties 确实不同。另外,有关更多详细信息和 configuration 选项,请参阅各个 binder 的文档。
如果未配置内部错误处理程序,则错误将传播到 binders,然后 binders 会将这些错误传播回消息传递系统。根据消息传递系统的功能,这样的系统可能会丢弃消息 re-queue 消息 re-processing 或将失败的消息发送到 DLQ。 Rabbit 和 Kafka 都支持这些概念。但是,其他 binder 可能不会,因此请参阅您单独的 binder 文档以获取有关支持的 system-level error-handling 选项的详细信息。
丢弃失败的消息
默认情况下,如果未提供其他 system-level configuration,则消息传递系统将丢弃失败的消息。虽然在某些情况下可接受,但在大多数情况下,它不是,我们需要一些恢复机制来避免消息丢失。
DLQ - 死信队列
DLQ 允许将失败的消息发送到特殊目的地: - 死信队列。
配置后,失败的消息将发送到此目标,以便后续进行 re-processing 或审核和对帐。
对于 example,继续上一个 example 并使用 Rabbit binder 设置 DLQ,您需要设置以下 property:
spring.cloud.stream.rabbit.bindings.input.consumer.auto-bind-dlq=true
请记住,在上面的 property 中,input对应于输入目标 binding 的 name。 consumer表示它是 consumer property,auto-bind-dlq指示 binder 为input目标配置 DLQ,这会产生另一个名为input.myGroup.dlq的 Rabbit 队列。
配置完成后,所有失败的消息都将路由到此队列,并显示类似于以下内容的错误消息:
delivery_mode:	1
headers:
x-death:
count:	1
reason:	rejected
queue:	input.hello
time:	1522328151
exchange:
routing-keys:	input.myGroup
Payload {"name":"Bob"}
从上面的内容可以看出,您的原始邮件会被保留以供进一步操作。
但是,您可能注意到的一件事是,有关消息处理的原始问题的信息有限。对于 example,您没有看到与原始错误对应的堆栈跟踪。要获取有关原始错误的更多相关信息,您必须设置其他 property:
spring.cloud.stream.rabbit.bindings.input.consumer.republish-to-dlq=true
这样做会强制内部错误处理程序拦截错误消息,并在将其发布到 DLQ 之前向其添加其他信息。配置完成后,您可以看到错误消息包含与原始错误相关的更多信息,如下所示:
delivery_mode:	2
headers:
x-original-exchange:
x-exception-message:	has an error
x-original-routingKey:	input.myGroup
x-exception-stacktrace:	org.springframework.messaging.MessageHandlingException: nested exception is
      org.springframework.messaging.MessagingException: has an error, failedMessage=GenericMessage [payload=byte[15],
      headers={amqp_receivedDeliveryMode=NON_PERSISTENT, amqp_receivedRoutingKey=input.hello, amqp_deliveryTag=1,
      deliveryAttempt=3, amqp_consumerQueue=input.hello, amqp_redelivered=false, id=a15231e6-3f80-677b-5ad7-d4b1e61e486e,
      amqp_consumerTag=amq.ctag-skBFapilvtZhDsn0k3ZmQg, contentType=application/json, timestamp=1522327846136}]
      at org.spring...integ...han...MethodInvokingMessageProcessor.processMessage(MethodInvokingMessageProcessor.java:107)
      at. . . . .
Payload {"name":"Bob"}
这有效地结合了 application-level 和 system-level 错误处理,以进一步帮助下游故障排除机械。
Re-queue 失败的消息
如前所述,当前支持的 binders(Rabbit 和 Kafka)依赖于RetryTemplate来促进成功的消息处理。有关详细信息,请参阅第 27.4.3 节,“重试模板”。但是,对于max-attempts property 设置为 1 的情况,将禁用消息的内部重新处理。此时,您可以通过指示消息传递系统 re-queue 失败的消息来促进消息 re-processing(re-tries)。一旦 re-queued,失败的消息将被发送回原始处理程序,基本上创建重试循环。
对于错误的性质与某些资源的某些零星但不可用的情况相关的情况,此选项可能是可行的。
要实现此目的,您必须设置以下 properties:
spring.cloud.stream.bindings.input.consumer.max-attempts=1
spring.cloud.stream.rabbit.bindings.input.consumer.requeue-rejected=true
在前面的 example 中,max-attempts设置为 1 基本上禁用内部 re-tries 和requeue-rejected(重新排队被拒绝的消息的简称)设置为true。设置完成后,失败的消息将重新提交给同一个处理程序并连续循环或直到处理程序抛出AmqpRejectAndDontRequeueException本质上允许您在处理程序本身内构建自己的 re-try 逻辑。
27.4.3 重试模板
RetryTemplate是Spring 重试 library 的一部分。虽然涵盖RetryTemplate的所有功能超出了本文档的范围,但我们将提及以下与RetryTemplate特别相关的 consumer properties:
maxAttempts
- 处理邮件的尝试次数。
默认值:3。
backOffInitialInterval
- 重试时的退避初始间隔。
默认为 1000 毫秒。
backOffMaxInterval
- 最大退避间隔。
默认 10000 毫秒。
backOffMultiplier
- 退避乘数。
默认 2.0.
虽然前面的设置足以满足大多数自定义要求,但它们可能无法满足某些复杂要求,此时您可能希望提供自己的RetryTemplate实例。为此,请在 application configuration 中将其配置为 bean。 application 提供的实例将覆盖 framework 提供的实例。另外,为了避免冲突,您必须将 binder 要使用的RetryTemplate实例限定为@StreamRetryTemplate。例如,
@StreamRetryTemplate
public RetryTemplate myRetryTemplate() {
    return new RetryTemplate();
}
从上面的示例中可以看出,您不需要使用@Bean对其进行注释,因为@StreamRetryTemplate是一个合格的@Bean。
27.5 Reactive Programming Support
Spring Cloud Stream 还支持使用 reactive API,其中传入和传出数据作为连续数据流进行处理。通过spring-cloud-stream-reactive可以获得对 reactive API 的支持,需要将其明确添加到您的项目中。
带有 reactive API 的编程 model 是声明性的。您可以使用 operators 来描述从入站数据流到出站数据流的功能转换,而不是指定应如何处理每条消息。
目前 Spring Cloud Stream 仅支持反应堆 API。将来,我们打算基于 Reactive Streams 支持更通用的 model。
reactive 编程 model 还使用@StreamListener annotation 来设置 reactive 处理程序。不同之处在于:
@StreamListenerannotation 不能指定输入或输出,因为它们是作为方法的 arguments 和 return 值提供的。必须使用
@Input和@Output注释方法的 arguments,分别指示传入和传出数据流连接到哪个输入或输出。方法的 return value(如果有)用
@Output注释,表示应该发送数据的输入。
Reactive 编程支持需要 Java 1.8.
从 Spring Cloud Stream 1.1.1 及更高版本开始(从发布列号 Brooklyn.SR2 开始),reactive 编程支持需要使用 Reactor 3.0.4.RELEASE 和更高版本。不支持早期的 Reactor 版本(包括 3.0.1.RELEASE,3.0.2.RELEASE 和 3.0.3.RELEASE)。
spring-cloud-stream-reactive传递性地检索正确的 version,但是项目结构可以将io.projectreactor:reactor-core的 version 管理到早期版本,尤其是在使用 Maven 时。对于使用 Spring Initializr 和 Spring Boot 1.x 生成的项目就是这种情况,它会将 Reactor version 重写为2.0.8.RELEASE。在这种情况下,您必须确保释放 artifact 的正确 version。您可以通过向添加的直接依赖项,并将或更高版本添加到项目中。
术语“reactive”的使用目前指的是正在使用的 reactive API 而不是执行 model 是 reactive(即绑定的 endpoints 仍然使用'push'而不是'pull'model)。虽然使用 Reactor 提供了一些背压支持,但我们打算在未来的版本中通过使用本机 reactive clients 为连接的中间件支持完全 reactive 管道。
27.5.1 Reactor-based 处理程序
Reactor-based 处理程序可以具有以下参数类型:
对于使用
@Input注释的 arguments,它支持 ReactorFlux类型。入站 Flux 的参数化遵循与单个消息处理相同的规则:它可以是整个Message,可以是Message有效载荷的 POJO,或者是基于Messagecontent-type 的转换结果的 POJO 头。提供多个输入。对于使用
Output注释的 arguments,它支持FluxSender类型,它将方法生成的Flux与输出连接起来。一般来说,仅当方法可以具有多个输出时,才建议将输出指定为 arguments。
Reactor-based 处理程序支持_ret 的 return 类型。在这种情况下,它必须用@Output注释。当单个输出Flux可用时,我们建议使用方法的 return value。
以下 example 显示 Reactor-based Processor:
@EnableBinding(Processor.class)
@EnableAutoConfiguration
public static class UppercaseTransformer {

  @StreamListener
  @Output(Processor.OUTPUT)
  public Flux<String> receive(@Input(Processor.INPUT) Flux<String> input) {
    return input.map(s -> s.toUpperCase());
  }
}
使用 output arguments 的相同处理器类似于以下 example:
@EnableBinding(Processor.class)
@EnableAutoConfiguration
public static class UppercaseTransformer {

  @StreamListener
  public void receive(@Input(Processor.INPUT) Flux<String> input,
     @Output(Processor.OUTPUT) FluxSender output) {
     output.send(input.map(s -> s.toUpperCase()));
  }
}
27.5.2 Reactive Sources
Spring Cloud Stream reactive support 还提供了通过@StreamEmitter annotation 创建 reactive 源的功能。通过使用@StreamEmitter annotation,可以将常规源转换为 reactive 源。 @StreamEmitter是一个方法 level annotation,它将方法标记为使用@EnableBinding声明的输出的发射器。您不能将@Input annotation 与@StreamEmitter一起使用,因为使用此 annotation 标记的方法不会侦听任何输入。相反,标有@StreamEmitter的方法会生成输出。遵循@StreamListener中使用的相同编程 model,@StreamEmitter也允许使用@Output annotation 的灵活方式,具体取决于方法是否具有 arguments,return 类型和其他注意事项。
本节的其余部分包含使用各种样式的@StreamEmitter annotation 的示例。
以下 example 每毫秒发出Hello, World消息并发布到 Reactor Flux:
@EnableBinding(Source.class)
@EnableAutoConfiguration
public static class HelloWorldEmitter {

  @StreamEmitter
  @Output(Source.OUTPUT)
  public Flux<String> emit() {
    return Flux.intervalMillis(1)
            .map(l -> "Hello World");
  }
}
在前面的 example 中,Flux中的结果消息被发送到Source的输出 channel。
下一个 example 是发送 Reactor Flux的@StreamEmmitter的另一种风格。以下方法使用FluxSender以编程方式从源发送Flux,而不是返回Flux:
@EnableBinding(Source.class)
@EnableAutoConfiguration
public static class HelloWorldEmitter {

  @StreamEmitter
  @Output(Source.OUTPUT)
  public void emit(FluxSender output) {
    output.send(Flux.intervalMillis(1)
            .map(l -> "Hello World"));
  }
}
下一个 example 与功能和样式中的上述代码段完全相同。但是,它不是在方法上使用显式@Output annotation,而是在 method 参数上使用 annotation。
@EnableBinding(Source.class)
@EnableAutoConfiguration
public static class HelloWorldEmitter {

  @StreamEmitter
  public void emit(@Output(Source.OUTPUT) FluxSender output) {
    output.send(Flux.intervalMillis(1)
            .map(l -> "Hello World"));
  }
}
本节中的最后一个示例是使用 Reactive Streams Publisher API 编写反应源的另一种方式,并利用Spring Integration Java DSL中对它的支持。以下 example 中的Publisher仍然使用 Reactor Flux,但是,从 application 的角度来看,这对用户是透明的,只需要 Reactive Streams 和 Java DSL for Spring Integration:
@EnableBinding(Source.class)
@EnableAutoConfiguration
public static class HelloWorldEmitter {

  @StreamEmitter
  @Output(Source.OUTPUT)
  @Bean
  public Publisher<Message<String>> emit() {
    return IntegrationFlows.from(() ->
                new GenericMessage<>("Hello World"),
        e -> e.poller(p -> p.fixedDelay(1)))
        .toReactivePublisher();
  }
}